目录
- 一. 为什么要使用Composition API
- 1.1.一个Options API实例
- 1.2.Options API存在的问题
- 1.3.Composition API简介
- 二.Composition API
- 2.1.setup()入口
- 2.2.ref 响应式监听
- 2.3.reactive与toRefs
- 2.4.computed的用法
- 2.5.watch的用法
- 2.6.setup()参数
- 2.6.1.props参数
- 2.6.2.context参数
- 三.Composition API的使用
- 3.1.provide与inject的使用
- 3.2.vue生命周期的用法
- 3.3.编程式路由的使用
- 3.4.Vuex的使用
- 3.5.获取DOM的使用
- 四.使用Composition API重写todoList
- 五.setup语法糖
- 5.1.setup语法糖的基本结构
- 5.2.响应数据的使用
- 5.3.其它语法的使用
- 5.4.引入组件的使用
- 5.5.父子组件传值的使用
- 5.5.1.defineProps的使用
- 5.5.2.defineEmits的使用
- 六.使用setup语法糖重写todoList
- 七. 总结
一. 为什么要使用Composition API
1.1.一个Options API实例
在前面的课程中,我们都是采用 Options API(基于选项的 API ) 来写一个组件的。下面是一个实例:
| <template> |
| Count is: {{ count }}, doubleCount is: {{ doubleCount }} |
| <button @click="add">加</button> |
| </template> |
| |
| <script> |
| export default { |
| data() { |
| return { |
| count: 0, |
| }; |
| }, |
| computed: { |
| doubleCount() { |
| return this.count * 2; |
| }, |
| }, |
| methods: { |
| add() { |
| this.count++; |
| } |
| } |
| } |
| </script> |
当要去理解一个组件时,我们更加关心的是:“这个组件是要干什么(即代码背后的意图)”,而不是:“这个组件用到了什么选项”。
Options API 撰写出来的代码自然采用了后者的表述方式,然而对前者的表述并不好。
1.2.Options API存在的问题
在 Options API 中实际上形成了一种强制的约定:
- props 里面设置接收参数
- data 里面设置变量
- computed 里面设置计算属性
- watch 里面设置监听属性
- methods 里面设置事件方法
我们会发现: Options API 都约定了我们该在哪个位置做什么事,这在一定程度上也强制我们进行了代码分割。这就为展示背后的逻辑关注点设置了障碍。我们必须不断地在选项代码块之间“跳转”,以找到与该关注点相关的部分。
尤其是在大型组件中,数据与方法会很多,而数据与其相关联的方法就会被其他数据和方法分隔的很远,往往很难被看出它们之间的关联。
这是一个大型组件的示例,其中逻辑关注点是按颜色分组。
这种碎片化使得理解和维护复杂组件变得困难。选项的分离掩盖了潜在的逻辑问题。此外,在处理单个逻辑关注点时,我们必须不断地“跳转”相关代码的选项块。
如果我们能够将与同一个逻辑关注点相关的代码配置在一起,这样会更好。而这正是组合式 API 使我们能够做到的。
1.3.Composition API简介
Composition API:组合式 API;一组低侵入式的、函数式的 API,使得我们能够更灵活地【组合】组件的逻辑。
这是有别于 Options API 的一种函数式 API。无需通过很多选项来完成业务逻辑,Composition API提供了一个setup函数,我们可以将data数据、计算属性、方法等等,都放在setup函数中,这样就可以对业务进行集中处理了。
采用Composition API来重写上面的组件:
| <template> |
| Count is: {{ state.count }}, doubleCount is: {{ state.doubleCount }} |
| <button @click="add">加</button> |
| </template> |
| |
| <script> |
| import { reactive, computed } from "vue"; |
| |
| export default { |
| setup() { |
| const state = reactive({ |
| count: 0, |
| doubleCount: computed(() => state.count * 2), |
| }); |
| |
| function add() { |
| state.count++; |
| } |
| |
| return { |
| state, |
| add |
| } |
| } |
| } |
| </script> |
还有一个 setup 函数,setup 函数是一个新的组件选项。作为在组件内使用 Composition API 的入口点,如果 setup 返回一个对象,则对象的属性将会被合并到组件模板的渲染上下文,我们就可以在模板里使用对应的属性和方法。
二.Composition API
2.1.setup()入口
setup 函数是一个新的组件选项,它是在组件内使用 Composition API 的入口点。它会在Vue实例创建完成前被调用。所以,setup函数中没有this指针
| <template> |
| <div></div> |
| </template> |
| |
| <script> |
| export default { |
| setup() { |
| |
| console.log('setup函数'); |
| } |
| } |
| </script> |
如果 setup 返回一个对象,则对象的属性将会被合并到组件模板的渲染上下文,我们就可以在模板里使用对应的属性和方法。所以,我们可以将本地状态(data数据)、方法、计算属性等写在 setup 函数中。
| <template> |
| Count is: {{ count }} |
| </template> |
| |
| <script> |
| export default { |
| setup() { |
| let count = 10; |
| |
| return { |
| count |
| } |
| } |
| } |
| </script> |
上面代码中,在 setup 函数中声明了一个 count 数据。然后使用 return 返回需要暴露的内容。运行之后可以看到:视图能够正确显示count数据。
setup函数总结:
- setup函数是Composition API 的入口点,是它的核心。
- 由于执行 setup 时,组件实例尚未被创建,因此在 setup 中不能使用 this。
- setup中定义的东西必须要return出去,才能被使用或绑定视图。
2.2.ref 响应式监听
上面实例中,虽然视图能够显示数据。但当改变数据时,视图却不会得到响应。
| <template> |
| Count is: {{ count }} |
| <button @click="add">加</button> |
| </template> |
| |
| <script> |
| export default { |
| setup() { |
| let count = 10; |
| |
| function add(){ |
| count++; |
| } |
| |
| return { |
| count, |
| add |
| } |
| } |
| } |
| </script> |
原因很简单,count只是声明的一个普通数据,不具备响应功能。
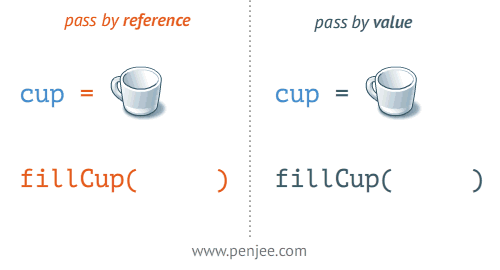
在 Vue 3.0 中,我们可以通过一个 ref 函数来实现响应式数据监听。ref 接受一个参数,并将其包裹在一个带有 value 属性的对象中返回,然后可以使用该 value 属性访问或更改响应式变量的值:
| <template> |
| Count is: {{ count }} |
| <button @click="add">加</button> |
| </template> |
| |
| <script> |
| |
| import {ref} from 'vue'; |
| |
| export default { |
| setup() { |
| let count = ref(10); |
| |
| function add(){ |
| count.value++; |
| } |
| |
| return { |
| count, |
| add |
| } |
| } |
| } |
| </script> |
为什么要将值封装在一个对象中,看似没有必要,但为了保持 JavaScript 中不同数据类型的行为统一,这是必须的。因为在 JavaScript 中,Number 或 String 等基本类型是通过值传递的,而不是通过引用传递的:
2.3.reactive与toRefs
上面实例中,操作数据时需要使用 value 属性,比较麻烦。
可以使用 reactive 与 toRefs 解决这个问题。首先使用 reactive 创建响应式对象,封装数据。
| <template> |
| <p>Count is: {{ state.count }}</p> |
| <button @click="add">加</button> |
| <p>{{ state.user.username }}</p> |
| </template> |
| |
| <script> |
| |
| import {reactive} from 'vue'; |
| |
| export default { |
| setup() { |
| |
| const state = reactive({ |
| count: 10, |
| user:{ |
| userId: 1, |
| username: '张三' |
| } |
| }) |
| |
| function add(){ |
| state.count++; |
| } |
| |
| return { |
| state, |
| add |
| } |
| } |
| } |
| </script> |
此时不用使用 value 属性了。
但是因为只有state是响应式数据,而state中的那些数据还不是响应式的。所以在视图访问数据时都需要使用 state 作为前缀才可以。这就比较麻烦了。
此时我们可以使用 toRefs 进行优化。toRefs可以将state中的每一个数据进行展开,且都包装成响应数据。这样视图层就可以直接使用了。
| <template> |
| <p>Count is: {{ count }}</p> |
| <button @click="add">加</button> |
| <p>{{ user.username }}</p> |
| </template> |
| |
| <script> |
| |
| import {reactive, toRefs} from 'vue'; |
| |
| export default { |
| setup() { |
| |
| const state = reactive({ |
| count: 10, |
| user:{ |
| userId: 1, |
| username: '张三' |
| } |
| }) |
| |
| function add(){ |
| state.count++; |
| } |
| |
| return { |
| ...toRefs(state), |
| add |
| } |
| } |
| } |
| </script> |
在返回时使用 ...toRefs(state) ,这样视图层就可以不使用 state 前缀了。
为什么要使用 ... 参数扩展运输符呢?因为toRefs(state) 将state对象展开,并包装成多个响应数据。
2.4.computed的用法
| <template> |
| <p>Count is: {{ count }}</p> |
| <p>doubleCount is: {{ doubleCount }}</p> |
| <button @click="add">加</button> |
| <p>{{ user.username }}</p> |
| </template> |
| |
| <script> |
| |
| import { reactive, toRefs, computed } from "vue"; |
| |
| export default { |
| setup() { |
| |
| const state = reactive({ |
| count: 10, |
| user: { |
| userId: 1, |
| username: "张三", |
| }, |
| doubleCount: computed(() => { |
| return state.count * 2; |
| }), |
| }); |
| |
| function add() { |
| state.count++; |
| } |
| |
| return { |
| ...toRefs(state), |
| add, |
| }; |
| }, |
| }; |
| </script> |
首先要import导入computed。
在reactive({})中声明computed即可。
到现在为止,响应式数据就都可以处理了。
2.5.watch的用法
| <template> |
| <div> |
| {{ num }} |
| <button @click="add">加</button> |
| </div> |
| </template> |
| |
| <script> |
| import { reactive, toRefs, watch } from "vue"; |
| |
| export default { |
| setup() { |
| const state = reactive({ |
| num: 0, |
| }); |
| |
| watch(state,(newValue, oldValue) => { |
| console.log(newValue, oldValue); |
| } |
| ); |
| |
| function add() { |
| state.num++; |
| } |
| |
| return { |
| ...toRefs(state), |
| add, |
| }; |
| }, |
| }; |
| </script> |
使用watch函数来进行数据监听。watch函数有两个参数。
第一个参数:要监听的数据。
第二个参数:触发监听时的处理函数(包括newValue, oldValue)
上面实例中直接监听state响应对象。但我们知道,在state中会有很多数据,如果只想监听其中的某个数据,就需要换一种写法:
| watch(() => state.num,(newValue, oldValue) => { |
| console.log(newValue, oldValue); |
| }); |
第一个参数要写成函数返回值的形式,这样就能监听state响应对象中的某个数据了。
2.6.setup()参数
setup() 函数有两个参数:props 和 context。
为什么要有这两个参数呢?我们知道父子组件之间是可以传值。但是现在我们的业务逻辑都写在setup函数中,而setpu中没有this指针,那么就只能靠这两个参数来进行传递了。
- props:父组件向子组件传值的参数。
- context:子组件向父组件传值的参数。
2.6.1.props参数
setup() 函数的 props 是父组件向子组件传值的参数。
在components文件夹中创建子组件(Hello.vue):
| <template> |
| <div>我是子组件</div> |
| </template> |
| |
| <script> |
| export default { |
| setup(props, context) { |
| console.log(props.msg) |
| }, |
| props: { |
| msg: String, |
| }, |
| }; |
| </script> |
| |
| <style> |
| </style> |
父组件(HomeView.vue):
| <template> |
| <div> |
| <Hello msg="hello"></Hello> |
| </div> |
| </template> |
| |
| <script> |
| import Hello from '../components/Hello.vue' |
| import { reactive, toRefs, computed } from "vue"; |
| |
| export default { |
| setup() { |
| const state = reactive({ |
| |
| }); |
| return { |
| ...toRefs(state), |
| }; |
| }, |
| components:{ |
| Hello |
| } |
| }; |
| </script> |
注意,要先import导入子组件,然后使用components挂载子组件。
2.6.2.context参数
setup() 函数的 context 是子组件向父组件传值的参数。
子组件(Hello.vue):
| <template> |
| <div> |
| <div>我是子组件</div> |
| <button @click="send">给父组件发数据</button> |
| </div> |
| </template> |
| |
| <script> |
| export default { |
| setup(props, context) { |
| function send() { |
| context.emit("childmsg", "hello world!"); |
| } |
| |
| return { |
| send, |
| }; |
| }, |
| props: { |
| msg: String, |
| }, |
| }; |
| </script> |
| |
| <style> |
| </style> |
父组件(HomeView.vue):
| <template> |
| <div> |
| <Hello msg="hello" @childmsg="get"></Hello> |
| <p>我是父组件,接受子组件传的值:{{welcome}}</p> |
| </div> |
| </template> |
| |
| <script> |
| import Hello from '../components/Hello.vue' |
| import { reactive, toRefs, computed } from "vue"; |
| |
| export default { |
| setup() { |
| |
| const state = reactive({ |
| welcome: '' |
| }); |
| |
| function get(param) { |
| state.welcome = param; |
| } |
| |
| return { |
| ...toRefs(state), |
| get |
| }; |
| }, |
| components:{ |
| Hello |
| } |
| }; |
| </script> |
三.Composition API的使用
下面我们会将前面学过的知识点都改写为Composition API的形式。而且,Vue3兼容Options API和Composition API两种写法。所以这两种写法都要会。
3.1.provide与inject的使用
我们学过provide与inject可用于多级组件直接传递数据,下面学习provide与inject在Composition API中的使用。
创建孙子组件(SubHello.vue)
| <template> |
| <div> |
| <div>我是孙组件</div> |
| </div> |
| </template> |
| |
| <script> |
| import { inject } from "vue"; |
| |
| export default { |
| setup(props, context) { |
| |
| console.log(inject('msg')) |
| |
| return {}; |
| } |
| }; |
| </script> |
在孙子组件中import导入inject,并使用inject接收上级组件的传值。
在子组件(Hello.vue)中使用孙子组件
| <template> |
| <div> |
| <div>我是子组件</div> |
| <SubHello></SubHello> |
| </div> |
| </template> |
| |
| <script> |
| import SubHello from './SubHello.vue' |
| |
| export default { |
| setup(props, context) { |
| |
| return {}; |
| }, |
| components:{ |
| SubHello |
| } |
| }; |
| </script> |
| |
| <style> |
| </style> |
在父组件中使用provide给多级组件传值
| <template> |
| <div> |
| <Hello></Hello> |
| </div> |
| </template> |
| |
| <script> |
| import Hello from "../components/Hello.vue"; |
| import { provide } from "vue"; |
| |
| export default { |
| setup() { |
| provide('msg','hello'); |
| }, |
| components:{ |
| Hello |
| } |
| }; |
| </script> |
注意,由于父组件向孙子组件传递数据是单向的,所以孙子组件不能修改传递的值。如果子组件
3.2.vue生命周期的用法
在 setup () 内部调用生命周期钩子:
选项式API | setup () 内部调用生命周期钩子 |
beforeCreate() | setup() |
created() | setup() |
beforeMount() | onBeforeMount() |
mounted() | onMounted() |
beforeUpdate() | onBeforeUpdate() |
updated() | onUpdated() |
beforeUnmount() | onBeforeUnmount() |
unmounted() | onUnmounted() |
注意:在Composition API中没有beforeCreate()和created()这里两个声明周期函数了,统一使用setup()。
实例:
| <template> |
| <div> |
| {{ num }} |
| <button @click="add">加</button> |
| </div> |
| </template> |
| |
| <script> |
| import { reactive,toRefs,onBeforeMount,onMounted,onBeforeUpdate,onUpdated,onBeforeUnmount,onUnmounted } from "vue"; |
| |
| export default { |
| setup() { |
| const state = reactive({ |
| num: 1, |
| }); |
| |
| function add() { |
| state.num++; |
| } |
| |
| onBeforeMount(() => { |
| console.log("DOM挂载前!"); |
| }); |
| |
| onMounted(() => { |
| console.log("DOM挂载后!"); |
| }); |
| |
| onBeforeUpdate(() => { |
| console.log("数据更新前!"); |
| }) |
| |
| onUpdated(() => { |
| console.log("数据更新后!"); |
| }) |
| |
| onBeforeUnmount(() => { |
| console.log("实例卸载前!"); |
| }) |
| |
| onUnmounted(() => { |
| console.log("实例卸载后!"); |
| }) |
| |
| return { |
| ...toRefs(state), |
| add, |
| }; |
| }, |
| }; |
| </script> |
3.3.编程式路由的使用
下面学习如何在Composition API中使用路由。
打开App.vue组件,这里已经有了路由。当然,是使用router-link标签来实现的。现在我们将它改成编程式路由。
| <template> |
| <nav> |
| |
| |
| |
| |
| <button @click="toHome">Home</button> |
| <button @click="toAbout">About</button> |
| </nav> |
| <router-view /> |
| </template> |
| |
| <script> |
| import { useRouter } from "vue-router"; |
| |
| export default{ |
| setup() { |
| const router = useRouter(); |
| |
| function toHome(){ |
| router.push('/'); |
| } |
| |
| function toAbout(){ |
| router.push({path:'/about',query:{name:'zhangsan'}}); |
| } |
| |
| return { |
| toHome, |
| toAbout |
| } |
| }, |
| } |
| </script> |
先import导入useRouter模块。
通过useRouter模块获取router对象。以后的路由写法就与前面所学一样了。
下面是获取路由参数,打开AboutView.vue文件
| <template> |
| <div> |
| </div> |
| </template> |
| |
| <script> |
| import { useRoute } from "vue-router"; |
| |
| export default { |
| setup(){ |
| const route = useRoute(); |
| |
| console.log(route.query.name); |
| } |
| } |
| </script> |
通过同样的方式获取route对象后就可以获取路由参数了。
3.4.Vuex的使用
下面学习如何在Composition API中使用Vuex。
| <template> |
| <div> |
| </div> |
| </template> |
| |
| <script> |
| import { useStore } from "vuex"; |
| |
| export default { |
| setup() { |
| const store = useStore(); |
| console.log(store.state.num); |
| console.log(store.getters.newnum); |
| } |
| }; |
| </script> |
先import导入useStore模块。
通过useStore模块获取store对象。就可以通过store对象获取Vuex中的所有数据了。
3.5.获取DOM的使用
前面我们知道在Vue中,可以使用ref来获取DOM对象。下面学习如何在Composition API中使用ref。
| <template> |
| <div ref="myRef">获取单个DOM元素</div> |
| </template> |
| |
| <script> |
| import { ref, onMounted } from 'vue'; |
| |
| export default { |
| setup() { |
| const myRef = ref(null); |
| |
| onMounted(() => { |
| console.dir(myRef.value); |
| }); |
| return { |
| myRef |
| }; |
| } |
| }; |
| </script> |
- 在HTML标签中使用 ref 属性标识一个DOM对象。
- 需要 import 导入 ref 对象。
- 使用 const myRef = ref(null); 的方式获取包装好的DOM对象,命名为HTML中的 ref 属性名。并且此数据需要暴露出去。
- 使用 value 属性即可获取 DOM对象。
四.使用Composition API重写todoList
AddNew组件
| <template> |
| <div> |
| <input type="text" v-model="newItem" /> |
| <button @click="handleAdd">添加</button> |
| </div> |
| </template> |
| |
| <script> |
| import {reactive, toRefs} from 'vue'; |
| |
| export default { |
| setup(props, context){ |
| const state = reactive({ |
| newItem: "" |
| }) |
| |
| function handleAdd() { |
| if (state.newItem == "") { |
| alert("不能为空"); |
| return; |
| } |
| |
| context.emit("submitNewItem", state.newItem); |
| state.newItem = ""; |
| } |
| |
| return { |
| ...toRefs(state), |
| handleAdd |
| } |
| } |
| } |
| </script> |
TheList组件
| <template> |
| <ol> |
| <li v-for="(item, index) in list" :key="index" @click="judgeItem(index)"> |
| {{ item }} |
| </li> |
| </ol> |
| </template> |
| |
| <script> |
| export default { |
| setup(props, context) { |
| |
| function judgeItem(index) { |
| if (props.listType) { |
| context.emit("handleDelete", index); |
| } else { |
| context.emit("handleJudge", index); |
| } |
| } |
| |
| return { |
| judgeItem |
| }; |
| }, |
| props: { |
| list: { |
| type: Array, |
| required: true, |
| }, |
| listType: { |
| type: Boolean, |
| default: false, |
| }, |
| }, |
| }; |
| </script> |
TodoList组件
| <template> |
| <div> |
| <h1>todoList</h1> |
| <AddNew @submitNewItem="addNewItem"></AddNew> |
| <TheList :list="todoList" @handleJudge="toDone"></TheList> |
| <hr /> |
| <TheList :list="doneList" :listType="true" @handleDelete="toDelete"></TheList> |
| </div> |
| </template> |
| |
| <script> |
| import AddNew from "../components/AddNew.vue"; |
| import TheList from "../components/TheList.vue"; |
| import {reactive, toRefs} from 'vue'; |
| |
| export default { |
| setup(){ |
| const state = reactive({ |
| todoList: [], |
| doneList: [] |
| }) |
| |
| function addNewItem(newItem){ |
| state.todoList.push(newItem); |
| } |
| function toDone(index){ |
| state.doneList.push(state.todoList.splice(index,1)[0]); |
| } |
| function toDelete(index){ |
| state.doneList.splice(index,1); |
| } |
| |
| return { |
| ...toRefs(state), |
| addNewItem, |
| toDone, |
| toDelete |
| } |
| }, |
| components: { |
| AddNew, |
| TheList, |
| }, |
| }; |
| </script> |
五.setup语法糖
在Composition API中,在setup函数中声明的数据、函数等内容,都需要通过 return 对外暴露,才能被组件的视图模板(template)使用,这就造成了书写上的不方便。于是,Vue官方又给我们推出了一个新的setup语法糖。
使用setup语法糖,就可以不用写setup函数了。并且,数据和函数也不用返回,组件也不需要注册了。
5.1.setup语法糖的基本结构
| <template> |
| </template> |
| |
| <script setup> |
| |
| </script> |
| |
| <style> |
| </style> |
- 在script标签中使用setup属性即可。
- 运行时,script标签中的内容会被重新编译成 setup() 函数的形式。
- 而且,声明的数据、函数不需要通过 return 暴露,即可被 template所使用
5.2.响应数据的使用
| <template> |
| <div> |
| <p>{{ num }}</p> |
| <button @click="add">加</button> |
| </div> |
| </template> |
| |
| <script setup> |
| let num = 10; |
| |
| |
| |
| const add = ()=>{ |
| alert("触发了此方法"); |
| num++; |
| } |
| </script> |
直接声明的数据不是响应式的,数据改变时不会响应到视图模板中。
| <template> |
| <div> |
| <p>{{ num }}</p> |
| <p>{{ dept.deptno }},{{ dept.dname }},{{ dept.loc }}</p> |
| <ul> |
| <li v-for="user in userArr" :key="user.userId"> |
| {{user.userId}},{{user.userName}},{{user.userAge}} |
| </li> |
| </ul> |
| <button @click="add">加</button> |
| </div> |
| </template> |
| |
| <script setup> |
| import { reactive, ref } from "vue"; |
| |
| const num = ref(10); |
| |
| const dept = reactive({ |
| deptno: 20, |
| dname: "技术部", |
| loc: '沈阳市', |
| }); |
| |
| const userArr = ref([ |
| { |
| userId: 100, |
| userName: "张三", |
| userAge: 25, |
| }, |
| { |
| userId: 101, |
| userName: "李四", |
| userAge: 26, |
| }, |
| { |
| userId: 102, |
| userName: "王五", |
| userAge: 27, |
| }, |
| ]); |
| |
| const add = () => { |
| num.value++; |
| dept.deptno++; |
| |
| userArr.value = []; |
| } |
| </script> |
ref 和 reactive 都可以做响应式数据,它们的区别如下:
- reactive:用于定义引用类型。只能修改数据,不能改变其引用。
- ref:用于定义基本类型和引用类型。可以修改数据,也可以改变其引用。
- 在方法中修改数据时需要使用 value属性。因为,Ref的本质是通过Reactive创建的,Ref(10) 就相当于:Reactive({value:10});
- 在视图模板调用可以省略value属性的书写。
5.3.其它语法的使用
下面例子演示了computed计算属性、watch监听、生命周期函数的使用。
| <template> |
| <div> |
| {{ num }} |
| {{ newNum }} |
| <button @click="add">add</button> |
| </div> |
| </template> |
| |
| <script setup> |
| import { ref, computed, watch, onMounted } from 'vue'; |
| |
| const num = ref(10); |
| |
| const newNum = computed(() => { |
| return num.value*2; |
| }) |
| |
| const add = ()=>{ |
| num.value++; |
| } |
| |
| watch(num,(newValue,oldValue)=>{ |
| console.log(newValue,oldValue); |
| }) |
| |
| |
| onMounted(() => { |
| console.log("DOM挂载后!"); |
| }); |
| </script> |
5.4.引入组件的使用
引入的组件不必注册,可以直接使用。
| <template> |
| <div class="home"> |
| <HelloWorld msg="Welcome to Your Vue.js App"/> |
| </div> |
| </template> |
| |
| <script setup> |
| |
| import HelloWorld from '@/components/HelloWorld.vue' |
| </script> |
5.5.父子组件传值的使用
5.5.1.defineProps的使用
defineProps用于父组件向子组件传值。
父组件
| <template> |
| <div class="home"> |
| <HelloWorld msg="Welcome to Your Vue.js App" :num="num"/> |
| </div> |
| </template> |
| |
| <script setup> |
| |
| import HelloWorld from '@/components/HelloWorld.vue' |
| |
| const num = 20 |
| </script> |
子组件
| <template> |
| <div class="hello"> |
| <h1>{{ msg }},{{ num }}</h1> |
| </div> |
| </template> |
| |
| <script setup> |
| |
| |
| const myProps = defineProps({ |
| msg:{ |
| type: String |
| }, |
| num:{ |
| type: Number, |
| required: true |
| } |
| }); |
| </script> |
| |
| <style scoped> |
| </style> |
defineProps也可以有数组形式和对象形式两种写法。
5.5.2.defineEmits的使用
defineEmits用于子组件向父组件传值。
父组件
| <template> |
| <div class="home"> |
| <HelloWorld |
| msg="Welcome to Your Vue.js App" |
| :num="num" |
| @childmsg="get"/> |
| </div> |
| </template> |
| |
| <script setup> |
| |
| import HelloWorld from '@/components/HelloWorld.vue' |
| |
| const num = 20; |
| |
| const get = (value) => { |
| console.log(value) |
| } |
| </script> |
子组件
| <template> |
| <div class="hello"> |
| <h1>{{ msg }},{{ num }}</h1> |
| <button @click="send">给父组件传值</button> |
| </div> |
| </template> |
| |
| <script setup> |
| const myProps = defineProps(['msg','num']); |
| |
| const emit = defineEmits(['childmsg']); |
| |
| const send = () => { |
| emit('childmsg','子组件向父组件传的值'); |
| } |
| </script> |
| |
| <style scoped> |
| </style> |
六.使用setup语法糖重写todoList
AddNew组件
| <template> |
| <div> |
| <input type="text" v-model="newItem" /> |
| <button @click="handleAdd">添加</button> |
| </div> |
| </template> |
| |
| <script setup> |
| import { ref } from "vue"; |
| |
| const newItem = ref(""); |
| |
| const emit = defineEmits(["submitNewItem"]); |
| |
| const handleAdd = () => { |
| if (newItem.value == "") { |
| alert("不能为空"); |
| return; |
| } |
| emit("submitNewItem", newItem.value); |
| newItem.value = ""; |
| }; |
| </script> |
TheList组件
| <template> |
| <ol> |
| <li v-for="(item, index) in list" :key="index" @click="judgeItem(index)"> |
| {{ item }} |
| </li> |
| </ol> |
| </template> |
| |
| <script setup> |
| const emit = defineEmits(['handleDelete','handleJudge']); |
| |
| const judgeItem = (index) => { |
| if (myProps.listType) { |
| emit("handleDelete", index); |
| } else { |
| emit("handleJudge", index); |
| } |
| }; |
| |
| const myProps = defineProps({ |
| list: { |
| type: Array, |
| required: true, |
| }, |
| listType: { |
| type: Boolean, |
| default: false, |
| }, |
| }); |
| </script> |
TodoList组件
| <template> |
| <div> |
| <h1>todoList</h1> |
| <AddNew @submitNewItem="addNewItem"></AddNew> |
| <TheList :list="todoList" @handleJudge="toDone"></TheList> |
| <hr /> |
| <TheList |
| :list="doneList" |
| :listType="true" |
| @handleDelete="toDelete" |
| ></TheList> |
| </div> |
| </template> |
| |
| <script setup> |
| import AddNew from "../components/AddNew.vue"; |
| import TheList from "../components/TheList.vue"; |
| import { reactive } from "vue"; |
| |
| const todoList = reactive([]); |
| const doneList = reactive([]); |
| |
| const addNewItem = (newItem) => { |
| todoList.push(newItem); |
| } |
| const toDone = (index) => { |
| doneList.push(todoList.splice(index, 1)[0]); |
| } |
| const toDelete = (index) => { |
| doneList.splice(index, 1); |
| } |
| </script> |