春天的脚步愈发临近,相信很多小伙伴已经开始规划自己的踏春计划了,无论是欣赏名胜古迹,还是走访风土人文,你都需要提前准备一份旅游清单!有了这款Angular旅游计划应用,从地点到预算,它都能帮助你创建自己的踏春足迹!
踏春正当时,马上跟随本文,从云平台创建应用模版,本地编写《旅游清单》项目,到一键部署上线开始,一步一步创建自己的踏春计划,让一场说走就走的旅行,从当下发生吧!
一 、通过云开发平台快速创建初始化应用
1.创建相关应用模版请参考链接: developer.aliyun.com/article/87464...
2.完成创建后就可以在github中查看到新增的Angular 仓库

二 、 本地编写《旅游清单》项目
1.将应用模版克隆到本地
• 首先假定你已经安装了Git、node,没有安装请移步node官网进行安装。克隆项目:
git clone + 项目地址
• 进入项目文件
cd Angular
• 切换到feature/1.0.0 分支上
git checkout feature/1.0.0
• 使用一下命令全局安装 Angular CLI :
npm install -g @angular/cli
• 安装依赖包
npm install
• 启动服务
ng serve
这里打开浏览器4200端口,并出现默认页面。
2.架构与效果预览
• 《旅游清单》项目架构
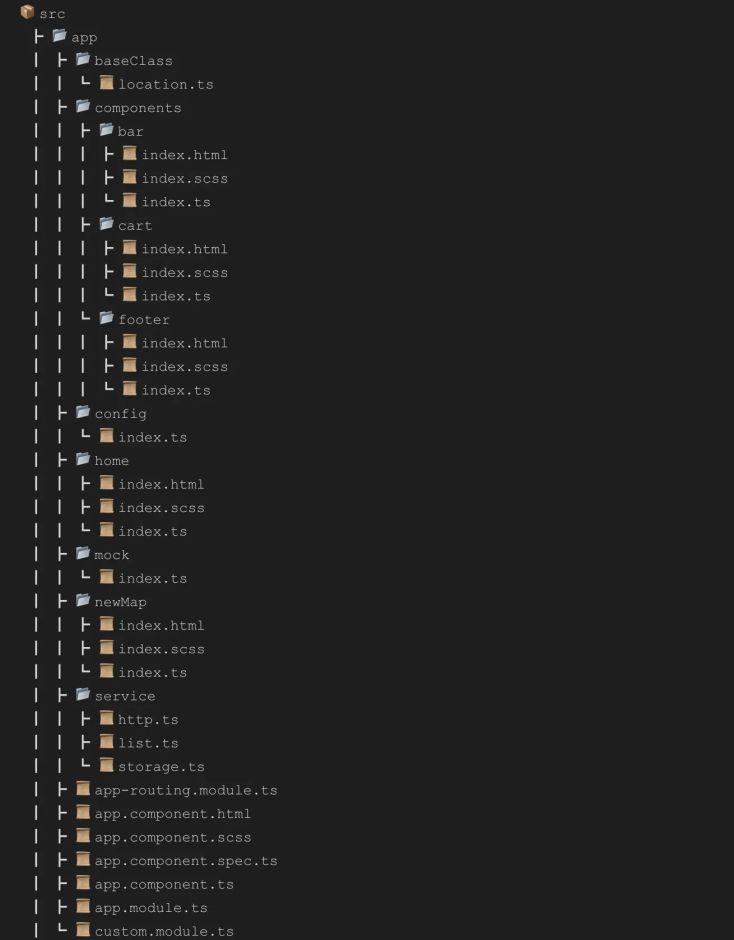
• 其中components为组件存放区,config为公共配置区,home/newMap为页面区,mock为模拟数据区,service为应用所需服务区,如http服务,存储服务,custom.modules文件为第三方组件安置区。
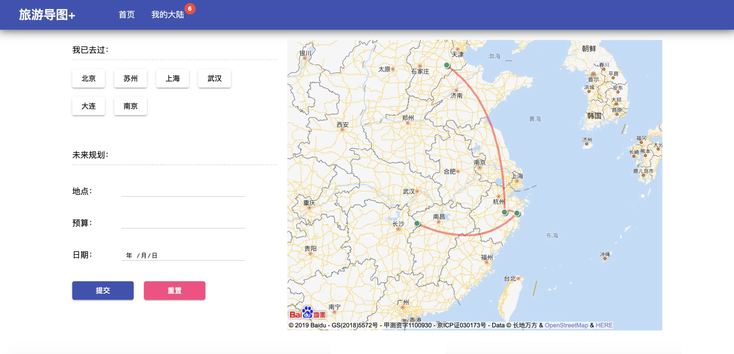
• 效果预览
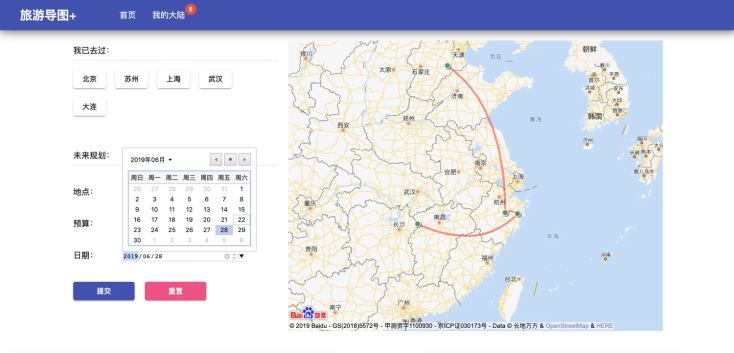
添加旅游规划之后:
3.项目编写
• 引入地图api
| <script type="text/javascript" src="http://api.map.baidu.com/api?v=2.0&ak=你的ak"></script> | |
| <script type="text/javascript" src="http://api.map.baidu.com/library/CurveLine/1.5/src/CurveLine.min.js"></script> |
至此,项目的基本准备工作已经做好了,下面让我们先聊一聊angular。
4.angular基本语法和架构
• 基本语法
和vue类似,ng的基本语法如下:
* 模版语法
* 数据指令
* 属性绑定
* 事件绑定
案例如下:
| <h1>{{title}}</h1> | |
| <h2 [title]="mytitle">My favorite hero is: {{ mytitle }}</h2> | |
| <p>Heroes:</p> | |
| <ul> | |
| <li *ngFor="let item of list"> | |
| {{ hero }} | |
| </li> | |
| </ul> | |
| <button (click)="onclickBtn">单机</button> |
以上代码可以知道,我们用{{}}插入数据,用[属性名]绑定属性,ngFor为循环指令,类似的ngIf为条件判断,事件绑定用(click),我们看看组件的ts文件对应的写法:
| import { Component } from '@angular/core'; | |
| ({ | |
| selector: 'app-root', | |
| templateUrl: './index.html', | |
| styleUrls: ['./index.scss'] | |
| }) | |
| export class AppComponent { | |
| mytitle = 'Xujiang'; | |
| list = [ | |
| 'xujaing', | |
| 'zhangjiang', | |
| 'xakeng' | |
| ]; | |
| onclickBtn() { | |
| console.log('你好') | |
| } | |
| } |
• 基本架构
采用angular官方提供的架构图:
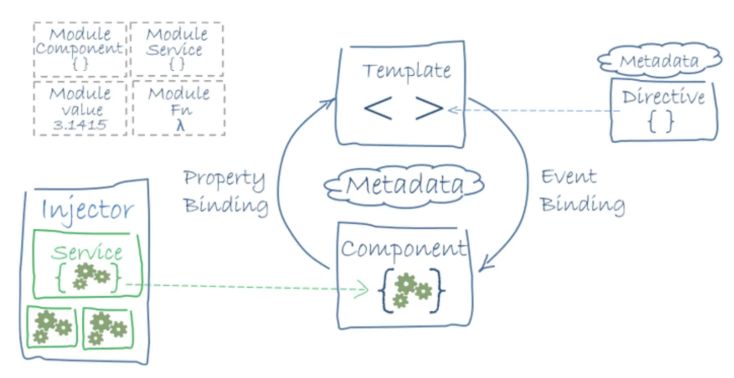
我们知道,一个完整的angular应该包括:
- 模块Angular 定义了 NgModule,NgModule 为一个组件集声明了编译的上下文环境,它专注于某个应用领域、某个工作流或一组紧密相关的能力,每个 Angular 应用都有一个根模块,通常命名为 AppModule。根模块提供了用来启动应用的引导机制。 一个应用通常会包含很多功能模块。
- 组件每个 Angular 应用都至少有一个组件,也就是根组件,它会把组件树和页面中的 DOM 连接起来。 每个组件都会定义一个类,其中包含应用的数据和逻辑,并与一个 HTML 模板相关联,该模板定义了一个供目标环境下显示的视图 比如:
| import { Component, OnInit } from '@angular/core'; | |
| import { LocationService } from '../../service/list'; | |
| ({ | |
| selector: 'app-bar', | |
| templateUrl: './index.html', | |
| styleUrls: ['./index.scss'] | |
| }) | |
| export class AppBar implements OnInit { | |
| items; | |
| constructor(private locationService: LocationService) { | |
| this.items = this.locationService.getItems(); | |
| } | |
| ngOnInit() { | |
| } | |
| } |
• 服务于依赖注入
对于与特定视图无关并希望跨组件共享的数据或逻辑,可以创建服务类。 服务类的定义通常紧跟在 “@Injectable()” 装饰器之后。该装饰器提供的元数据可以让你的服务作为依赖被注入到客户组件中。例如:
| ``` | |
| import { Injectable } from '@angular/core'; | |
| providedIn: 'root' | |
| }) | |
| export class Storage {} | |
| ``` |
• 路由
Angular 的 Router 模块提供了一个服务,它可以让你定义在应用的各个不同状态和视图层次结构之间导航时要使用的路径。如下:
| import { NgModule } from '@angular/core'; | |
| import { Routes, RouterModule } from '@angular/router'; | |
| import { HomeComponent } from './home'; | |
| import { NewMapComponent } from './newMap'; | |
| // 路由不能以‘/’开始 | |
| const routes: Routes = [ | |
| { path: '', component: HomeComponent }, | |
| { path: 'newMap', component: NewMapComponent }, | |
| ]; | |
| ({ | |
| imports: [RouterModule.forRoot(routes)], | |
| exports: [RouterModule] | |
| }) | |
| export class AppRoutingModule { } |
• 百度地图api及跨域问题解决
我们进入百度地图官网后,去控制台创建一个应用,此时会生成对应的应用ak,如下:
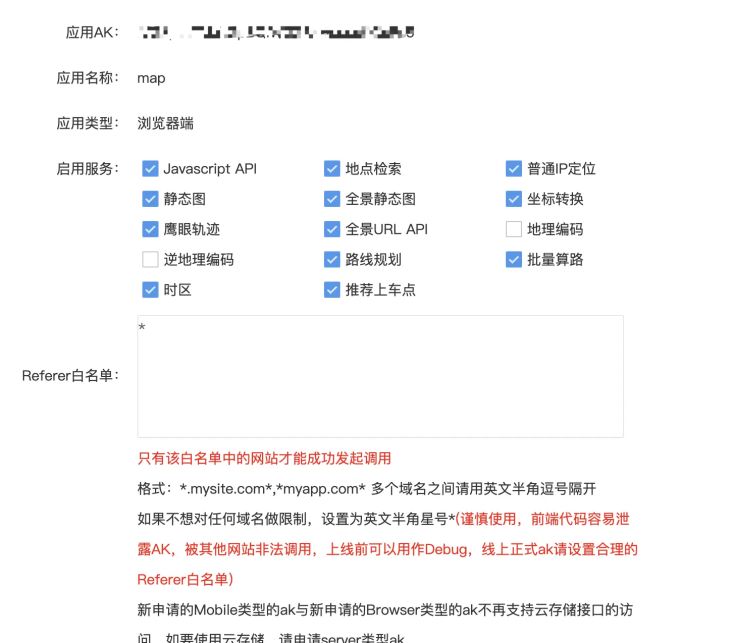
本地调试时将referer写成*即可,但是我们用ng的http或者fetch去请求api接口时仍会出现跨域,在网上搜集了各种资料,都没有达到效果,我们这里使用jquery的$.getScript(url),结合jsonp回调,即可解决该问题。
所以先安装以下jquery:
npm install jquery
解决方案如下:
• 封装http服务:
| import { Injectable } from '@angular/core'; | |
| import { HttpClient } from '@angular/common/http'; | |
| import { AK, BASE_URL } from '../config'; | |
| import * as $ from "jquery"; | |
| ({ | |
| providedIn: 'root' | |
| }) | |
| export class Http { | |
| constructor(private http: HttpClient | |
| ) { | |
| } | |
| params(data = {}) { | |
| let obj = {...data, ak: AK, output: 'json' }; | |
| let paramsStr = '?'; | |
| for(let v in obj) { | |
| paramsStr += `${v}=${obj[v]}&` | |
| }; | |
| return paramsStr.substr(0, paramsStr.length -1); | |
| } | |
| get(url, params) { | |
| return this.http.get(`${BASE_URL}${url}${this.params(params)}`) | |
| } | |
| getCors(url, params) { | |
| return new Promise((resolve, reject) => { | |
| $.getScript(`${BASE_URL}${url}${this.params(params)}`, (res, status) => { | |
| if(status === 'success') { | |
| resolve(status) | |
| } else { | |
| reject(status) | |
| } | |
| }); | |
| }) | |
| } | |
| } |
定义jsonp回调和接收数据变量:
| let locationData = null; | |
| window['cb'] = function(data) { | |
| locationData = data && data.results; | |
| } |
使用:
| async searchLocation(v) { | |
| return await this.http.getCors('/place/v2/search', | |
| { region:v, query: v, callback: 'cb' }); | |
| } |
至此,应用几个主要的突破点已经解决好了,接下来我们来开发项目的核心页面和组件。
• 按需引入materialUI组件:
| // custom.module.ts | |
| import { NgModule } from '@angular/core'; | |
| import { MatButtonModule, MatTooltipModule, MatBadgeModule } from '@angular/material'; | |
| ({ | |
| imports: [MatButtonModule, MatTooltipModule, MatBadgeModule], | |
| exports: [MatButtonModule, MatTooltipModule, MatBadgeModule], | |
| }) | |
| export class CustomMaterialModule { } |
custom.module.ts为根目录下的文件,这里我用来做存储第三方组件的位置,定义好之后在app.module.ts中引入:
| // material组件库 | |
| import { CustomMaterialModule } from './custom.module'; | |
| import { BrowserAnimationsModule } from '@angular/platform-browser/animations'; | |
| @NgModule({ | |
| declarations: [ | |
| AppComponent, | |
| ], | |
| imports: [ | |
| BrowserModule, | |
| BrowserAnimationsModule, | |
| ReactiveFormsModule, | |
| AppRoutingModule, | |
| HttpClientModule, | |
| CustomMaterialModule, | |
| ], | |
| providers: [], | |
| bootstrap: [AppComponent] | |
| }) |
BrowserAnimationsModule主要是angular为组件提供一些动效支持的模块。 接下来我们看看入口页面:
| // app.component.html | |
| <div class="app-wrap"> | |
| <app-bar></app-bar> | |
| <main class="main"> | |
| <router-outlet></router-outlet> | |
| </main> | |
| <app-footer></app-footer> | |
| </div> |
app-bar,app-footer为我们定义好的页头页尾组件,如下:
| // app-bar.html | |
| <nav class="nav-bar"> | |
| <div class="logo">旅游导图+</div> | |
| <a [routerLink]="['/']">首页</a> | |
| <a [routerLink]="['/newMap']"><span [matBadge]="items.length" matBadgeOverlap="false" matBadgeColor="warn">我的大陆</span></a> | |
| </nav> | |
| // app-bar.ts | |
| import { Component, OnInit } from '@angular/core'; | |
| import { LocationService } from '../../service/list'; | |
| ({ | |
| selector: 'app-bar', | |
| templateUrl: './index.html', | |
| styleUrls: ['./index.scss'] | |
| }) | |
| export class AppBar implements OnInit { | |
| items; | |
| constructor(private locationService: LocationService) { | |
| this.items = this.locationService.getItems(); | |
| } | |
| ngOnInit() { | |
| } | |
| } | |
| // footer.html | |
| <footer class="footer">@开发者:{{ name }}</footer> | |
| // footer.ts | |
| import { Component, OnInit } from '@angular/core'; | |
| ({ | |
| selector: 'app-footer', | |
| templateUrl: './index.html', | |
| styleUrls: ['./index.scss'] | |
| }) | |
| export class AppFooter implements OnInit { | |
| name = '猪先森'; | |
| constructor() { | |
| } | |
| ngOnInit() { | |
| } | |
| } |
其次,页面头部组件用到了LocationService,我们来看看这个service:
| import { Injectable } from '@angular/core'; | |
| import { HttpClient } from '@angular/common/http'; | |
| import { Storage } from './storage'; | |
| export class LocationService { | |
| items = [ | |
| { | |
| name: '北京', | |
| desc: '北京好,风景真的不错!', | |
| price: '2000', | |
| date: '2018-12-29', | |
| hasDone: true, | |
| location: { | |
| lat: 39.910924, | |
| lng: 116.413387 | |
| } | |
| }, | |
| { | |
| name: '苏州', | |
| desc: '苏州好,去了还想去,不错!', | |
| price: '2000', | |
| hasDone: true, | |
| date: '2018-12-29', | |
| location: { | |
| lat: 31.303565, | |
| lng: 120.592412 | |
| } | |
| }, | |
| { | |
| name: '上海', | |
| desc: '上海好,去了还想去,不错!', | |
| price: '2000', | |
| hasDone: true, | |
| date: '2018-12-29', | |
| location: { | |
| lat: 31.235929, | |
| lng: 121.48054 | |
| } | |
| }, | |
| { | |
| name: '武汉', | |
| desc: '武汉好,去了还想去,不错!', | |
| price: '2000', | |
| hasDone: true, | |
| date: '2018-12-29', | |
| location: { | |
| lat: 30.598467, | |
| lng: 114.311586 | |
| } | |
| } | |
| ]; | |
| constructor( | |
| private http: HttpClient, | |
| private store: Storage | |
| ) { | |
| if(store.get('list')) { | |
| this.items = store.get('list'); | |
| } | |
| } | |
| addToList(location) { | |
| this.items.push(location); | |
| this.store.set('list', this.items); | |
| } | |
| getItems() { | |
| return this.items; | |
| } | |
| clearList() { | |
| this.items = []; | |
| return this.items; | |
| } | |
| } |
该服务主要提供访问列表,添加旅游清单,清除清单的功能,我们利用@Injectable({ providedIn: ‘root’ })将服务注入根组件以便共享服务。其次我们使用自己封装的Storage服务来进行持久化数据存储,storage服务如下:
| import { Injectable } from '@angular/core'; | |
| ({ | |
| providedIn: 'root' | |
| }) | |
| export class Storage { | |
| get(k) { | |
| return JSON.parse(localStorage.getItem(k)) | |
| } | |
| set(k, v) { | |
| localStorage.setItem(k, JSON.stringify(v)) | |
| } | |
| remove(k) { | |
| localStorage.removeItem(k) | |
| } | |
| } |
实现起来比较简单,这里就不多说明了。 接下来我们看看首页核心功能的实现:
• 地图初始化路线图:
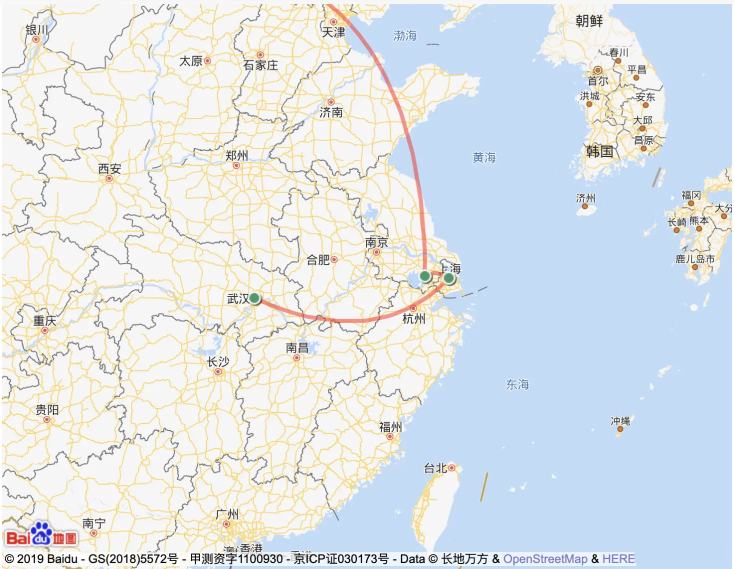
代码如下:
| import { Component, OnInit } from '@angular/core'; | |
| import { ActivatedRoute } from '@angular/router'; | |
| import { Input } from '@angular/core'; | |
| import { Http } from '../service/http'; | |
| import { FormBuilder } from '@angular/forms'; | |
| import { LocationService } from '../service/list'; | |
| ({ | |
| selector: 'app-home', | |
| templateUrl: './index.html', | |
| styleUrls: ['./index.scss'] | |
| }) | |
| export class HomeComponent implements OnInit { | |
| hasDoneList; | |
| constructor(private locationService: LocationService, | |
| private http: Http, | |
| ) { | |
| this.hasDoneList = this.locationService.getItems(); | |
| } | |
| ngOnInit() { | |
| let map = new BMap.Map("js_hover_map"); | |
| // 创建地图实例 | |
| map.centerAndZoom(new BMap.Point(118.454, 32.955), 6); | |
| map.enableScrollWheelZoom(); | |
| let hasDoneLocations = []; | |
| this.locationService.getItems().forEach(item => { | |
| item.hasDone && hasDoneLocations.push(new BMap.Point(item.location.lng,item.location.lat)) | |
| }) | |
| let curve = new BMapLib.CurveLine(hasDoneLocations, {strokeColor:"red", strokeWeight:4, strokeOpacity:0.5}); //创建弧线对象 | |
| map.addOverlay(curve); //添加到地图中 | |
| curve.enableEditing(); //开启编辑功能 | |
| } | |
| } |
我们在ngOninit生命周期里,初始化地图数据,根据前面我们定义的list server,把hasDone为true的数据过滤出来,显示在地图上。 接下来我们实现添加旅游清单的功能。
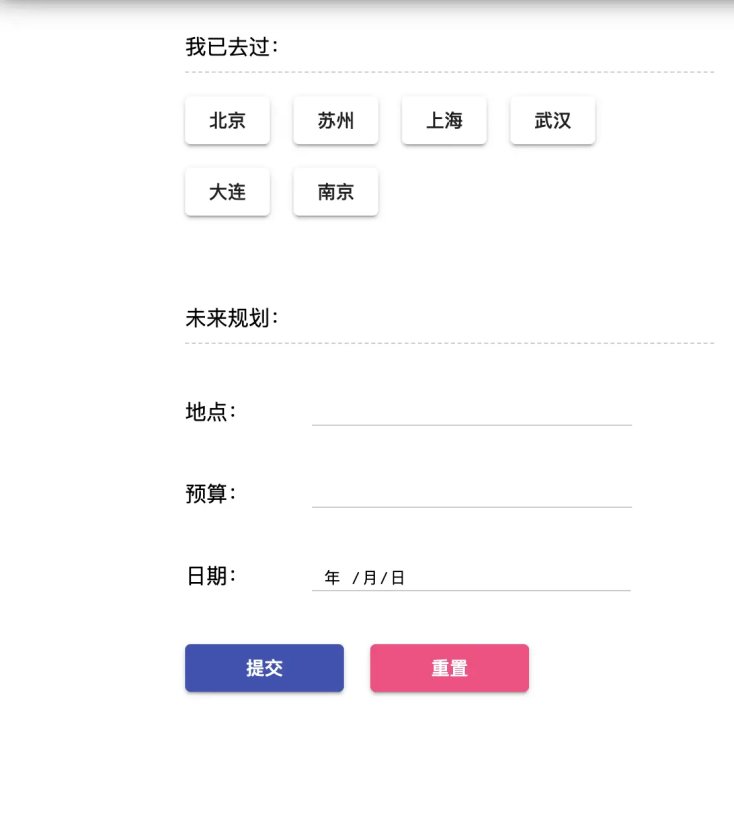
- 添加旅游清单
- 表单空间我们都用h5原生控件,我们使用angular提供的form模块,具体代码如下:
| import { Component, OnInit } from '@angular/core'; | |
| import { ActivatedRoute } from '@angular/router'; | |
| import { Input } from '@angular/core'; | |
| import { Http } from '../service/http'; | |
| import { FormBuilder } from '@angular/forms'; | |
| import { LocationService } from '../service/list'; | |
| // 获取跨域数据的回调 | |
| let locationData = null; | |
| window['cb'] = function(data) { | |
| locationData = data && data.results; | |
| } | |
| @Component({ | |
| selector: 'app-home', | |
| templateUrl: './index.html', | |
| styleUrls: ['./index.scss'] | |
| }) | |
| export class HomeComponent implements OnInit { | |
| hasDoneList; | |
| checkoutForm; | |
| constructor( | |
| private formBuilder: FormBuilder, | |
| private locationService: LocationService, | |
| private http: Http, | |
| ) { | |
| this.hasDoneList = this.locationService.getItems(); | |
| this.checkoutForm = this.formBuilder.group({ | |
| name: '', | |
| price: '', | |
| date: '' | |
| }); | |
| } | |
| ngOnInit() { | |
| ... | |
| } | |
| async searchLocation(v) { | |
| return await this.http.getCors('/place/v2/search', | |
| { region:v, query: v, callback: 'cb' }); | |
| } | |
| onSubmit(customerData) { | |
| if(customerData.name) { | |
| this.searchLocation(customerData.name).then(data => { | |
| this.locationService.addToList({...customerData, location: locationData[0].location, hasDone: false}) | |
| }); | |
| } else { | |
| alert('请填写旅游地点!'); | |
| return | |
| } | |
| this.checkoutForm.reset(); | |
| } | |
| onReset() { | |
| this.checkoutForm.reset(); | |
| } | |
| } | |
| // html | |
| <div class="home-wrap"> | |
| <section class="content"> | |
| <div class="has-done"> | |
| <div class="title">我已去过:</div> | |
| <div class="visit-list"> | |
| <button | |
| *ngFor="let item of hasDoneList" | |
| class="has-btn" | |
| mat-raised-button | |
| []="item.desc" | |
| aria-label="按钮当聚焦或者经过时展示工具提示框"> | |
| {{ item.name }} | |
| </button> | |
| </div> | |
| </div> | |
| <div class="has-done"> | |
| <div class="title">未来规划:</div> | |
| <div class="future-list"> | |
| <form [formGroup]="checkoutForm"> | |
| <div class="form-control"> | |
| <label>地点:</label> | |
| <input type="text" formControlName="name"> | |
| </div> | |
| <div class="form-control"> | |
| <label>预算:</label> | |
| <input type="number" formControlName="price"> | |
| </div> | |
| <div class="form-control"> | |
| <label>日期:</label> | |
| <input type="date" formControlName="date"> | |
| </div> | |
| <div class="form-control"> | |
| <button mat-raised-button color="primary" class="submit-btn" type="submit" (click)="onSubmit(checkoutForm.value)">提交</button> | |
| <button mat-raised-button color="accent" class="reset-btn" (click)="onReset()">重置</button> | |
| </div> | |
| </form> | |
| </div> | |
| </div> | |
| </section> | |
| <section class="map-wrap" id="js_hover_map"></section> | |
| </div> |
我们使用angular提供的FormBuilder来处理表单数据,这里需要注意,我们在提交表单的时候,需要先调用百度地图的api去生成经纬度数据,之后一起添加到清单,这样做的目的是要想画路线图,我们需要给百度地图api提供经纬度数据。还有一点,由于访问涉及到跨域,我们要定义jsonp的回调,来拿到数据,如下:
| let locationData = null; | |
| window['cb'] = function(data) { | |
| locationData = data && data.results; | |
| } |
locationService的addToList方法会将数据添加到清单,并存储到storage中。 如果想了解完整代码,欢迎在我的github上查看。
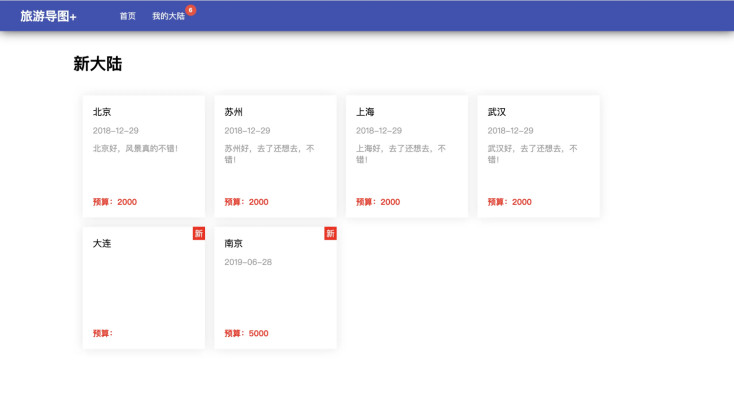
接下来看看我的大陆页面,其实涉及的难点不是很多,主要是根据hasDone为true或false去显示不同的样式。
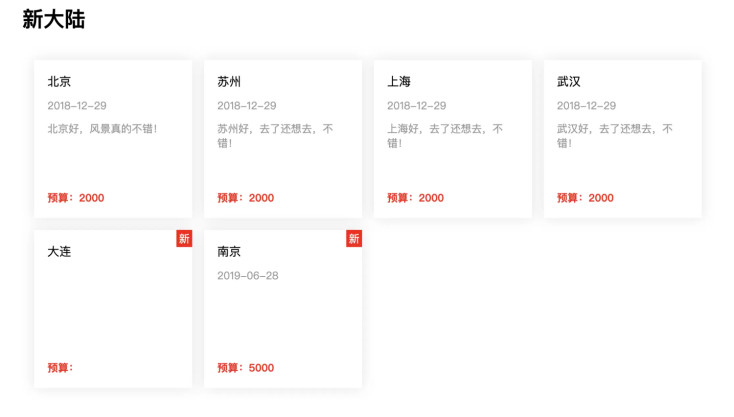
代码如下:
| // html | |
| <div class="detail"> | |
| <h1>新大陆</h1> | |
| <div class="position-list"> | |
| <div class="position-item" *ngFor="let item of list"> | |
| <span class="is-new" *ngIf="!item.hasDone">新</span> | |
| <span class="title">{{item.name}}</span> | |
| <span class="date">{{item.date}}</span> | |
| <span class="desc">{{item.desc}}</span> | |
| <span class="price">预算:{{item.price}}</span> | |
| </div> | |
| </div> | |
| </div> | |
| // ts | |
| import { Component, OnInit } from '@angular/core'; | |
| import { ActivatedRoute } from '@angular/router'; | |
| import { Input } from '@angular/core'; | |
| import { LocationService } from '../service/list'; | |
| ({ | |
| selector: 'app-new-map', | |
| templateUrl: './index.html', | |
| styleUrls: ['./index.scss'] | |
| }) | |
| export class NewMapComponent implements OnInit { | |
| () product; // 指定product值从父组件中传递 | |
| list; | |
| constructor(private route: ActivatedRoute, | |
| private locationService: LocationService | |
| ) { | |
| this.list = locationService.getItems(); | |
| } | |
| editItem(item) { | |
| } | |
| ngOnInit() { | |
| this.route.paramMap.subscribe(params => { | |
| // this.product = products[+params.get('productId')]; | |
| }); | |
| } | |
| } |
大致项目基本完成,如果想查看实际项目效果,可参考原项目作者的代码:
github.com/MrXujiang/angularDemo
三 、 云端一键部署上线应用
1.上传代码
| git add . | |
| git commit -m '添加你的注释' | |
| git push |
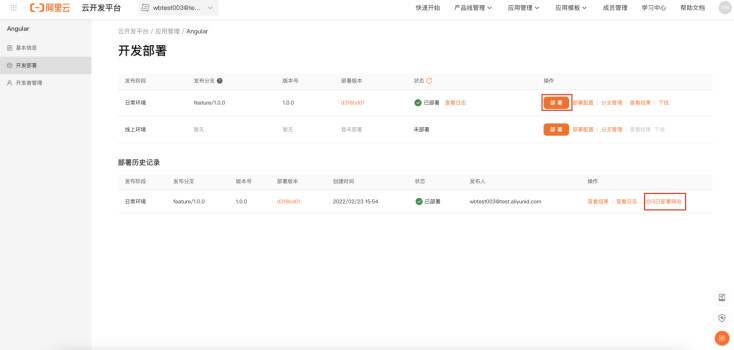
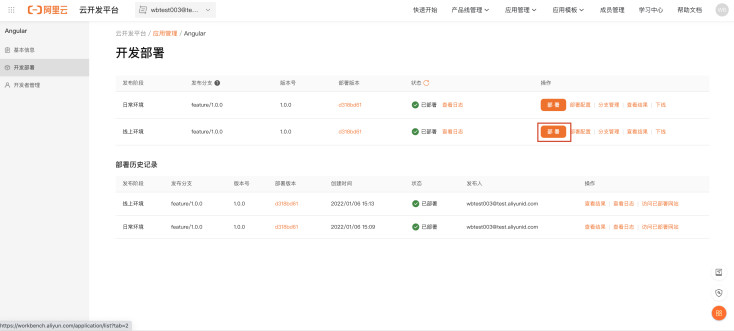
2.在日常环境部署
一键进行应用部署。在应用详情页面点击日常环境的「部署」按钮进行一键部署,部署状态变成绿色已部署以后可以点击访问部署网站查看效果。
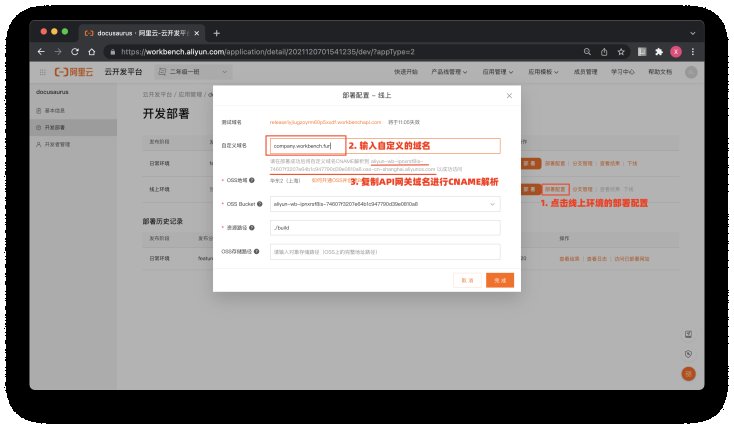
3.配置自定义域名在线上环境上线
• 配置线上环境自定义域名。在功能开发验证完成后要在线上环境进行部署,在线上环境的「部署配置」-「自定义域名」中填写自己的域名。例如我们添加一个二级域名 company.workbench.fun 来绑定我们部署的前端应用。然后复制自定义域名下方的API网关地址对添加的二级域名进行CNAME配置。
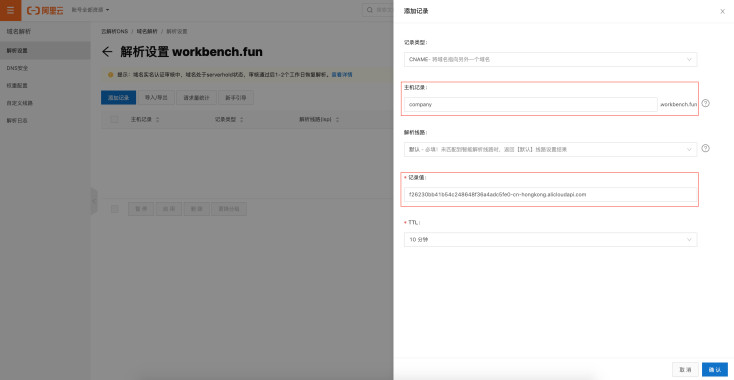
• 配置CNAME地址。复制好 API网关域名地址后,来到你自己的域名管理平台(此示例中的域名管理是阿里云的域名管理控制台,请去自己的域名控制台操作)。添加记录的「记录类型」选择「CNAME」,在「主机记录」中输入你要创建的二级域名,这里我们输入「company」,在「记录值」中粘贴我们之前复制的 API网关域名地址,「TTL」保留默认值或者设置一个你认为合适的值即可。
• 在线上环境部署上线。回到云开发平台的应用详情页面,按照部署的操作,点击线上环境的「部署按钮」,部署完成以后就在你自定义的域名进行了上线。CNAME 生效之后,我们输入 company.workbench.fun(示例网址) 可以打开部署的页面。至此,如何部署一个应用到线上环境,如何绑定自己的域名来访问一个线上的应用就完成了,赶紧部署自己的应用到线上环境,用自己的域名玩起来吧 ;)
一键创建angular应用模版链接 :workbench.aliyun.com/application/f...