目录
- 前言
- 一.用法
- 二.原理
- 三.webpack
- 1. package.json
- 2. 入口
- 3. Entry
- 4. Output
- 5. Alias
- 6. Loader
- a. lib/main:
- b. wrap-loader:
- c. webpack-uni-pages-loader:
- d. vue-loader:
- 7. plugin
- 四. 编译器知一二
- 1. vue-template-compiler
- 2. @babel/parser
- 3. @babel/traverse和@babel/types
- 4. Generate vnode
- 5. Generate code
- 6. 总体流程:
- 五.运行时的原理
- 1.事件代理
- a. 编译后的ttml,这里编译出来data-event-opts、bindtap跟前面的编译器div => view的原理是差不多,也是在traverse做的ast转换,我们直接看编译后生成的ttml:
- b. 编译后的js的代码:
- 2. 数据同步机制
- 3. diff算法
- 六.对比
- 七.总结
- 七.参考资料
- 总结
前言
uni-app是一个基于Vue.js语法开发小程序的前端框架,开发者通过编写一套代码,可发布到iOS、Android、Web以及各种小程序平台。今天,我们通过相关案例分析uni-app是怎样把Vue.js构建成原生小程序的。
Vue是template、script、style三段式的SFC,uni-app是怎么把SFC拆分成小程序的ttml、ttss、js、json四段式?带着问题,本文将从webpack、编译器、运行时三方面带你了解uni-app是如何构建小程序的。
一.用法
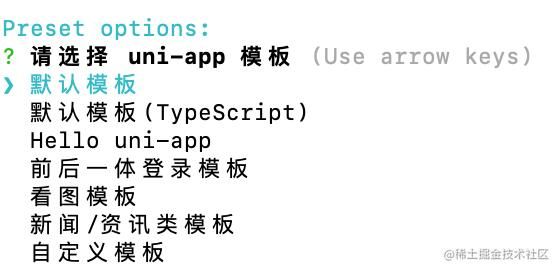
uni-app是基于vue-cli脚手架开发,集成一个远程的Vue Preset
| npm install -g @vue/cli | |
| vue create -p dcloudio/uni-preset-vue my-project |
uni-app目前集成了很多不同的项目模版,可以根据不同的需要,选择不同的模版
运行、发布uni-app,以字节小程序为例
| npm run dev:mp-toutiao | |
| npm run build:mp-toutiao |
二.原理
uni-app是一个比较传统的小程序框架,包括编译器+运行时。 小程序是视图和逻辑层分开的双线程架构,视图和逻辑的加载和运行互不阻塞,同时,逻辑层数据更新会驱动视图层的更新,视图的事件响应,会触发逻辑层的交互。 uni-app的源码主要包括三方面:
- webpack。webpack是前端常用的一个模块打包器,uni-app构建过程中,会将Vue SFC的template、script、style三段式的结构,编译成小程序四段式结构,以字节小程序为例,会得到ttml、ttss、js、json四种文件。
- 编译器。uni-app的编译器本质是把Vue 的视图编译成小程序的视图,即把template语法编译成小程序的ttml语法,之后,uni-app不会维护视图层,视图层的更新完全交给小程序自身维护。但是uni-app是使用Vue进行开发的,那Vue跟小程序是怎么交互的呢?这就依赖于uni-app的运行时。
- 运行时。运行时相当于一个桥梁,打通了Vue和小程序。小程序视图层的更新,比如事件点击、触摸等操作,会经过运行时的事件代理机制,然后到达Vue的事件函数。而Vue的事件函数触发了数据更新,又会重新经过运行时,触发setData,进一步更新小程序的视图层。 备注:本文章阅读的源码是uni-app ^2.0.0-30720210122002版本。
三.webpack
1. package.json
先看package.json scripts命令:
- 注入NODE_ENV和UNI_PLATFORM命令
- 调用vue-cli-service命令,执行uni-build命令
"dev:mp-toutiao": "cross-env NODE_ENV=development UNI_PLATFORM=mp-toutiao vue-cli-service uni-build --watch",
2. 入口
当我们在项目内部运行 vue-cli-service 命令时,它会自动解析并加载 package.json 中列出的所有 CLI 插件,Vue CLI 插件的命名遵循 vue-cli-plugin- 或者 @scope/vue-cli-plugin-的规范,这里主要的插件是@dcloudio/vue-cli-plugin-uni,相关源码:
| module.exports = (api, options) => { | |
| api.registerCommand('uni-build', { | |
| description: 'build for production', | |
| usage: 'vue-cli-service uni-build [options]', | |
| options: { | |
| '--watch': 'watch for changes', | |
| '--minimize': 'Tell webpack to minimize the bundle using the TerserPlugin.', | |
| '--auto-host': 'specify automator host', | |
| '--auto-port': 'specify automator port' | |
| } | |
| }, async (args) => { | |
| for (const key in defaults) { | |
| if (args[key] == null) { | |
| args[key] = defaults[key] | |
| } | |
| } | |
| require('./util').initAutomator(args) | |
| args.entry = args.entry || args._[] | |
| process.env.VUE_CLI_BUILD_TARGET = args.target | |
| // build函数会去获取webpack配置并执行 | |
| await build(args, api, options) | |
| delete process.env.VUE_CLI_BUILD_TARGET | |
| }) | |
| } |
当我们执行UNI_PLATFORM=mp-toutiao vue-cli-service uni-build时,@dcloudio/vue-cli-plugin-uni无非做了两件事:
- 获取小程序的webpack配置。
- 执行uni-build命令时,然后执行webpack。 所以,入口文件其实就是执行webpack,uni-app的webpack配置主要位于@dcloudio/vue-cli-plugin-uni/lib/mp/index.js,接下来我们通过entry、output、loader、plugin来看看uni-app是怎么把Vue SFC转换成小程序的。
3. Entry
uni-app会调用parseEntry去解析pages.json,然后放在process.UNI_ENTRY
| webpackConfig () { | |
| parseEntry(); | |
| return { | |
| entry () { | |
| return process.UNI_ENTRY | |
| } | |
| } | |
| } |
我们看下parseEntry主要代码:
| function parseEntry (pagesJson) { | |
| // 默认有一个入口 | |
| process.UNI_ENTRY = { | |
| 'common/main': path.resolve(process.env.UNI_INPUT_DIR, getMainEntry()) | |
| } | |
| if (!pagesJson) { | |
| pagesJson = getPagesJson() | |
| } | |
| // 添加pages入口 | |
| pagesJson.pages.forEach(page => { | |
| process.UNI_ENTRY[page.path] = getMainJsPath(page.path) | |
| }) | |
| } | |
| function getPagesJson () { | |
| // 获取pages.json进行解析 | |
| return processPagesJson(getJson('pages.json', true)) | |
| } | |
| const pagesJsonJsFileName = 'pages.js' | |
| function processPagesJson (pagesJson) { | |
| const pagesJsonJsPath = path.resolve(process.env.UNI_INPUT_DIR, pagesJsonJsFileName) | |
| if (fs.existsSync(pagesJsonJsPath)) { | |
| const pagesJsonJsFn = require(pagesJsonJsPath) | |
| if (typeof pagesJsonJsFn === 'function') { | |
| pagesJson = pagesJsonJsFn(pagesJson, loader) | |
| if (!pagesJson) { | |
| console.error(`${pagesJsonJsFileName} 必须返回一个 json 对象`) | |
| } | |
| } else { | |
| console.error(`${pagesJsonJsFileName} 必须导出 function`) | |
| } | |
| } | |
| // 检查配置是否合法 | |
| filterPages(pagesJson.pages) | |
| return pagesJson | |
| } | |
| function getMainJsPath (page) { | |
| // 将main.js和page参数组合成出新的入口 | |
| return path.resolve(process.env.UNI_INPUT_DIR, getMainEntry() + '?' + JSON.stringify({ | |
| page: encodeURIComponent(page) | |
| })) | |
| } |
parseEntry的主要工作:
- 配置默认入口main.js
- 解析pages.json,将page作为参数,和main.js组成新的入口 比如,我们的pages.json内容如下:
| { | |
| "pages": [ | |
| { | |
| "path": "pages/index/index", | |
| "style": { | |
| "navigationBarTitleText": "uni-app" | |
| } | |
| } | |
| ], | |
| "globalStyle": { | |
| "navigationBarTextStyle": "black", | |
| "navigationBarTitleText": "uni-app", | |
| "navigationBarBackgroundColor": "#FF8F8", | |
| "backgroundColor": "#FF8F8" | |
| } | |
| } |
然后我们看下输出的enrty,可以发现其实就是通过在main.js带上响应参数来区分page的,这跟vue-loader区分template、script、style其实很像,后面可以通过判断参数,调用不同loader进行处理。
| { | |
| 'common/main': '/Users/src/main.js', | |
| 'pages/index/index': '/Users/src/main.js?{"page":"pages%Findex%2Findex"}' | |
| } |
4. Output
对于输出比较简单,dev和build分别打包到dist/dev/mp-toutiao和dist/build/mp-toutiao
| Object.assign(options, { | |
| outputDir: process.env.UNI_OUTPUT_TMP_DIR || process.env.UNI_OUTPUT_DIR, | |
| assetsDir | |
| }, vueConfig) | |
| webpackConfig () { | |
| return { | |
| output: { | |
| filename: '[name].js', | |
| chunkFilename: '[id].js', | |
| } | |
| } |
5. Alias
uni-app有两个主要的alias配置
- vue$是把vue替换成来uni-app的mp-vue
- uni-pages表示pages.json文件
| resolve: { | |
| alias: { | |
| vue$: getPlatformVue(vueOptions), | |
| 'uni-pages': path.resolve(process.env.UNI_INPUT_DIR, 'pages.json'), | |
| }, | |
| modules: [ | |
| process.env.UNI_INPUT_DIR, | |
| path.resolve(process.env.UNI_INPUT_DIR, 'node_modules') | |
| ] | |
| }, | |
| getPlatformVue (vueOptions) { | |
| if (uniPluginOptions.vue) { | |
| return uniPluginOptions.vue | |
| } | |
| if (process.env.UNI_USING_VUE) { | |
| return '@dcloudio/uni-mp-vue' | |
| } | |
| return '@dcloudio/vue-cli-plugin-uni/packages/mp-vue' | |
| }, |
6. Loader
从上面我们看出entry都是main.js,只不过会带上page的参数,我们从入口开始,看下uni-app是怎么一步步处理文件的,先看下处理main.js的两个loader:lib/main和wrap-loader
| module: { | |
| rules: [{ | |
| test: path.resolve(process.env.UNI_INPUT_DIR, getMainEntry()), | |
| use: [{ | |
| loader: path.resolve(__dirname, '../../packages/wrap-loader'), | |
| options: { | |
| before: [ | |
| 'import \'uni-pages\';' | |
| ] | |
| } | |
| }, { | |
| loader: '@dcloudio/webpack-uni-mp-loader/lib/main' | |
| }] | |
| }] | |
| } |
a. lib/main:
我们看下核心代码,根据resourceQuery参数进行划分,我们主要看下有query的情况,会在这里引入Vue和pages/index/index.vue,同时调用createPage进行初始化,createPage是运行时,后面会讲到。由于引入了.vue,所以之后的解析就交给了vue-loader。
| module.exports = function (source, map) { | |
| this.cacheable && this.cacheable() | |
| if (this.resourceQuery) { | |
| const params = loaderUtils.parseQuery(this.resourceQuery) | |
| if (params && params.page) { | |
| params.page = decodeURIComponent(params.page) | |
| // import Vue from 'vue'是为了触发 vendor 合并 | |
| let ext = '.vue' | |
| return this.callback(null, | |
| ` | |
| import Vue from 'vue' | |
| import Page from './${normalizePath(params.page)}${ext}' | |
| createPage(Page) | |
| `, map) | |
| } | |
| } else {......} | |
| } |
b. wrap-loader:
引入了uni-pages,从alias可知道就是import pages.json,对于pages.json,uni-app也有专门的webpack-uni-pages-loader进行处理。
| module.exports = function (source, map) { | |
| this.cacheable() | |
| const opts = utils.getOptions(this) || {} | |
| this.callback(null, [].concat(opts.before, source, opts.after).join('').trim(), map) | |
| } |
c. webpack-uni-pages-loader:
代码比较多,我们贴下大体的核心代码,看看主要完成的事项
| module.exports = function (content, map) { | |
| // 获取mainfest.json文件 | |
| const manifestJsonPath = path.resolve(process.env.UNI_INPUT_DIR, 'manifest.json') | |
| const manifestJson = parseManifestJson(fs.readFileSync(manifestJsonPath, 'utf')) | |
| // 解析pages.json | |
| let pagesJson = parsePagesJson(content, { | |
| addDependency: (file) => { | |
| (process.UNI_PAGES_DEPS || (process.UNI_PAGES_DEPS = new Set())).add(normalizePath(file)) | |
| this.addDependency(file) | |
| } | |
| }) | |
| const jsonFiles = require('./platforms/' + process.env.UNI_PLATFORM)(pagesJson, manifestJson, isAppView) | |
| if (jsonFiles && jsonFiles.length) { | |
| jsonFiles.forEach(jsonFile => { | |
| if (jsonFile) { | |
| // 对解析到的app.json和project.config.json进行缓存 | |
| if (jsonFile.name === 'app') { | |
| // updateAppJson和updateProjectJson其实就是调用updateComponentJson | |
| updateAppJson(jsonFile.name, renameUsingComponents(jsonFile.content)) | |
| } else { | |
| updateProjectJson(jsonFile.name, jsonFile.content) | |
| } | |
| } | |
| }) | |
| } | |
| this.callback(null, '', map) | |
| } | |
| function updateAppJson (name, jsonObj) { | |
| updateComponentJson(name, jsonObj, true, 'App') | |
| } | |
| function updateProjectJson (name, jsonObj) { | |
| updateComponentJson(name, jsonObj, false, 'Project') | |
| } | |
| // 更新json文件 | |
| function updateComponentJson (name, jsonObj, usingComponents = true, type = 'Component') { | |
| if (type === 'Component') { | |
| jsonObj.component = true | |
| } | |
| if (type === 'Page') { | |
| if (process.env.UNI_PLATFORM === 'mp-baidu') { | |
| jsonObj.component = true | |
| } | |
| } | |
| const oldJsonStr = getJsonFile(name) | |
| if (oldJsonStr) { // update | |
| if (usingComponents) { // merge usingComponents | |
| // 其实直接拿新的 merge 到旧的应该就行 | |
| const oldJsonObj = JSON.parse(oldJsonStr) | |
| jsonObj.usingComponents = oldJsonObj.usingComponents || {} | |
| jsonObj.usingAutoImportComponents = oldJsonObj.usingAutoImportComponents || {} | |
| if (oldJsonObj.usingGlobalComponents) { // 复制 global components(针对不支持全局 usingComponents 的平台) | |
| jsonObj.usingGlobalComponents = oldJsonObj.usingGlobalComponents | |
| } | |
| } | |
| const newJsonStr = JSON.stringify(jsonObj, null,) | |
| if (newJsonStr !== oldJsonStr) { | |
| updateJsonFile(name, newJsonStr) | |
| } | |
| } else { // add | |
| updateJsonFile(name, jsonObj) | |
| } | |
| } | |
| let jsonFileMap = new Map() | |
| function updateJsonFile (name, jsonStr) { | |
| if (typeof jsonStr !== 'string') { | |
| jsonStr = JSON.stringify(jsonStr, null,) | |
| } | |
| jsonFileMap.set(name, jsonStr) | |
| } |
我们通过分步来了解webpack-uni-pages-loader的作用:
- 获取mainfest.json和pages.json的内容
- 分别调用updateAppJson和updateProjectJson处理mainfest.json和page.json
- updateAppJson和updateProjectJson本质都是调用了updateComponentJson,updateComponentJson会更新json文件,最终调用updateJsonFile
- updateJsonFile是json文件生成的关键点。首先会定义一个共享的jsonFileMap键值对象,然后这里并没有直接生成相应的json文件,而是把mainfest.json和page.json处理成project.config和app,然后缓存在jsonFileMap中。
- 这里为什么不直接生成?因为后续pages/index/index.vue里也会有json文件的生成,所以所有的json文件都是暂时缓存在jsonFileMap中,后续由plugin统一生成。 通俗的说,webpack-uni-pages-loader实现的功能就是json语法的转换,还有就是缓存,语法转换很简单,只是对象key value的更改,我们可以直观的对比下mainfest.json和page.json构建前后差异。
| // 转换前的page.json | |
| { | |
| "pages": [ | |
| { | |
| "path": "pages/index/index", | |
| "style": { | |
| "navigationBarTitleText": "uni-app" | |
| } | |
| } | |
| ], | |
| "globalStyle": { | |
| "navigationBarTextStyle": "black", | |
| "navigationBarTitleText": "uni-app", | |
| "navigationBarBackgroundColor": "#FF8F8", | |
| "backgroundColor": "#FF8F8" | |
| } | |
| } | |
| // 转换后得到的app.json | |
| { | |
| "pages": [ | |
| "pages/index/index" | |
| ], | |
| "subPackages": [], | |
| "window": { | |
| "navigationBarTextStyle": "black", | |
| "navigationBarTitleText": "uni-app", | |
| "navigationBarBackgroundColor": "#FF8F8", | |
| "backgroundColor": "#FF8F8" | |
| }, | |
| "usingComponents": {} | |
| } | |
| // 转换前的mainfest.json | |
| { | |
| "name": "", | |
| "appid": "", | |
| "description": "", | |
| "versionName": ".0.0", | |
| "versionCode": "", | |
| "transformPx": true | |
| } | |
| // 转换后得到的project.config.json | |
| { | |
| "setting": { | |
| "urlCheck": true, | |
| "es": false, | |
| "postcss": false, | |
| "minified": false, | |
| "newFeature": true | |
| }, | |
| "appid": "体验appId", | |
| "projectname": "uniapp-analysis" | |
| } |
d. vue-loader:
处理完js和json文件,接下来就到了vue文件的处理,vue-loader会把vue拆分成template、style、script。 对于style,其实就是css,会经过less-loader、sass-loader、postcss-loader、css-loader的处理,最后由mini-css-extract-plugin生成对应的.ttss文件。 对于script,uni-app主要配置了script loader进行处理,该过程主要是将index.vue中引入的组件抽离成index.json,然后也是跟app.json一样,缓存在jsonFileMap数组中。
| { | |
| resourceQuery: /vue&type=script/, | |
| use: [{ | |
| loader: '@dcloudio/webpack-uni-mp-loader/lib/script' | |
| }] | |
| } |
对于template,这是比较核心的模块,uni-app更改了vue-loader的compiler,将vue-template-compiler替换成了uni-template-compiler,uni-template-compiler是用来把vue语法转换为小程序语法的,这里我们可以先记着,后面会讲到是如何编译的。这里我们关注的处理template的loader lib/template 。
| { | |
| resourceQuery: /vue&type=template/, | |
| use: [{ | |
| loader: '@dcloudio/webpack-uni-mp-loader/lib/template' | |
| }, { | |
| loader: '@dcloudio/vue-cli-plugin-uni/packages/webpack-uni-app-loader/page-meta' | |
| }] | |
| } |
loader lib/template首先会去获取vueLoaderOptions,然后添加新的options,小程序这里有一个关键是emitFile,因为vue-loader本身是没有往compiler注入emitFile的,所以compiler编译出来的语法要生成ttml需要有emitFile。
| module.exports = function (content, map) { | |
| this.cacheable && this.cacheable() | |
| const vueLoaderOptions = this.loaders.find(loader => loader.ident === 'vue-loader-options') | |
| Object.assign(vueLoaderOptions.options.compilerOptions, { | |
| mp: { | |
| platform: process.env.UNI_PLATFORM | |
| }, | |
| filterModules, | |
| filterTagName, | |
| resourcePath, | |
| emitFile: this.emitFile, | |
| wxComponents, | |
| getJsonFile, | |
| getShadowTemplate, | |
| updateSpecialMethods, | |
| globalUsingComponents, | |
| updateGenericComponents, | |
| updateComponentGenerics, | |
| updateUsingGlobalComponents | |
| }) | |
| } |
7. plugin
uni-app主要的plugin是createUniMPPlugin,该过程对应了我们loader处理json时生成的jsonFileMap对象,本质就是把jsonFileMap里的json生成真实的文件。
| class WebpackUniMPPlugin { | |
| apply (compiler) { | |
| if (!process.env.UNI_USING_NATIVE && !process.env.UNI_USING_V_NATIVE) { | |
| compiler.hooks.emit.tapPromise('webpack-uni-mp-emit', compilation => { | |
| return new Promise((resolve, reject) => { | |
| // 生成.json | |
| generateJson(compilation) | |
| // 生成app.json、project.config.json | |
| generateApp(compilation) | |
| .forEach(({ | |
| file, | |
| source | |
| }) => emitFile(file, source, compilation)) | |
| resolve() | |
| }) | |
| }) | |
| } |
相关的全局配置变量
| plugins: [ | |
| new webpack.ProvidePlugin({ | |
| uni: [ | |
| '/Users/luojincheng/source code/uniapp-analysis/node_modules/@dcloudio/uni-mp-toutiao/dist/index.js', | |
| 'default' | |
| ], | |
| createPage: [ | |
| '/Users/luojincheng/source code/uniapp-analysis/node_modules/@dcloudio/uni-mp-toutiao/dist/index.js', | |
| 'createPage' | |
| ] | |
| }) | |
| ] |
四. 编译器知一二
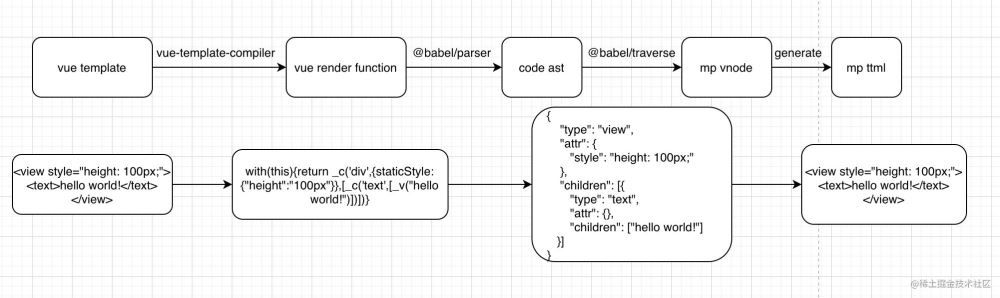
编译器的原理其实就是通过ast的语法分析,把vue的template语法转换为小程序的ttml语法。但这样说其实很抽象,具体是怎么通过ast语法来转换的?接下来,我们通过构建简单版的template=>ttml的编译器,实现div=>view的标签转换,来了解uni-app的编译流程。
<div style="height:px;"><text>hello world!</text></div>
上面这个template经过uni-app编译后会变成下面的代码,看这里只是div => view的替换,但其实中间是走了很多流程的。
<view style="height:px;"><text>hello world!</text></view>
1. vue-template-compiler
首先,template会经过vue的编译器,得到渲染函数render。
| const {compile} = require('vue-template-compiler'); | |
| const {render} = compile(state.vueTemplate); | |
| // 生成的render: | |
| // with(this){return _c('div',{staticStyle:{"height":"px"}},[_c('text',[_v("hello world!")])])} |
2. @babel/parser
这一步是利用parser将render函数转化为ast。ast是Abstract syntax tree的缩写,即抽象语法树。
| const parser = require('@babel/parser'); | |
| const ast = parser.parse(render); |
这里我们过滤掉了一些start、end、loc、errors等会影响我们阅读的字段(完整ast可以通过 astexplorer.net网站查看),看看转译后的ast对象,该json对象我们重点关注program.body[0].expression。 1.type的类型在这里有四种:
- CallExpression(调用表达式):_c()
- StringLiteral(字符串字面量):'div'
- ObjectExpression(对象表达式):'{}'
- ArrayExpression(数组表达式):[_v("hello world!")] 2.callee.name是调用表达式的名称:这里有_c、_v两种 3.arguments.*.value是参数的值:这里有div、text、hello world! 我们把ast对象和render函数对比,不难发现这两个其实是一一对应可逆的关系。
| { | |
| "type": "File", | |
| "program": { | |
| "type": "Program", | |
| }, | |
| "sourceType": "module", | |
| "interpreter": null, | |
| "body": [ | |
| { | |
| "type": "ExpressionStatement", | |
| "expression": { | |
| "callee": { | |
| "type": "Identifier", | |
| "name": "_c" | |
| }, | |
| "arguments": [ | |
| { | |
| "type": "StringLiteral", | |
| "value": "div" | |
| }, | |
| { | |
| "type": "ObjectExpression", | |
| "properties": [ | |
| { | |
| "type": "ObjectProperty", | |
| "method": false, | |
| "key": { | |
| "type": "Identifier", | |
| "name": "staticStyle" | |
| }, | |
| "computed": false, | |
| "shorthand": false, | |
| "value": { | |
| "type": "ObjectExpression", | |
| "properties": [ | |
| { | |
| "type": "ObjectProperty", | |
| "method": false, | |
| "key": { | |
| "type": "StringLiteral", | |
| "value": "height" | |
| }, | |
| "computed": false, | |
| "shorthand": false, | |
| "value": { | |
| "type": "StringLiteral", | |
| "value": "px" | |
| } | |
| } | |
| ] | |
| } | |
| } | |
| ] | |
| }, | |
| { | |
| "type": "ArrayExpression", | |
| "elements": [ | |
| { | |
| "type": "CallExpression", | |
| "callee": { | |
| "name": "_c" | |
| }, | |
| "arguments": [ | |
| { | |
| "type": "StringLiteral", | |
| "value": "text" | |
| }, | |
| { | |
| "type": "ArrayExpression", | |
| "elements": [ | |
| { | |
| "type": "CallExpression", | |
| "callee": { | |
| "type": "Identifier", | |
| "name": "_v" | |
| }, | |
| "arguments": [ | |
| { | |
| "type": "CallExpression", | |
| "callee": { | |
| "type": "Identifier", | |
| "name": "_s" | |
| }, | |
| "arguments": [ | |
| { | |
| "type": "Identifier", | |
| "name": "hello" | |
| } | |
| ] | |
| } | |
| ] | |
| } | |
| ] | |
| } | |
| ] | |
| } | |
| ] | |
| } | |
| ] | |
| } | |
| } | |
| ], | |
| "directives": [] | |
| }, | |
| "comments": [] | |
| } |
3. @babel/traverse和@babel/types
这一步主要是利用traverse对生成的ast对象进行遍历,然后利用types判断和修改ast的语法。 traverse(ast, visitor)主要有两个参数:
- parser解析出来的ast
- visitor:visitor是一个由各种type或者是enter和exit组成的对象。这里我们指定了CallExpression类型,遍历ast时遇到CallExpression类型会执行该函数,把对应的div、img转换为view、image。 其它类型可看文档:babeljs.io/docs/en/bab…
| const t = require('@babel/types') | |
| const babelTraverse = require('@babel/traverse').default | |
| const tagMap = { | |
| 'div': 'view', | |
| 'img': 'image', | |
| 'p': 'text' | |
| }; | |
| const visitor = { | |
| CallExpression (path) { | |
| const callee = path.node.callee; | |
| const methodName = callee.name | |
| switch (methodName) { | |
| case '_c': { | |
| const tagNode = path.node.arguments[]; | |
| if (t.isStringLiteral(tagNode)) { | |
| const tagName = tagMap[tagNode.value]; | |
| tagNode.value = tagName; | |
| } | |
| } | |
| } | |
| } | |
| }; | |
| traverse(ast, visitor); |
4. Generate vnode
uni-app生成小程序的ttml需要先把修改后的ast生成类似vNode的对象,然后再遍历vNode生成ttml。
| const traverse = require('@babel/traverse').default; | |
| traverse(ast, { | |
| WithStatement(path) { | |
| state.vNode = traverseExpr(path.node.body.body[].argument); | |
| }, | |
| }); | |
| // 不同的element走不同的创建函数 | |
| function traverseExpr(exprNode) { | |
| if (t.isCallExpression(exprNode)) { | |
| const traverses = { | |
| _c: traverseCreateElement, | |
| _v: traverseCreateTextVNode, | |
| }; | |
| return traverses[exprNode.callee.name](exprNode); | |
| } else if (t.isArrayExpression(exprNode)) { | |
| return exprNode.elements.reduce((nodes, exprNodeItem) => { | |
| return nodes.concat(traverseExpr(exprNodeItem, state)); | |
| }, []); | |
| } | |
| } | |
| // 转换style属性 | |
| function traverseDataNode(dataNode) { | |
| const ret = {}; | |
| dataNode.properties.forEach((property) => { | |
| switch (property.key.name) { | |
| case 'staticStyle': | |
| ret.style = property.value.properties.reduce((pre, {key, value}) => { | |
| return (pre += `${key.value}: ${value.value};`); | |
| }, ''); | |
| break; | |
| } | |
| }); | |
| return ret; | |
| } | |
| // 创建Text文本节点 | |
| function traverseCreateTextVNode(callExprNode) { | |
| const arg = callExprNode.arguments[]; | |
| if (t.isStringLiteral(arg)) { | |
| return arg.value; | |
| } | |
| } | |
| // 创建element节点 | |
| function traverseCreateElement(callExprNode) { | |
| const args = callExprNode.arguments; | |
| const tagNode = args[]; | |
| const node = { | |
| type: tagNode.value, | |
| attr: {}, | |
| children: [], | |
| }; | |
| if (args.length <) { | |
| return node; | |
| } | |
| const dataNodeOrChildNodes = args[]; | |
| if (t.isObjectExpression(dataNodeOrChildNodes)) { | |
| Object.assign(node.attr, traverseDataNode(dataNodeOrChildNodes)); | |
| } else { | |
| node.children = traverseExpr(dataNodeOrChildNodes); | |
| } | |
| if (args.length <) { | |
| return node; | |
| } | |
| const childNodes = args[]; | |
| if (node.children && node.children.length) { | |
| node.children = node.children.concat(traverseExpr(childNodes)); | |
| } else { | |
| node.children = traverseExpr(childNodes, state); | |
| } | |
| return node; | |
| } |
这里之所以没有使用@babel/generator,是因为使用generator生成的还是render函数,虽然语法已经修改了,但要根据render是没办法直接生成小程序的ttml,还是得转换成vNode。 最好,我们看下生成的VNode对象。
| { | |
| "type": "view", | |
| "attr": { | |
| "style": "height:px;" | |
| }, | |
| "children": [{ | |
| "type": "text", | |
| "attr": {}, | |
| "children": ["hello world!"] | |
| }] | |
| } |
5. Generate code
遍历VNode,递归生成小程序代码
| function generate(vNode) { | |
| if (!vNode) { | |
| return ''; | |
| } | |
| if (typeof vNode === 'string') { | |
| return vNode; | |
| } | |
| const names = Object.keys(vNode.attr); | |
| const props = names.length | |
| ? ' ' + | |
| names | |
| .map((name) => { | |
| const value = vNode.attr[name]; | |
| return `${name}="${value}"`; | |
| }) | |
| .join(' ') | |
| : ''; | |
| const children = vNode.children | |
| .map((child) => { | |
| return generate(child); | |
| }) | |
| .join(''); | |
| return `<${vNode.type}${props}>${children}</${vNode.type}>`; | |
| } |
6. 总体流程:
这里列出了uni-template-compiler大致转换的流程和关键代码,uni-template-compiler的ast语法转换工作都是在traverse这个过程完成的。
| const {compile} = require('vue-template-compiler'); | |
| const parser = require('@babel/parser'); | |
| const traverse = require('@babel/traverse').default; | |
| const t = require('@babel/types'); | |
| const state = { | |
| vueTemplate: '<div style="height:px;"><text>hello world!</text></div>', | |
| mpTemplate: '', | |
| vNode: '', | |
| }; | |
| const tagMap = { | |
| div: 'view', | |
| }; | |
| //.vue template => vue render | |
| const {render} = compile(state.vueTemplate); | |
| //.vue render => code ast | |
| const ast = parser.parse(`function render(){${render}}`); | |
| //.map code ast, modify syntax | |
| traverse(ast, getVisitor()); | |
| //.code ast => mp vNode | |
| traverse(ast, { | |
| WithStatement(path) { | |
| state.vNode = traverseExpr(path.node.body.body[].argument); | |
| }, | |
| }); | |
| //.mp vNode => ttml | |
| state.mpTemplate = generate(state.vNode); | |
| console.log('vue template:', state.vueTemplate); | |
| console.log('mp template:', state.mpTemplate); |
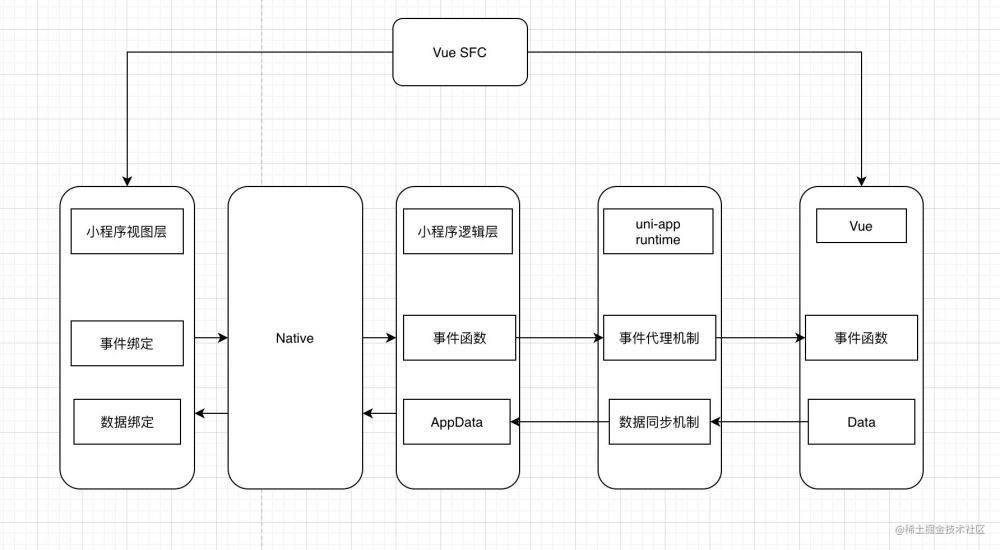
五.运行时的原理
uni-app提供了一个运行时uni-app runtime,打包到最终运行的小程序发行代码中,该运行时实现了Vue.js 和小程序两系统之间的数据、事件同步。
1.事件代理
我们以一个数字增加为例,看看uni-app是怎样把小程序的数据、事件跟vue整合起来的。
| <template> | |
| <div @click="add(); subtract()" @touchstart="mixin($event)">{{ num }}</div> | |
| </template> | |
| <script> | |
| export default { | |
| data() { | |
| return { | |
| num: 0, | |
| num: 0, | |
| } | |
| }, | |
| methods: { | |
| add () { | |
| this.num++; | |
| }, | |
| subtract (num) { | |
| console.log(num) | |
| }, | |
| mixin (e) { | |
| console.log(e) | |
| } | |
| } | |
| } | |
| </script> |
a. 编译后的ttml,这里编译出来data-event-opts、bindtap跟前面的编译器div => view的原理是差不多,也是在traverse做的ast转换,我们直接看编译后生成的ttml:
| <view | |
| data-event-opts="{{ | |
| [ | |
| ['tap',[['add'],['subtract',[]]]], | |
| ['touchstart',[['mixin',['$event']]]] | |
| ] | |
| }}" | |
| bindtap="__e" bindtouchstart="__e" | |
| class="_div"> | |
| {{num}} | |
| </view> |
这里我们先解析一下data-event-opts数组: data-event-opts是一个二维数组,每个子数组代表一个事件类型。子数组有两个值,第一个表示事件类型名称,第二个表示触发事件函数的个数。事件函数又是一个数组,第一个值表述事件函数名称,第二个是参数个数。 ['tap',[['add'],['subtract',[2]]]]表示事件类型为tap,触发函数有两个,一个为add函数且无参数,一个为subtract且参数为2。 ['touchstart',[['mixin',['$event']]]]表示事件类型为touchstart,触发函数有一个为mixin,参数为$event对象。
b. 编译后的js的代码:
| import Vue from 'vue' | |
| import Page from './index/index.vue' | |
| createPage(Page) |
这里其实就是后调用uni-mp-toutiao里的createPage对vue的script部分进行了初始化。 createPage返回小程序的Component构造器,之后是一层层的调用parsePage、parseBasePage、parseComponent、parseBaseComponent,parseBaseComponent最后返回一个Component构造器
| function createPage (vuePageOptions) { | |
| { | |
| return Component(parsePage(vuePageOptions)) | |
| } | |
| } | |
| function parsePage (vuePageOptions) { | |
| const pageOptions = parseBasePage(vuePageOptions, { | |
| isPage, | |
| initRelation | |
| }); | |
| return pageOptions | |
| } | |
| function parseBasePage (vuePageOptions, { | |
| isPage, | |
| initRelation | |
| }) { | |
| const pageOptions = parseComponent(vuePageOptions); | |
| return pageOptions | |
| } | |
| function parseComponent (vueOptions) { | |
| const [componentOptions, VueComponent] = parseBaseComponent(vueOptions); | |
| return componentOptions | |
| } |
我们直接对比转换前后的vue和mp参数差异,本身vue的语法和mp Component的语法就很像。这里,uni-app会把vue的data属性和methods方法copy到mp的data,而且mp的methods主要有__e方法。
回到编译器生成ttml代码,发现所有的事件都会调用__e事件,而__e对应的就是handleEvent事件,我们看下handleEvent:
- 拿到点击元素上的data-event-opts属性:[['tap',[['add'],['subtract',[2]]]],['touchstart',[['mixin',['$event']]]]]
- 根据点击类型获取相应数组,比如bindTap就取['tap',[['add'],['subtract',[2]]]],bindtouchstart就取['touchstart',[['mixin',['$event']]]]
- 依次调用相应事件类型的函数,并传入参数,比如tap调用this.add();this.subtract(2)
| function handleEvent (event) { | |
| event = wrapper$(event); | |
| // [['tap',[['handle',[,2,a]],['handle1',[1,2,a]]]]] | |
| const dataset = (event.currentTarget || event.target).dataset; | |
| const eventOpts = dataset.eventOpts || dataset['event-opts']; // 支付宝 web-view 组件 dataset 非驼峰 | |
| // [['handle',[,2,a]],['handle1',[1,2,a]]] | |
| const eventType = event.type; | |
| const ret = []; | |
| eventOpts.forEach(eventOpt => { | |
| let type = eventOpt[]; | |
| const eventsArray = eventOpt[]; | |
| if (eventsArray && isMatchEventType(eventType, type)) { | |
| eventsArray.forEach(eventArray => { | |
| const methodName = eventArray[]; | |
| if (methodName) { | |
| let handlerCtx = this.$vm; | |
| if (handlerCtx.$options.generic) { // mp-weixin,mp-toutiao 抽象节点模拟 scoped slots | |
| handlerCtx = getContextVm(handlerCtx) || handlerCtx; | |
| } | |
| if (methodName === '$emit') { | |
| handlerCtx.$emit.apply(handlerCtx, | |
| processEventArgs( | |
| this.$vm, | |
| event, | |
| eventArray[], | |
| eventArray[], | |
| isCustom, | |
| methodName | |
| )); | |
| return | |
| } | |
| const handler = handlerCtx[methodName]; | |
| const params = processEventArgs( | |
| this.$vm, | |
| event, | |
| eventArray[], | |
| eventArray[], | |
| isCustom, | |
| methodName | |
| ); | |
| ret.push(handler.apply(handlerCtx, (Array.isArray(params) ? params : []).concat([, , , , , , , , , , event]))); | |
| } | |
| }); | |
| } | |
| }); | |
| } |
2. 数据同步机制
小程序视图层事件响应,会触发小程序逻辑事件,逻辑层会调用vue相应的事件,触发数据更新。那Vue数据更新之后,又是怎样触发小程序视图层更新的呢?
小程序数据更新必须要调用小程序的setData函数,而Vue数据更新的时候会触发Vue.prototype._update方法,所以,只要在_update里调用setData函数就可以了。 uni-app在Vue里新增了patch函数,该函数会在_update时被调用。
| // install platform patch function | |
| Vue.prototype.__patch__ = patch; | |
| var patch = function(oldVnode, vnode) { | |
| var this$ = this; | |
| if (vnode === null) { //destroy | |
| return | |
| } | |
| if (this.mpType === 'page' || this.mpType === 'component') { | |
| var mpInstance = this.$scope; | |
| var data = Object.create(null); | |
| try { | |
| data = cloneWithData(this); | |
| } catch (err) { | |
| console.error(err); | |
| } | |
| data.__webviewId__ = mpInstance.data.__webviewId__; | |
| var mpData = Object.create(null); | |
| Object.keys(data).forEach(function (key) { //仅同步 data 中有的数据 | |
| mpData[key] = mpInstance.data[key]; | |
| }); | |
| var diffData = this.$shouldDiffData === false ? data : diff(data, mpData); | |
| if (Object.keys(diffData).length) { | |
| if (process.env.VUE_APP_DEBUG) { | |
| console.log('[' + (+new Date) + '][' + (mpInstance.is || mpInstance.route) + '][' + this._uid + | |
| ']差量更新', | |
| JSON.stringify(diffData)); | |
| } | |
| this.__next_tick_pending = true | |
| mpInstance.setData(diffData, function () { | |
| this$.__next_tick_pending = false; | |
| flushCallbacks$(this$1); | |
| }); | |
| } else { | |
| flushCallbacks$(this); | |
| } | |
| } | |
| }; |
源代码比较简单,就是比对更新前后的数据,然后获得diffData,最后批量调用setData更新数据。
3. diff算法
小程序数据更新有三种情况
- 类型改变
- 减量更新
- 增量更新
| page({ | |
| data:{ | |
| list:['item','item2','item3','item4'] | |
| }, | |
| change(){ | |
| //.类型改变 | |
| this.setData({ | |
| list: 'list' | |
| }) | |
| }, | |
| cut(){ | |
| //.减量更新 | |
| let newData = ['item', 'item6']; | |
| this.setData({ | |
| list: newData | |
| }) | |
| }, | |
| add(){ | |
| //.增量更新 | |
| let newData = ['item','item6','item7','item8']; | |
| this.data.list.push(...newData); //列表项新增记录 | |
| this.setData({ | |
| list:this.data.list | |
| }) | |
| } | |
| }) |
对于类型替换或者减量更新,我们只要直接替换数据即可,但对于增量更新,如果进行直接数据替换,会有一定的性能问题,比如上面的例子,将item1~item4更新为了item1~item8,这个过程我们需要8个数据全部传递过去,但是实践上只更新了item5~item8。在这种情况下,为了优化性能,我们必须要采用如下写法,手动进行增量更新:
| this.setData({ | |
| list[]: 'item5', | |
| list[]: 'item6', | |
| list[]: 'item7', | |
| list[]: 'item8', | |
| }) |
这种写法的开发体验极差,而且不便于维护,所以uni-app借鉴了westore JSON Diff的原理,在setData时进行了差量更新,下面,让我们通过源码,来了解diff的原理吧。
| function setResult(result, k, v) { | |
| result[k] = v; | |
| } | |
| function _diff(current, pre, path, result) { | |
| if (current === pre) { | |
| // 更新前后无改变 | |
| return; | |
| } | |
| var rootCurrentType = type(current); | |
| var rootPreType = type(pre); | |
| if (rootCurrentType == OBJECTTYPE) { | |
| //.对象类型 | |
| if (rootPreType != OBJECTTYPE || Object.keys(current).length < Object.keys(pre).length) { | |
| //.1数据类型不一致或者减量更新,直接替换 | |
| setResult(result, path, current); | |
| } else { | |
| var loop = function (key) { | |
| var currentValue = current[key]; | |
| var preValue = pre[key]; | |
| var currentType = type(currentValue); | |
| var preType = type(preValue); | |
| if (currentType != ARRAYTYPE && currentType != OBJECTTYPE) { | |
| //.2.1 处理基础类型 | |
| if (currentValue != pre[key]) { | |
| setResult(result, (path == '' ? '' : path + '.') + key, currentValue); | |
| } | |
| } else if (currentType == ARRAYTYPE) { | |
| //.2.2 处理数组类型 | |
| if (preType != ARRAYTYPE) { | |
| // 类型不一致 | |
| setResult(result, (path == '' ? '' : path + '.') + key, currentValue); | |
| } else { | |
| if (currentValue.length < preValue.length) { | |
| // 减量更新 | |
| setResult(result, (path == '' ? '' : path + '.') + key, currentValue); | |
| } else { | |
| // 增量更新则递归 | |
| currentValue.forEach(function (item, index) { | |
| _diff(item, preValue[index], (path == '' ? '' : path + '.') + key + '[' + index + ']', result); | |
| }); | |
| } | |
| } | |
| } else if (currentType == OBJECTTYPE) { | |
| //.2.3 处理对象类型 | |
| if (preType != OBJECTTYPE || Object.keys(currentValue).length < Object.keys(preValue).length) { | |
| // 类型不一致/减量更新 | |
| setResult(result, (path == '' ? '' : path + '.') + key, currentValue); | |
| } else { | |
| // 增量更新则递归 | |
| for (var subKey in currentValue) { | |
| _diff( | |
| currentValue[subKey], | |
| preValue[subKey], | |
| (path == '' ? '' : path + '.') + key + '.' + subKey, | |
| result | |
| ); | |
| } | |
| } | |
| } | |
| }; | |
| //.2遍历对象/数据类型 | |
| for (var key in current) loop(key); | |
| } | |
| } else if (rootCurrentType == ARRAYTYPE) { | |
| //.数组类型 | |
| if (rootPreType != ARRAYTYPE) { | |
| // 类型不一致 | |
| setResult(result, path, current); | |
| } else { | |
| if (current.length < pre.length) { | |
| // 减量更新 | |
| setResult(result, path, current); | |
| } else { | |
| // 增量更新则递归 | |
| current.forEach(function (item, index) { | |
| _diff(item, pre[index], path + '[' + index + ']', result); | |
| }); | |
| } | |
| } | |
| } else { | |
| //.基本类型 | |
| setResult(result, path, current); | |
| } | |
| }, |
- 当数据发生改变时,uni-app会将新旧数据进行比对,然后获得差量更新的数据,调用setData更新。
- 通过cur === pre进行判断,相同则直接返回。
- 通过type(cur) === OBJECTTYPE进行对象判断:
- 若pre不是OBJECTTYPE或者cur长度少于pre,则是类型改变或者减量更新,调用setResult直接添加新数据。
- 否则执行增量更新逻辑:
- 遍历cur,对每个key批量调用loop函数进行处理。
- 若currentType不是ARRAYTYPE或者OBJECTTYPE,则是类型改变,调用setResult直接添加新数据。
- 若currentType是ARRAYTYPE:
- 若preType不是ARRAYTYPE,或者currentValue长度少于preValue,则是类型改变或者减量更新,调用setResult直接添加新数据。
- 否则执行增量更新逻辑,遍历currentValue,执行_diff进行递归。
- 若currentType是OBJECTTYPE:
- 若preType不是OBJECTTYPE或者currentValue长度少于preValue,则是类型改变或者减量更新,调用setResult直接添加新数据。
- 否则执行增量更新逻辑,遍历currentValue,执行_diff进行递归。
- 通过type(cur) === ARRAYTYPE进行数组判断:
- 若preType不是OBJECTTYPE或者currentValue长度少于preValue,则是类型改变或者减量更新,调用setResult直接添加新数据。
- 否则执行增量更新逻辑,遍历currentValue,执行_diff进行递归。
- 若以上三个判断居不成立,则判断是基础类型,调用setResult添加新数据。 小结:_diff的过程,主要进行对象、数组和基础类型的判断。只有基本类型、类型改变、减量更新会进行setResult,否则进行遍历递归_diff。
六.对比
uni-app是编译型的框架,虽然目前市面上运行型的框架层出不穷,比如Rax 运行时/Remax/Taro Next。对比这些,uni-app这类编译型的框架的劣势在于语法支持,运行型的框架几乎没有语法限制,而uni-app因为ast的复杂度和可转换性,导致部分语法无法支持。但是运行时也有缺点,运行型用的是小程序的模版语法template,而uni-app采用Component构造器,使用Component的好处就是原生框架可以知道页面的大体结构,而template模版渲染无法做到,同时,运行型框架数据传输量大,需要将数据转换成VNode传递个视图层,这也是运行型性能损耗的原因。
七.总结
七.参考资料
uni-app官网
前端搞跨端跨栈|保哥-如何打磨 uni-app 跨端框架的高性能和易用性 · 语雀
前端搞跨端跨栈|JJ-如何借助 Taro Next 横穿跨端业务线 · 语雀
在 2020 年,谈小程序框架该如何选择