引子
① VsCode 集成 Sass ✅
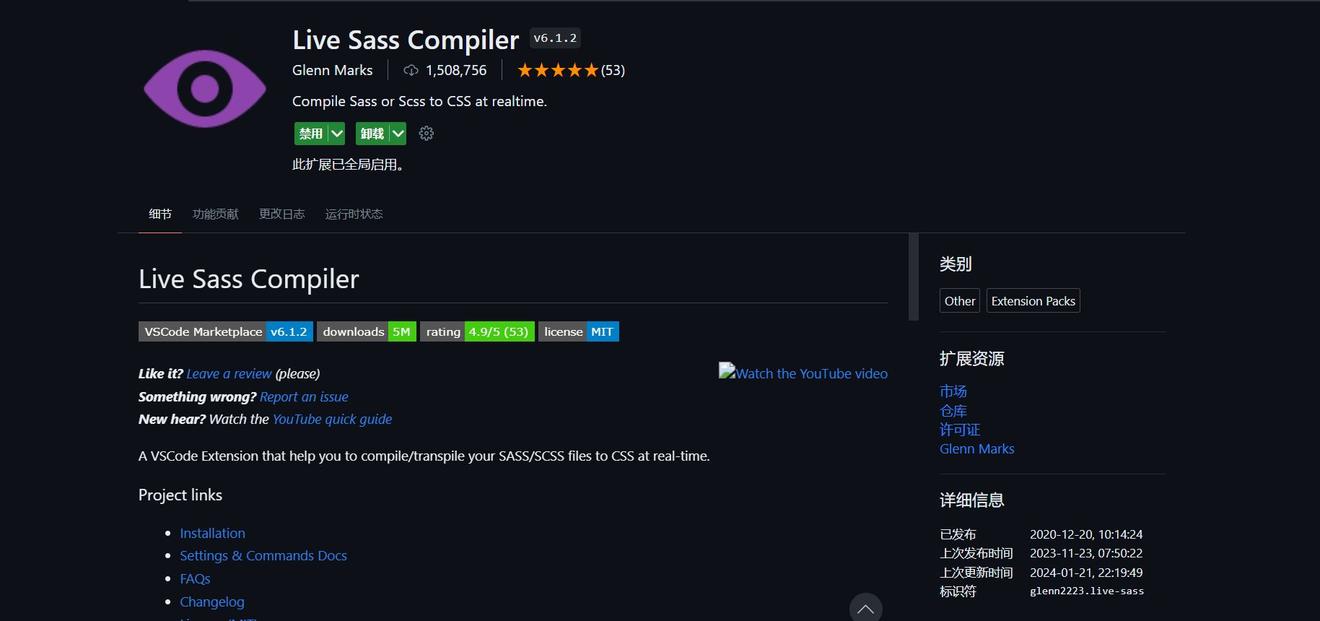
1.1 安装 Live Sass Compiler 插件
Live Sass Compiler 是一个用于实时编译和自动刷新 SCSS 文件的 VS Code 插件。
1.2 点击该页的设置按钮
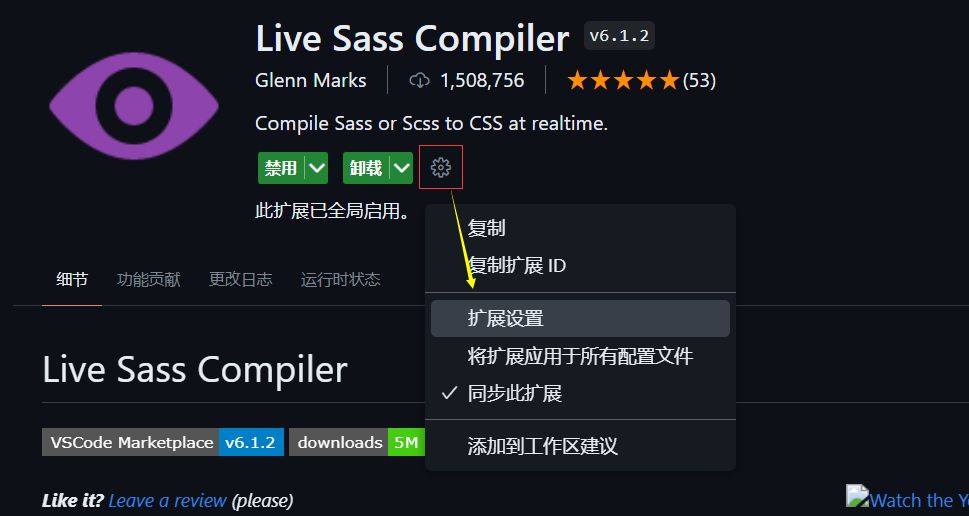
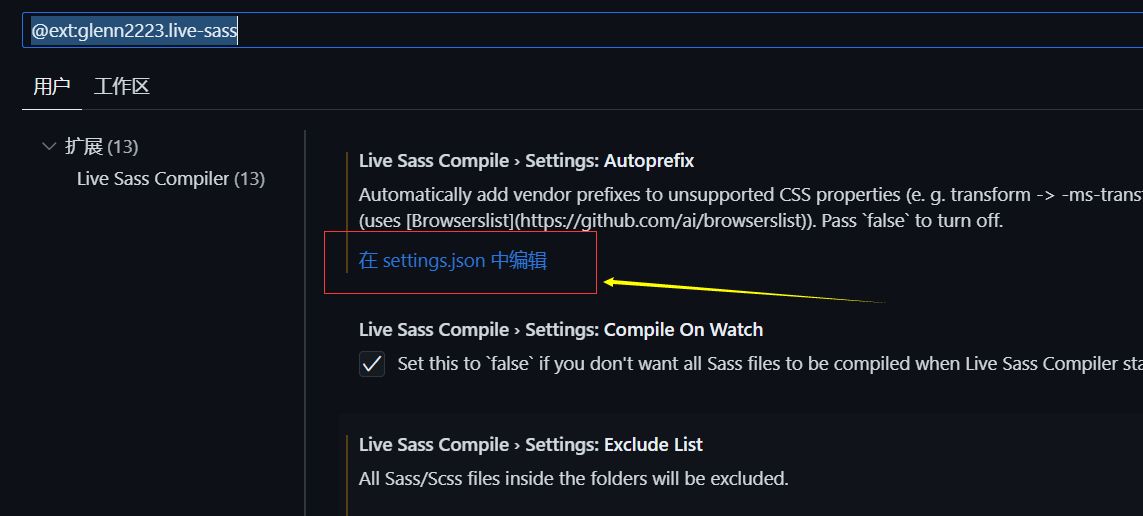
1.3 进行配置
| "liveSassCompile.settings.autoprefix": [ | |
| "> 1%", | |
| "last 2 versions" | |
| ], | |
| "liveSassCompile.settings.formats": [ | |
| { | |
| "format": "expanded", | |
| "extensionName": ".css", | |
| "savePath": "~/../css" | |
| } | |
| ], | |
| "liveSassCompile.settings.excludeList": [ | |
| "/**/node_modules/**", | |
| "/.vscode/**" | |
| ], | |
| "liveSassCompile.settings.generateMap": true, | |
"liveSassCompile.settings.autoprefix": 自动添加 CSS 前缀的配置。设置为使用最新的两个版本和全球使用率超过 1% 的浏览器。
"liveSassCompile.settings.formats": 编译输出格式的配置。这里设置为将编译后的 CSS 文件保存为扩展名为 .css 的文件,并指定保存路径为 ~/../css。【~/../css 指的是当前文件所在文件夹的上一文件夹下的css文件见】
"liveSassCompile.settings.excludeList": 排除列表的配置。
"liveSassCompile.settings.generateMap": 是否生成 CSS Source Map 文件的配置。
1.4 初体验
- 创建 css、sass、index.html
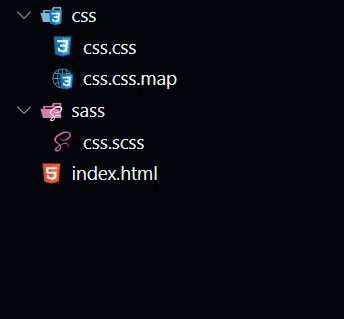
- 在 sass / css.scss 文件下编写
| $baseColor: red; | |
| p { | |
| color: $baseColor; | |
| display: flex; | |
| } |
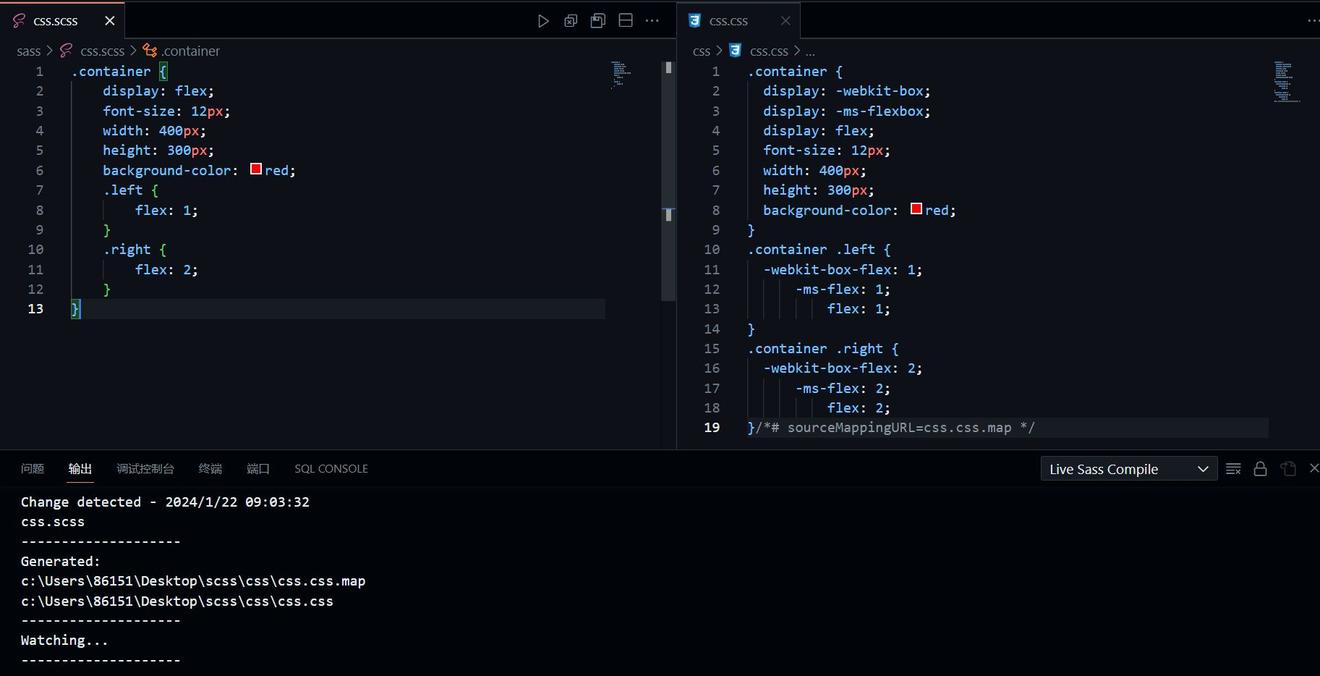
- 点击,之后会生成 css.css 文件于 css 文件夹

- 这就是生成的 css 文件,注意 index.html 中样式文件就是引入该文件
② Sass 语法扩张 ✅
2.1 选择器嵌套
index.scss
| .container{ | |
| .left { | |
| background-color: blue; | |
| } | |
| .right { | |
| background-color: green; | |
| } | |
| } |
转为 css 后
index.css
| .container .left { | |
| background-color: blue; | |
| } | |
| .container .right { | |
| background-color: green; | |
| } | |
| /*# sourceMappingURL=index.css.map */ |
2.2 父选择器 &
基础的使用
动态类名
| .button { | |
| &-primary { | |
| background-color: blue; | |
| } | |
| &-secondary { | |
| background-color: green; | |
| } | |
| } |
转为 css 后
index.css
| .button-primary { | |
| background-color: blue; | |
| } | |
| .button-secondary { | |
| background-color: green; | |
| } | |
| /*# sourceMappingURL=index.css.map */ |
结合 & 和伪类选择器
| .button { | |
| &:hover { | |
| background-color: red; | |
| } | |
| &:active { | |
| background-color: #ccc; | |
| } | |
| } |
转为 css 后
index.css
| .button:hover { | |
| background-color: red; | |
| } | |
| .button:active { | |
| background-color: #ccc; | |
| } | |
| /*# sourceMappingURL=index.css.map */ |
使用 & 与其它选择器组合,创建多重选择器
| .button { | |
| &.large { | |
| font-size: 20px; | |
| } | |
| } |
转为 css 后
index.css
| .button.large { | |
| font-size: 20px; | |
| } | |
| /*# sourceMappingURL=index.css.map */ |
使用 &::before 或 &::after 定义伪元素的样式
| .button { | |
| &::before { | |
| content: '>'; | |
| } | |
| } |
转为 css 后
index.css
| .button::before { | |
| content: ">"; | |
| } | |
| /*# sourceMappingURL=index.css.map */ |
在嵌套结构中使用@at-root指令生成平级的选择器
| .parent { | |
| font: { | |
| weight: 900; | |
| } | |
| .good { | |
| background-color: blue; | |
| } | |
| .child { | |
| color: red; | |
| .sub { | |
| color: blue; | |
| @at-root .new-selector { | |
| color: red; | |
| } | |
| } | |
| } | |
| } |
转为 css 后
index.css
| .parent { | |
| font-weight: 900; | |
| } | |
| .parent .good { | |
| background-color: blue; | |
| } | |
| .parent .child { | |
| color: red; | |
| } | |
| .parent .child .sub { | |
| color: blue; | |
| } | |
| .new-selector { | |
| color: red; | |
| } | |
| /*# sourceMappingURL=index.css.map */ |
2.3 属性嵌套
可以使用嵌套来组织 CSS 属性
语法
| .container { | |
| width: 100%; | |
| height: 200px; | |
| padding: { | |
| top: 10px; | |
| right: 20px; | |
| bottom: 10px; | |
| left: 20px; | |
| } | |
| font: { | |
| weight: bold; | |
| size: 16px; | |
| family: Arial, sans-serif; | |
| } | |
| } |
转为 css 后
index.css
| .container { | |
| width: 100%; | |
| height: 200px; | |
| padding-top: 10px; | |
| padding-right: 20px; | |
| padding-bottom: 10px; | |
| padding-left: 20px; | |
| font-weight: bold; | |
| font-size: 16px; | |
| font-family: Arial, sans-serif; | |
| } | |
| /*# sourceMappingURL=index.css.map */ |
2.4 占位符选择器 %foo
2.4.1 占位符选择器 %foo 有什么好处
继承样式
通过 @extend 关键字,它可以把占位符选择器变成样式的基础,避免了无穷无尽的重复编写相似的样式规则,就像是给代码穿上了可维护性的外套。避免生成多余的 CSS代码
使用占位符选择器,它不会变成实际的CSS选择器,只有在被@extend引用的时候才会真正起作用。这样一来,就减少了生成的CSS文件的大小,让页面加载性能变得轻盈如鸟。不需要多余的CSS代码。
避免与其他选择器冲突
占位符选择器的命名以%开头,与常规的CSS类选择器不同。这样可以避免与其他选择器冲突,减少样式命名的可能性。
2.4.2 %foo 的基础使用
咱们使用占位符选择器的使用用来定义按钮的基本样式,然后将其继承给 3 种类型的按钮
| %button-base { | |
| display: inline-block; | |
| padding: 10px 20px; | |
| font-size: 16px; | |
| text-align: center; | |
| text-decoration: none; | |
| border: 1px solid #000; | |
| color: #000; | |
| background-color: #fff; | |
| } | |
| .button-primary { | |
| @extend %button-base; | |
| background-color: #007bff; | |
| color: #fff; | |
| } | |
| .button-secondary { | |
| @extend %button-base; | |
| background-color: #6c757d; | |
| color: #fff; | |
| } | |
| .button-success { | |
| @extend %button-base; | |
| background-color: #28a745; | |
| color: #fff; | |
| } |
转为 css 后
index.css
| .button-success, .button-secondary, .button-primary { | |
| display: inline-block; | |
| padding: 10px 20px; | |
| font-size: 16px; | |
| text-align: center; | |
| text-decoration: none; | |
| border: 1px solid #000; | |
| color: #000; | |
| background-color: #fff; | |
| } | |
| .button-primary { | |
| background-color: #007bff; | |
| color: #fff; | |
| } | |
| .button-secondary { | |
| background-color: #6c757d; | |
| color: #fff; | |
| } | |
| .button-success { | |
| background-color: #28a745; | |
| color: #fff; | |
| } | |
| /*# sourceMappingURL=index.css.map */ |
③ Sass 代码注释 ✅
多行注释
| /* | |
| 多行注释 | |
| */ |
单行注释
// 单行注释
④ Sass 变量 ✅
4.1 css 中变量的定义与使用
| /* | |
| `:root` 伪类选择器用于选择文档根元素,对于 HTML 文档来说,它选择的是 `<html>` 元素。在这里,它定义了全局的 `CSS` 变量。 | |
| */ | |
| :root { | |
| --color: red; | |
| } | |
| /* | |
| `body` 选择器选择了页面的 `<body>` 元素,这里定义了其他全局的 `CSS` 变量。 | |
| */ | |
| body { | |
| --border-color: #ccc; | |
| } | |
| /* | |
| `.header` 选择器选择了页面的 .header 类元素,这里定义了 header 元素区域的 `CSS` 变量 | |
| */ | |
| .header { | |
| --background-color: #f2f2f2; | |
| } |
4.2 Sass 变量的定义
定义规则
- 变量以
$开头,后跟变量名 - 变量名是不以数字开头的可包含字母、数字、下划线、横线(连接符)
注意:连接符与下划线定义的同名变量为同一变量
| $font-size: 14px; | |
| $font_size: 20px; | |
| .container { | |
| font-size: $font-size; | |
| } |
4.2 Sass 变量的作用域
- 全局作用域 在 Sass 文件的任何地方定义的变量都具有全局作用域,可以在整个文件中访问和使用。这意味着在文件的任何位置都可以使用该变量,包括嵌套的规则块内部。
- 局部作用域 局部作用域是指在特定的规则块内部定义的变量,只能在该规则块内部使用。这些变量在规则块外部是不可见的。当规则块嵌套时,内部规则块可以访问外部规则块的变量,但外部规则块无法访问内部规则块的变量。
| $color: red; // 全局作用域 | |
| body { | |
| $size: 16px; // 局部作用域 | |
| font-size: $size; | |
| .container { | |
| color: $color; // 可以访问全局变量 | |
| width: $width; // 错误,无法访问外部规则块的变量 | |
| } | |
| } |
全局作用域的另一种定义方法
在局部作用域中定义一个变量时,它默认只在当前作用域内有效。但是,如果希望将该变量声明为全局变量,可以在变量赋值语句的末尾添加 !global 标志。
| $color: red; // 全局变量 | |
| body { | |
| $size: 16px; // 局部变量 | |
| font-size: $size; | |
| .container { | |
| $color: blue !global; // 声明为全局变量 | |
| color: $color; // 使用全局变量 | |
| } | |
| } |
4.3 Sass 变量值类型
Sass 支持 6 种主要的数据类型
- 数字::1、2、10px
- 字符串(有引用与无引用字符串):“foo”、‘bar’、car
- 颜色:blue、#000、rgba(0, 0, 0, .5)
- 布尔值
- 空值:null
- list:用空格或逗号作分隔符,1.5em 1em 0 2em,Helvetica, Arial, sans-serif
- maps, 相当于 JavaScript 的 object,(key1:value1, key2:value2)
| $layer-index: 10; | |
| $border-width: 3px; | |
| $font-base-family: 'Open Sans' , Helvetica, Sans-serif; | |
| $top-bg-color: rgba(255, 147, 29, 0.6); | |
| $block-mode: true; | |
| $var: null; | |
| $color-map: (color1: red, color2: #ccc, color3: pink); | |
| $fonts: (serif: 'Helvetica Neue', monospace: "Consolas"); | |
| .container { | |
| $font-size: 16px !global; | |
| font-size: $font-size; | |
| @if $block-mode { | |
| background-color: #000; | |
| } | |
| @else { | |
| background-color: #fff; | |
| } | |
| content: type-of($var); | |
| content: length($var); | |
| color: map-get($color-map, color2); | |
| } | |
| .footer { | |
| font-size: $font-size; | |
| } | |
| .wrap { | |
| font: 18px bold map-get($fonts, "sans"); // 如果没找到 key ,就为空 | |
| } |
转为 css 后
index.css
| .container { | |
| font-size: 16px; | |
| background-color: #000; | |
| content: null; | |
| content: 1; | |
| color: #ccc; | |
| } | |
| .footer { | |
| font-size: 16px; | |
| } | |
| .wrap { | |
| font: 18px bold; | |
| } | |
| /*# sourceMappingURL=01-scss的语法扩张.css.map */ |
4.3 Sass 变量值的默认值设置
| $color: #ccc; | |
| $color: #333 !default; | |
| .container { | |
| border-color: $color; | |
| } |
⑤ Sass 导入@import ✅
5.1 css 中的导入方法
@import url('public.css');
5.2 Sass 中使用
public.scss
$border-color: red;
index.scss
| @import 'public.scss'; | |
| border: 1px solid $border-color; |
5.3 注意事项
如下的几种方式将不会导入任何 Sass 文件
文件拓展名是 .css
@import "public.css";
文件名是以 http:// 开头
@import "http://xxx.com/xxx";
使用的是 url()
@import url(public.scss);
@import 包含了媒体查询
@import 'landscape' screen and (orientation:landscape);
5.4 局部文件的概念
如果不希望 _public.scss 文件被 Sass 检测到并编译成 CSS,可以将文件名改为以 下划线 开头的形式,例如 _public.scss。这是 Sass 的约定,以此命名的文件会被视为局部文件,不会被直接编译成独立的 CSS 文件。
当你在其他 Sass 文件中使用 @import 导入 _public.scss 文件时,只会将其中的变量和混合器等内容引入到当前文件中,而不会生成额外的 CSS 输出。
例如,在另一个 Sass 文件中导入 _public.scss 文件:
| @import 'path/to/_public.scss'; | |
| /* | |
| 在这里可以使用 _public.scss 中定义的变量和混合器 | |
| */ |
⑥ Sass 混合指令(Mixin Directives)✅
⑦ Sass @extend 继承指令 ✅
Sass 的 @extend 指令用于实现样式的继承。通过 @extend,可以将一个选择器的样式规则继承到另一个选择器中,从而避免重复编写相似的样式
7.1 单继承
index.scss
| .alert { | |
| padding: 15px; | |
| margin-bottom: 20px; | |
| border: 1px solid transparent; | |
| font-size: 12px; | |
| } | |
| .alert-info { | |
| @extend .alert; | |
| color: blue; | |
| background-color: #BDBEEA; | |
| border-color: #fafafa; | |
| } | |
| .alert-success { | |
| @extend .alert; | |
| color: green; | |
| background-color: #B1EBB6; | |
| border-color: #fafafa; | |
| } | |
| .alert-warning { | |
| @extend .alert; | |
| color: orange; | |
| background-color: #E8CEA1; | |
| border-color: #fafafa; | |
| } | |
| .alert-danger { | |
| @extend .alert; | |
| color: red; | |
| background-color: #EAABAD; | |
| border-color: #fafafa; | |
| } |
转为 css 后
index.css
| .alert, .alert-danger, .alert-warning, .alert-success, .alert-info { | |
| padding: 15px; | |
| margin-bottom: 20px; | |
| border: 1px solid transparent; | |
| font-size: 12px; | |
| } | |
| .alert-info { | |
| color: blue; | |
| background-color: #BDBEEA; | |
| border-color: #fafafa; | |
| } | |
| .alert-success { | |
| color: green; | |
| background-color: #B1EBB6; | |
| border-color: #fafafa; | |
| } | |
| .alert-warning { | |
| color: orange; | |
| background-color: #E8CEA1; | |
| border-color: #fafafa; | |
| } | |
| .alert-danger { | |
| color: red; | |
| background-color: #EAABAD; | |
| border-color: #fafafa; | |
| } | |
| /*# sourceMappingURL=index.css.map */ |
7.2 多继承
index.scss
| .message { | |
| padding: 15px; | |
| margin-top: 100px; | |
| border: 1px solid transparent; | |
| } | |
| .important { | |
| @extend .message; | |
| font-weight: 800; | |
| font-size: 14px; | |
| } | |
| .message-danger { | |
| @extend .important; | |
| background-color: #000; | |
| border-color:#B1EBB6; | |
| } |
转为 css 后
index.css
| .message, .important, .message-danger { | |
| padding: 15px; | |
| margin-top: 100px; | |
| border: 1px solid transparent; | |
| } | |
| .important, .message-danger { | |
| font-weight: 800; | |
| font-size: 14px; | |
| } | |
| .message-danger { | |
| background-color: #000; | |
| border-color: #B1EBB6; | |
| } | |
| /*# sourceMappingURL=index.css.map */ |
7.3 占位符 %
%message,它是一个占位符选择器。占位符选择器不会生成实际的 CSS 输出,只有在被继承时才会生成对应的样式规则。
index.scss
| %message { | |
| padding: 15px; | |
| margin-top: 100px; | |
| border: 1px solid transparent; | |
| } | |
| .important { | |
| @extend %message; | |
| font-weight: 800; | |
| font-size: 14px; | |
| } | |
| .message-danger { | |
| @extend .important; | |
| background-color: #000; | |
| border-color:#B1EBB6; | |
| } |
转为 css 后
index.css
| .important, .message-danger { | |
| padding: 15px; | |
| margin-top: 100px; | |
| border: 1px solid transparent; | |
| } | |
| .important, .message-danger { | |
| font-weight: 800; | |
| font-size: 14px; | |
| } | |
| .message-danger { | |
| background-color: #000; | |
| border-color: #B1EBB6; | |
| } | |
| /*# sourceMappingURL=index.css.map */ |
⑧ Sass 运算符的基本使用 ✅
8.1 等号操作符
所有数据类型都支持等号运算符
==、!=
| $them: "dark"; | |
| .container { | |
| @if $them == 'dark' { | |
| background-color: #000; | |
| color: #fff; | |
| font: { | |
| weight: 400; | |
| size: 12px; | |
| } | |
| } | |
| @else { | |
| background-color: #fff; | |
| color: #000; | |
| font: { | |
| weight: 500; | |
| size: 14px; | |
| } | |
| } | |
| } |
转为 css 后
index.css
| .container { | |
| background-color: #000; | |
| color: #fff; | |
| font-weight: 400; | |
| font-size: 12px; | |
| } | |
| /*# sourceMappingURL=index.css.map */ |
8.1 关系(比较)运算符
关系运算符只支持整数这一数据类型
< 、> 、<=、>=
| $them: 1; | |
| .container { | |
| @if $them >= 1 { | |
| background-color: #000; | |
| } | |
| @else { | |
| background-color: #fff; | |
| } | |
| } |
8.2 逻辑运算符
and、or、not
| $width: 100; | |
| $height: 200; | |
| $last: false; | |
| div { | |
| @if $width > 50 and $height < 300 { | |
| font-size: 16px; | |
| } | |
| @else { | |
| font-size: 14px; | |
| } | |
| @if not $last { | |
| border-color: red; | |
| } | |
| @else { | |
| border-color: blue; | |
| } | |
| } |
转为 css 后
| div { | |
| font-size: 16px; | |
| border-color: red; | |
| } | |
| /*# sourceMappingURL=index.css.map */ |
8.3 数字操作符
sass 中支持的数字类型有哪些呢?
纯数字、百分号、css 部分单位
可以使用如下操作符作为运算
+、-、*、/、%
8.3.1 +
| .container { | |
| width: 50 + 20; | |
| width: 50 + 20%; | |
| width: 50% + 20%; | |
| width: 50 + 20px; | |
| width: 50px + 20px; | |
| width: 50px + 20pt; | |
| } |
转为 css 后
| .container { | |
| width: 70; | |
| width: 70%; | |
| width: 70%; | |
| width: 70px; | |
| width: 70px; | |
| width: 76.6666666667px; | |
| } | |
| /*# sourceMappingURL=index.css.map */ |
8.3.2 -
| .container { | |
| width: 50 + 20; | |
| width: 50 - 20%; | |
| width: 50% - 20%; | |
| width: 50 - 20px; | |
| width: 50px - 20px; | |
| width: 50px - 20pt; | |
| } |
转为 css 后
| .container { | |
| width: 70; | |
| width: 30%; | |
| width: 30%; | |
| width: 30px; | |
| width: 30px; | |
| width: 23.3333333333px; | |
| } | |
| /*# sourceMappingURL=index.css.map */ |
8.3.3 *
| .container { | |
| width: 10 * 20; | |
| width: 5 * 10%; | |
| // width: 10% * 10%; ❌ | |
| // width: 10px * 10px; ❌ | |
| width: 10px * 2; | |
| } |
转为 css 后
| .container { | |
| width: 200; | |
| width: 50%; | |
| width: 20px; | |
| }/*# sourceMappingURL=index.css.map */ |
8.3.4 /
/ 运算符只有在某些特殊情况下才会当作是运算符,不然就是一个普通的分隔符。
以下 3 种情况,/ 将被视为除法运算符号
- 如果值或值的一部分,是变量或者函数的返回值
- 如果值被圆括号包裹
- 如果值是算数表达式的一部分
| $width: 100px; | |
| .container { | |
| width: 10 / 5; | |
| width: (10 / 5); | |
| width: $width / 5; | |
| width: round($number: 50) / 2; | |
| width: 10px / 2px; | |
| width: 10px / 2px + 3px; | |
| width: 10px / 2 + 3px; | |
| } |
转为 css 后
| .container { | |
| width: 10/5; | |
| width: 2; | |
| width: 20px; | |
| width: 25; | |
| width: 10px/2px; | |
| width: 8px; | |
| width: 8px; | |
| } | |
| /*# sourceMappingURL=index.css.map */ |
8.3.5 %
| $width: 100px; | |
| .container { | |
| width: 10 % 5; | |
| width: 50 % 3px; | |
| width: 50px % 3px; | |
| width: 50% / 7; | |
| width: 50px % 7; | |
| width: 50% % 9%; | |
| // width: 50% % 10px; ❌ | |
| width: 50px % 10pt; // => 等价于 50px % 13.33333px | |
| width: 50px + 10pt; // => 10pt = 13.33333px | |
| width: 50px % 13.33333px; | |
| } |
转为 css 后
| .container { | |
| width: 0; | |
| width: 2px; | |
| width: 2px; | |
| width: 50%/7; | |
| width: 1px; | |
| width: 5%; | |
| width: 10px; | |
| width: 63.3333333333px; | |
| width: 10.00001px; | |
| } | |
| /*# sourceMappingURL=index.css.map */ |
8.4 字符串运算
+ 可用于连接字符串
注意:如果有引号字符串(位于 + 左侧)连接无引号字符串,运算结果式有引号的,相反,无引号字符串(位于 + 左侧)连接有引号字符串,运算结果则没有引号。
| $width: 100px; | |
| .container { | |
| content: "foo" + bar; | |
| content: foo + "bar"; | |
| content: foo + bar; | |
| content: "foo" + "bar"; | |
| } |
转为 css 后
| .container { | |
| content: "foobar"; | |
| content: foobar; | |
| content: foobar; | |
| content: "foobar"; | |
| } | |
| /*# sourceMappingURL=index.css.map */ |
⑨ 插值语句 #{ … } 的基本使用 ✅
可以用于
- 选择器
- 属性名
- 属性值
- 注释
| $class-name: danger; | |
| $attr: color; | |
| $font-size: 12px; | |
| $line-height: 30px; | |
| $author: "一勺"; | |
| /* | |
| 文件说明 | |
| @author: #{$author} | |
| */ | |
| a.#{$class-name} { | |
| border-#{$attr}: #f00; | |
| font: #{$font-size} / #{$line-height} Helvetica; | |
| } |
转为 css 后
| @charset "UTF-8"; | |
| /* | |
| 文件说明 | |
| @author: 一勺 | |
| */ | |
| a.danger { | |
| border-color: #f00; | |
| font: 12px/30px Helvetica; | |
| } | |
| /*# sourceMappingURL=index.css.map */ |