目录
- 计数器
- 信号量
- 滑动窗口
- 漏桶
- 令牌桶
- 测试
- 示例代码
计数器
计数器限流方式比较粗暴,一次访问就增加一次计数,在系统内设置每 N 秒的访问量,超过访问量的访问直接丢弃,从而实现限流访问。
具体大概是以下步骤:
- 将时间划分为固定的窗口大小,例如 1 s;
- 在窗口时间段内,每来一个请求,对计数器加 1;
- 当计数器达到设定限制后,该窗口时间内的后续请求都将被丢弃;
- 该窗口时间结束后,计数器清零,从新开始计数。
这种算法的弊端
在开始的时间,访问量被使用完后,1 s 内会有很长时间的真空期是处于接口不可用的状态的,同时也有可能在一秒内出现两倍的访问量。
T窗口的前1/2时间 无流量进入,后1/2时间通过5个请求;
- T+1窗口的前 1/2时间 通过5个请求,后1/2时间因达到限制丢弃请求。
- 因此在 T的后1/2和(T+1)的前1/2时间组成的完整窗口内,通过了10个请求。
代码实现
 private final Semaphore count = new Semaphore();
 @PostConstruct
    public void init() {
        //初始化定时任务线程池
        ScheduledExecutorService service = new ScheduledThreadPoolExecutor(, t -> {
            Thread thread = new Thread(t);
            thread.setName("limit");
            return thread;
        });
        // 每s执行5次
        service.scheduleAtFixedRate(() -> count.release(), 10, 10, TimeUnit.SECONDS);
  }
 	/**
     * 计数器限流
     */
    public void count() {
        try {
            count.acquire();
            System.out.println("count");
        } catch (InterruptedException e) {
            e.printStackTrace();
        }
    }
信号量
控制并发访问量
具体大概是以下步骤:
- 初始化信号量
- 每个请求获取信号量,请求完释放
代码实现
private final Semaphore flag = new Semaphore();
	/**
 * 信号量限流
 */
public void flag() {
    try {
        flag.acquire();
        System.out.println("flag");
        int i = new Random().nextInt();
        TimeUnit.SECONDS.sleep(i);
    } catch (InterruptedException e) {
        e.printStackTrace();
    } finally {
        flag.release();
    }
}
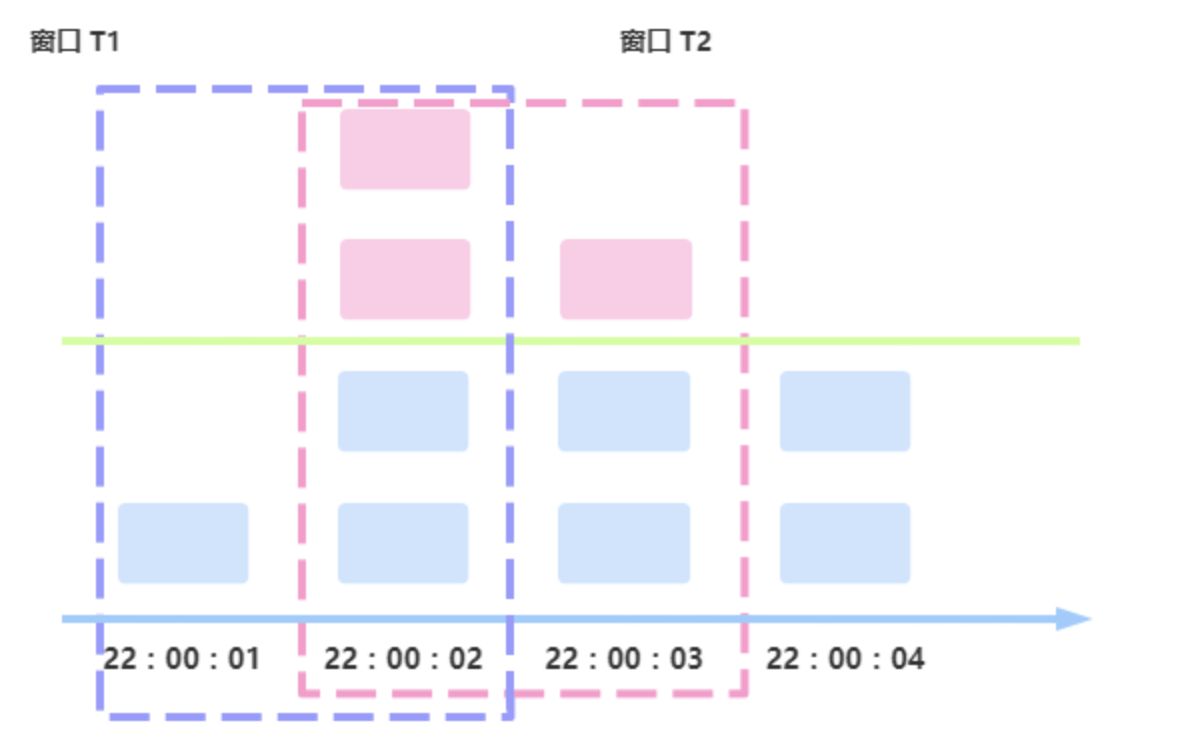
滑动窗口
具体大概是以下步骤:
- 将时间划分为细粒度的区间每个区间
- 维持一个计数器,每进入一个请求则将计数器加一;
- 多个区间组成一个时间窗口,每流逝一个区间时间后,则抛弃最老的一个区间,纳入新区间。如图中示例的窗口 T1 变为窗口 T2;
- 若当前窗口的区间计数器总和超过设定的限制数量,则本窗口内的后续请求都被丢弃。
代码实现
  private final AtomicInteger[] window = new AtomicInteger[];
 @PostConstruct
    public void init() {
        //初始化定时任务线程池
        ScheduledExecutorService service = new ScheduledThreadPoolExecutor(, t -> {
            Thread thread = new Thread(t);
            thread.setName("limit");
            return thread;
        });
        //个窗口,每次滑动1s
        Arrays.fill(window, new AtomicInteger());
        service.scheduleAtFixedRate(() -> {
            int index = (int) (System.currentTimeMillis() / % 10);
            window[index] = new AtomicInteger();
        },, 1, TimeUnit.SECONDS);
}
 /**
 * 滑动窗口
 */
public void window() {
    int sum =;
    for (int i =; i < window.length; i++) {
        sum += window[i].get();
    }
    if (sum >) {
        return;
    }
    System.out.println("window");
    int index = (int) (System.currentTimeMillis() / % 10);
    window[index].getAndAdd();
}
漏桶
具体大概是以下步骤:
- 初始化一个队列,做桶
- 每个请求入队列,队列满则阻塞
- 启动定时任务,以固定的速率执行,执行时判读一下入队时间,如果延迟太久,直接丢弃(有可能客户端已经超时,服务端还没有处理)
代码实现
 private final BlockingQueue<Long> queue = new LinkedBlockingDeque<>();
  @PostConstruct
public void init() {
    //初始化定时任务线程池
    ScheduledExecutorService service = new ScheduledThreadPoolExecutor(, t -> {
        Thread thread = new Thread(t);
        thread.setName("limit");
        return thread;
    });
    // 一恒定的速率执行
    service.scheduleAtFixedRate(() -> {
        try {
            if (System.currentTimeMillis() - queue.take() >L) {
                process();
            }
        } catch (InterruptedException e) {
            e.printStackTrace();
        }
    },, 100, TimeUnit.MILLISECONDS);
}
	/**
 * 漏桶限流
 */
public void bucket() {
    try {
        queue.put(System.currentTimeMillis());
    } catch (InterruptedException e) {
        e.printStackTrace();
    }
}
private void process() {
    System.out.println("process");
}
令牌桶
令牌桶算法是漏斗算法的改进版,为了处理短时间的突发流量而做了优化,令牌桶算法主要由三部分组成:令牌流、数据流、令牌桶。
名词释义:
- 令牌桶:流通令牌的管道,用于生成的令牌的流通,放入令牌桶中。
- 数据流:进入系统的数据流量。
- 令牌桶:保存令牌的区域,可以理解为一个缓冲区,令牌保存在这里用于使用。
具体大概是以下步骤:
- 初始化一个队列做桶,大小为通的大小
- 启动定时任务,以一定的速率往队列中放入令牌
- 每个请求来临,去队列中获取令牌,获取成功正执行,否则阻塞
代码实现
private final BlockingQueue<Integer> token = new LinkedBlockingDeque<>();
@PostConstruct
public void init() {
    //初始化定时任务线程池
    ScheduledExecutorService service = new ScheduledThreadPoolExecutor(, t -> {
        Thread thread = new Thread(t);
        thread.setName("limit");
        return thread;
    });
    // 以恒定的速率放入令牌
    service.scheduleAtFixedRate(() -> {
        try {
            token.put();
        } catch (InterruptedException e) {
            e.printStackTrace();
        }
    },, 1, TimeUnit.SECONDS);
}
public void token() {
    try {
        token.take();
        System.out.println("token");
    } catch (InterruptedException e) {
        e.printStackTrace();
    }
}
测试
  @Resource
private LimitDemo demo;
@Test
public void count() throws InterruptedException {
    process(() -> demo.count());
}
@Test
public void flag() throws InterruptedException {
    process(() -> demo.flag());
}
@Test
public void window() throws InterruptedException {
    process(() -> demo.window());
}
@Test
public void bucket() throws InterruptedException {
    process(() -> demo.bucket());
}
@Test
public void token() throws InterruptedException {
    process(() -> demo.token());
}
private void process(Process process) throws InterruptedException {
    CompletableFuture<?>[] objects = IntStream.range(, 10).mapToObj(i -> CompletableFuture.runAsync(() -> {
        while (true) {
            process.execute();
        }
    })).collect(Collectors.toList()).toArray(new CompletableFuture<?>[] {});
    CompletableFuture.allOf(objects);
    new CountDownLatch().await();
}
@FunctionalInterface
public interface Process {
    void execute();
}
示例代码
源码地址 https://github.com/googalAmbition/googol/tree/master/limit