目录
- 一、为什么要封装axios
- 二、怎么封装axios
- 三、具体步骤
- vue项目的前期配置
- 配置config文件中的代理地址
- 封装axios实例-request.js
- 四、封装请求-http.js
- 五、正式封装API用于发送请求-api.js
- 六、如何在vue文件中调用
一、为什么要封装axios
api统一管理,不管接口有多少,所有的接口都可以非常清晰,容易维护。
通常我们的项目会越做越大,页面也会越来越多,如果页面非常的少,直接用axios也没有什么大的影响,那页面组件多了起来,上百个接口呢,这个时候后端改了接口,多加了一个参数什么的呢?那就只有找到那个页面,进去修改,整个过程很繁琐,不易于项目的维护和迭代。
这个时候如果我们统一的区管理接口,需要修改某一个接口的时候直接在api里修改对应的请求,是不是很方便呢?因为我们用的最多的还是get post请求,我们就可以针对封装。
二、怎么封装axios
1. 拿到项目和后端接口,首先要配置全局代理;
2. 接着全局封装axios和request.js;
3. 过滤axios请求方式,控制路径,参数的格式,http.js;
4. 正式封装api.js;
5. 页面调用;
三、具体步骤
vue项目的前期配置
1. 终端输入
npm i axios -S
2. 在项目中 main.js 文件中输入
import axios from "axios";
配置config文件中的代理地址
修改项目中config目录下的index.js文件。【也可能是vue.config.js 文件】
| // Template version: 1.3.1 | |
| // see http://vuejs-templates.github.io/webpack for documentation. | |
| const path = require('path') | |
| module.exports = { | |
| dev: { | |
| // Paths | |
| assetsSubDirectory: 'static', | |
| assetsPublicPath: '/', | |
| proxyTable: { | |
| '/': { | |
| target: 'http://localhost:8080', | |
| changeOrigin: true, | |
| pathRewrite: { | |
| '^/': '' | |
| } | |
| }, | |
| '/ws/*': { | |
| target: 'ws://127.0.0.1:8080', | |
| ws: true | |
| } | |
| }, | |
| // Various Dev Server settings | |
| host: 'localhost', // can be overwritten by process.env.HOST | |
| port: 8082, // can be overwritten by process.env.PORT, if port is in use, a free one will be determined | |
| autoOpenBrowser: false, | |
| errorOverlay: true, | |
| notifyOnErrors: true, | |
| poll: false, // https://webpack.js.org/configuration/dev-server/#devserver-watchoptions- | |
| // Use Eslint Loader? | |
| // If true, your code will be linted during bundling and | |
| // linting errors and warnings will be shown in the console. | |
| useEslint: true, | |
| // If true, eslint errors and warnings will also be shown in the error overlay | |
| // in the browser. | |
| showEslintErrorsInOverlay: false, | |
| /** | |
| * Source Maps | |
| */ | |
| // https://webpack.js.org/configuration/devtool/#development | |
| devtool: 'cheap-module-eval-source-map', | |
| // If you have problems debugging vue-files in devtools, | |
| // set this to false - it *may* help | |
| // https://vue-loader.vuejs.org/en/options.html#cachebusting | |
| cacheBusting: true, | |
| cssSourceMap: true | |
| }, | |
| build: { | |
| // Template for index.html | |
| index: path.resolve(__dirname, '../dist/index.html'), | |
| // Paths | |
| assetsRoot: path.resolve(__dirname, '../dist'), | |
| assetsSubDirectory: 'static', | |
| assetsPublicPath: '/', | |
| /** | |
| * Source Maps | |
| */ | |
| productionSourceMap: true, | |
| // https://webpack.js.org/configuration/devtool/#production | |
| devtool: '#source-map', | |
| // Gzip off by default as many popular static hosts such as | |
| // Surge or Netlify already gzip all static assets for you. | |
| // Before setting to `true`, make sure to: | |
| // npm install --save-dev compression-webpack-plugin | |
| productionGzip: false, | |
| productionGzipExtensions: ['js', 'css'], | |
| // Run the build command with an extra argument to | |
| // View the bundle analyzer report after build finishes: | |
| // `npm run build --report` | |
| // Set to `true` or `false` to always turn it on or off | |
| bundleAnalyzerReport: process.env.npm_config_report | |
| } | |
| } |
封装axios实例-request.js
| /**** request.js ****/ | |
| // 导入axios | |
| import axios from 'axios' | |
| // 使用element-ui Message做消息提醒 | |
| import { Message} from 'element-ui'; | |
| //1. 创建新的axios实例, | |
| const service = axios.create({ | |
| // 公共接口--这里注意后面会讲 | |
| baseURL: process.env.BASE_API, | |
| // 超时时间 单位是ms,这里设置了3s的超时时间 | |
| timeout: 3 * 1000 | |
| }) | |
| // 2.请求拦截器 | |
| service.interceptors.request.use(config => { | |
| //发请求前做的一些处理,数据转化,配置请求头,设置token,设置loading等,根据需求去添加 | |
| config.data = JSON.stringify(config.data); //数据转化,也可以使用qs转换 | |
| config.headers = { | |
| 'Content-Type':'application/json' //配置请求头 | |
| } | |
| //如有需要:注意使用token的时候需要引入cookie方法或者用本地localStorage等方法,推荐js-cookie | |
| //const token = getCookie('名称');//这里取token之前,你肯定需要先拿到token,存一下 | |
| //if(token){ | |
| //config.params = {'token':token} //如果要求携带在参数中 | |
| //config.headers.token= token; //如果要求携带在请求头中 | |
| //} | |
| return config | |
| }, error => { | |
| Promise.reject(error) | |
| }) | |
| // 3.响应拦截器 | |
| service.interceptors.response.use(response => { | |
| //接收到响应数据并成功后的一些共有的处理,关闭loading等 | |
| return response | |
| }, error => { | |
| /***** 接收到异常响应的处理开始 *****/ | |
| if (error && error.response) { | |
| // 1.公共错误处理 | |
| // 2.根据响应码具体处理 | |
| switch (error.response.status) { | |
| case 400: | |
| error.message = '错误请求' | |
| break; | |
| case 401: | |
| error.message = '未授权,请重新登录' | |
| break; | |
| case 403: | |
| error.message = '拒绝访问' | |
| break; | |
| case 404: | |
| error.message = '请求错误,未找到该资源' | |
| window.location.href = "/NotFound" | |
| break; | |
| case 405: | |
| error.message = '请求方法未允许' | |
| break; | |
| case 408: | |
| error.message = '请求超时' | |
| break; | |
| case 500: | |
| error.message = '服务器端出错' | |
| break; | |
| case 501: | |
| error.message = '网络未实现' | |
| break; | |
| case 502: | |
| error.message = '网络错误' | |
| break; | |
| case 503: | |
| error.message = '服务不可用' | |
| break; | |
| case 504: | |
| error.message = '网络超时' | |
| break; | |
| case 505: | |
| error.message = 'http版本不支持该请求' | |
| break; | |
| default: | |
| error.message = `连接错误${error.response.status}` | |
| } | |
| } else { | |
| // 超时处理 | |
| if (JSON.stringify(error).includes('timeout')) { | |
| Message.error('服务器响应超时,请刷新当前页') | |
| } | |
| error.message = '连接服务器失败' | |
| } | |
| Message.error(error.message) | |
| /***** 处理结束 *****/ | |
| //如果不需要错误处理,以上的处理过程都可省略 | |
| return Promise.resolve(error.response) | |
| }) | |
| //4.导入文件 | |
| export default service |
四、封装请求-http.js
| /**** http.js ****/ | |
| // 导入封装好的axios实例 | |
| import request from './request' | |
| const http ={ | |
| /** | |
| * methods: 请求 | |
| * @param url 请求地址 | |
| * @param params 请求参数 | |
| */ | |
| get(url,params){ | |
| const config = { | |
| method: 'get', | |
| url:url | |
| } | |
| if(params) config.params = params | |
| return request(config) | |
| }, | |
| post(url,params){ | |
| const config = { | |
| method: 'post', | |
| url:url | |
| } | |
| if(params) config.data = params | |
| return request(config) | |
| }, | |
| put(url,params){ | |
| const config = { | |
| method: 'put', | |
| url:url | |
| } | |
| if(params) config.params = params | |
| return request(config) | |
| }, | |
| delete(url,params){ | |
| const config = { | |
| method: 'delete', | |
| url:url | |
| } | |
| if(params) config.params = params | |
| return request(config) | |
| } | |
| } | |
| //导出 | |
| export default http | |
五、正式封装API用于发送请求-api.js
| import request from "@/utils/request.js"; | |
| import qs from "qs"; | |
| const baseUrl = '/api/jwt/auth' | |
| //登录 | |
| export function authCodeLogin(params) { | |
| return request({ | |
| url: baseUrl + "/authCodeLogin/" + params.code, | |
| method: "get", | |
| }); | |
| } | |
| //退出 | |
| export function authLogout(params) { | |
| return request({ | |
| url: baseUrl + "/logout", | |
| method: "get", | |
| }); | |
| } | |
| //获取用户数据 | |
| export function getUserInfo(params) { | |
| return request({ | |
| url: baseUrl + "/getUserInfo", | |
| method: "get", | |
| params:qs.stringfy(params) | |
| }); | |
| } | |
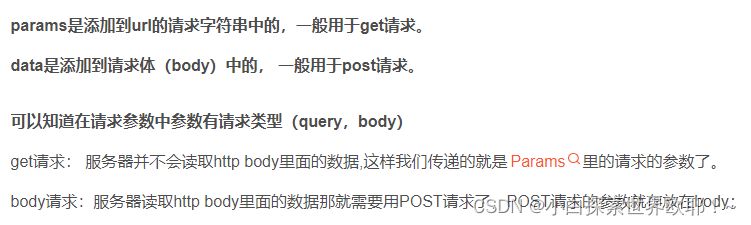
| //其实,也不一定就是params,也可以是 query 还有 data 的呀! | |
| //params是添加到url的请求字符串中的,用于get请求。会将参数加到 url后面。所以,传递的都是字符串。无法传递参数中含有json格式的数据 | |
| //而data是添加到请求体(body)中的, 用于post请求。添加到请求体(body)中,json 格式也是可以的。 |
六、如何在vue文件中调用
用到哪个api 就调用哪个接口
| import { authCodeLogin } from '@/api/api.js' | |
| getModellogin(code){ | |
| let params = { | |
| code: code, | |
| } | |
| authCodeLogin(params).then(res=>{ | |
| if (res.code === 200) { | |
| localStorage.clear() | |
| // 菜单 | |
| this.$store.dispatch('saveMenu', []) | |
| // this.getFloorMenu() | |
| // this.getmenu() | |
| this.$router.push('/') | |
| }else{ | |
| console.log('error'); | |
| } | |
| }) | |
| }, |