实战:在Java中实现常用网络I/O模型
Java从初创之日起,就是为网络而生的。随着互联网应用的发展,Java也被越来越多的企业所采用。本节演示了如何基于Java实现常用网络I/O模型。
Java OIO
早期的Java提供java.net包用于开发网络应用,这类API也被称为Java OIO(Old-blocking I/O,阻塞I/O)。以下演示使用java.net包及java.io来开发Echo协议的客户端及服务器的过程。
Echo协议是指把接收到的消息按照原样返回,其主要用于检测和调试网络。这个协议可以基于TCP/UDP用于服务器检测端口7有无消息。
1.实战:开发Echo协议的服务器
以下是使用原生java.net包来开发Echo协议的服务器的示例。
| package com.waylau.java.demo.net; | |
| import java.io.BufferedReader; | |
| import java.io.IOException; | |
| import java.io.InputStreamReader; | |
| import java.io.PrintWriter; | |
| import java.net.ServerSocket; | |
| import java.net.Socket; | |
| public class BlockingEchoServer { | |
| public static int DEFAULT_PORT =; | |
| /** | |
| * @param args | |
| */ | |
| public static void main(String[] args) { | |
| int port; | |
| try { | |
| port = Integer.parseInt(args[]); | |
| } catch (RuntimeException ex) { | |
| port = DEFAULT_PORT;} | |
| ServerSocket serverSocket = null; | |
| try { | |
| // 服务器监听 | |
| serverSocket = new ServerSocket(port); | |
| System.out.println( | |
| "BlockingEchoServer已启动,端口:" + port); | |
| } catch (IOException e) { | |
| System.out.println( | |
| "BlockingEchoServer启动异常,端口:" + port); | |
| System.out.println(e.getMessage()); | |
| } | |
| // Java try-with-resource语句 | |
| try ( | |
| // 接受客户端建立链接,生成Socket实例 | |
| Socket clientSocket = serverSocket.accept(); | |
| PrintWriter out = | |
| new PrintWriter(clientSocket.getOutputStream(), true); | |
| // 接收客户端的消息 | |
| BufferedReader in = | |
| new BufferedReader( | |
| new InputStreamReader( | |
| clientSocket.getInputStream()));) { | |
| String inputLine; | |
| while ((inputLine = in.readLine()) != null) { | |
| // 发送消息给客户端 | |
| out.println(inputLine); | |
| System.out.println("BlockingEchoServer -> " | |
| + clientSocket.getRemoteSocketAddress() + ":" + inputLine); | |
| } | |
| } catch (IOException e) { | |
| System.out.println( | |
| "BlockingEchoServer异常!" + e.getMessage()); | |
| } | |
| } | |
| } |
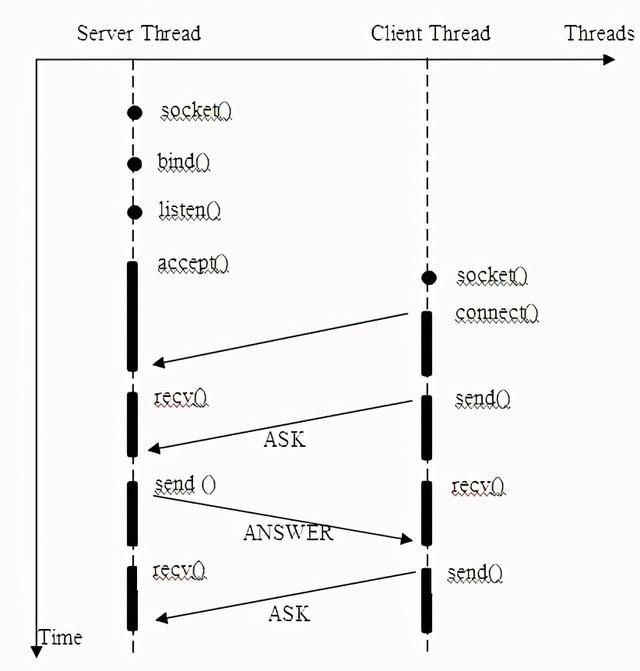
上述例子BlockingEchoServer实现了Echo协议。BlockingEchoServer使用了java.net包中的Socket和ServerSocket类库,这两个类库主要用于开发基于TCP的应用。如果想要开发UDP的应用,则需要使用DatagramSocket类。
ServerSocket用于服务器端,而Socket是建立网络连接时使用的。在客户端连接服务器成功时,客户端和服务器端都会产生一个Socket实例,通过操作这个实例,来完成所需的会话。对于一个网络连接来说,Socket是平等的,并没有差别,不因为在服务器端或在客户端而产生不同的级别,不管是Socket还是ServerSocket,它们的工作都是通过Socket类和其子类来完成的。
运行BlockingEchoServer,可以看到控制台输出内容如下。
BlockingEchoServer已启动,端口:
2.实战:开发Echo协议的客户端
以下是使用原生java.net包来开发Echo协议的客户端的示例。
| package com.waylau.java.demo.net; | |
| import java.io.BufferedReader; | |
| import java.io.IOException; | |
| import java.io.InputStreamReader; | |
| import java.io.PrintWriter; | |
| import java.net.Socket; | |
| import java.net.UnknownHostException; | |
| public class BlockingEchoClient { | |
| /** | |
| * @param args | |
| */ | |
| public static void main(String[] args) { | |
| if (args.length !=) { | |
| System.err.println( | |
| "用法: java BlockingEchoClient <host name> <port number>"); | |
| System.exit(); | |
| } | |
| String hostName = args[]; | |
| int portNumber = Integer.parseInt(args[]); | |
| try ( | |
| Socket echoSocket = new Socket(hostName, portNumber); | |
| PrintWriter out = | |
| new PrintWriter(echoSocket.getOutputStream(), true); | |
| BufferedReader in = | |
| new BufferedReader( | |
| new InputStreamReader(echoSocket.getInputStream())); | |
| BufferedReader stdIn = | |
| new BufferedReader( | |
| new InputStreamReader(System.in)) | |
| ) { | |
| String userInput; | |
| while ((userInput = stdIn.readLine()) != null) { | |
| out.println(userInput); | |
| System.out.println("echo: " + in.readLine()); | |
| } | |
| } catch (UnknownHostException e) { | |
| System.err.println("不明主机,主机名为: " + hostName); | |
| System.exit(); | |
| } catch (IOException e) { | |
| System.err.println("不能从主机中获取I/O,主机名为:" + | |
| hostName);System.exit(); | |
| } | |
| } | |
| } |
BlockingEchoClient的Socket的使用与BlockingEchoServer的Socket的使用基本类似。如果你本地的JDK版本是11以上,则可以跳过编译阶段直接运行源代码,命令如下。
$ java BlockingEchoClient.java localhost
从JDK 11开始,可以直接运行启动Java源代码文件。有关Java的最新特性,可见笔者所著的《Java核心编程》。
当BlockingEchoClient客户端与BlockingEchoServer服务器建立了连接之后,客户端就可以与服务器进行交互了。
当我们在客户端输入“a”字符时,服务器也会将“a”发送回客户端,客户端输入的任何内容,服务器也会原样返回。
BlockingEchoServer控制台输出内容如下。
| BlockingEchoServer已启动,端口: | |
| BlockingEchoServer -> /.0.0.1:52831:a | |
| BlockingEchoServer -> /.0.0.1:52831:hello waylau |
3.java.net包API的缺点
BlockingEchoClient和BlockingEchoServer代码只是一个简单的示例,如果要创建一个复杂的客户端/服务器协议,仍然需要大量的样板代码,并且要求开发人员必须掌握相当多的底层技术细节才能使它整个流畅地运行起来。Socket和ServerSocket类库的API只支持由本地系统套接字库提供的所谓的阻塞函数,因此客户端与服务器的通信是阻塞的,并且要求每个新加入的连接,必须在服务器中创建一个新的Socket实例。这极大消耗了服务器的性能,并且也使得连接数受到了限制。
BlockingEchoClient客户端与BlockingEchoServer服务器所实现的方式是阻塞的。
那么Java是否可以实现非阻塞的I/O程序呢?答案是肯定的。
Java NIO
从Java 1.4开始,Java提供了NIO(New I/O),用来替代标准JavaI/O API(3.5.1小节所描述的早期的Java网络编程API)。Java NIO也被称为“Non-blocking I/O”,提供了非阻塞I/O的方式,用法与标准I/O有非常大的差异。
Java NIO提供了以下3个核心概念。
·通道(Channel)和缓冲区(Buffer):标准的I/O是基于字节流和字符流进行操作的,而NIO是基于通道和缓冲区进行操作的,数据总是从通道读取到缓冲区,或者从缓冲区写入通道。
·非阻塞I/O(Non-blocking I/O):Java NIO可以让你非阻塞地使用I/O,例如,当线程从通道读取数据到缓冲区时,线程还可以进行其他事情。当数据被写入缓冲区时,线程可以继续处理它。从缓冲区写入通道也类似。
·选择器(Selector):Java NIO引入了选择器的概念,选择器用于监听多个通道的事件(比如连接打开、数据到达)。因此,单个的线程可以监听多个数据通道,这极大提升了单机的并发能力。
Java NIO API位于java.nio包下。下面介绍Java NIO版本实现的支持Echo协议的客户端及服务器。
1.实战:开发NIO版本的Echo服务器
下面是使用原生Java NIO API来开发Echo协议的服务器的示例。package com.waylau.java.demo.nio;
| import java.io.IOException; | |
| import java.net.InetSocketAddress; | |
| import java.nio.ByteBuffer; | |
| import java.nio.channels.SelectionKey; | |
| import java.nio.channels.Selector; | |
| import java.nio.channels.ServerSocketChannel; | |
| import java.nio.channels.SocketChannel; | |
| import java.util.Iterator; | |
| import java.util.Set; | |
| public class NonBlockingEchoServer { | |
| public static int DEFAULT_PORT =; | |
| /** | |
| * @param args | |
| */ | |
| public static void main(String[] args) { | |
| int port; | |
| try { | |
| port = Integer.parseInt(args[]); | |
| } catch (RuntimeException ex) { | |
| port = DEFAULT_PORT; | |
| } | |
| ServerSocketChannel serverChannel; | |
| Selector selector; | |
| try { | |
| serverChannel = ServerSocketChannel.open(); | |
| InetSocketAddress address = new InetSocketAddress(port); | |
| serverChannel.bind(address); | |
| serverChannel.configureBlocking(false); | |
| selector = Selector.open(); | |
| serverChannel.register(selector, SelectionKey.OP_ACCEPT); | |
| System.out.println("NonBlockingEchoServer已启动,端口:" + port); | |
| } catch (IOException ex) { | |
| ex.printStackTrace(); | |
| return; | |
| } | |
| while (true) { | |
| try { | |
| selector.select(); | |
| } catch (IOException e) { | |
| System.out.println("NonBlockingEchoServer异常!" + e.getMessage()); | |
| } | |
| Set<SelectionKey> readyKeys = selector.selectedKeys(); | |
| Iterator<SelectionKey> iterator = readyKeys.iterator(); | |
| while (iterator.hasNext()) { | |
| SelectionKey key = iterator.next(); | |
| iterator.remove(); | |
| try { | |
| // 可连接 | |
| if (key.isAcceptable()) { | |
| ServerSocketChannel server = | |
| (ServerSocketChannel) key.channel(); | |
| SocketChannel client = server.accept(); | |
| System.out.println("NonBlockingEchoServer接受客户端的连接:" | |
| + client); | |
| // 设置为非阻塞 | |
| client.configureBlocking(false);// 客户端注册到Selector | |
| SelectionKey clientKey = client.register(selector, | |
| SelectionKey.OP_WRITE | SelectionKey.OP_READ); | |
| // 分配缓存区 | |
| ByteBuffer buffer = ByteBuffer.allocate(); | |
| clientKey.attach(buffer); | |
| } | |
| // 可读 | |
| if (key.isReadable()) { | |
| SocketChannel client = (SocketChannel) key.channel(); | |
| ByteBuffer output = (ByteBuffer) key.attachment(); | |
| client.read(output); | |
| System.out.println(client.getRemoteAddress() | |
| + " -> NonBlockingEchoServer:" + output.toString()); | |
| key.interestOps(SelectionKey.OP_WRITE); | |
| } | |
| // 可写 | |
| if (key.isWritable()) { | |
| SocketChannel client = (SocketChannel) key.channel(); | |
| ByteBuffer output = (ByteBuffer) key.attachment(); | |
| output.flip(); | |
| client.write(output); | |
| System.out.println("NonBlockingEchoServer -> " | |
| + client.getRemoteAddress() + ":" + output.toString()); | |
| output.compact(); | |
| key.interestOps(SelectionKey.OP_READ); | |
| } | |
| }ca tch (IOException ex) { | |
| key.cancel(); | |
| try { | |
| key.channel().close(); | |
| } catch (IOException cex) { | |
| } | |
| } | |
| } | |
| } | |
| } | |
| } |
上述例子NonBlockingEchoServer实现了Echo协议,ServerSocketChannel与ServerSocket的职责类似。相比较而言,ServerSocket读和写操作都是同步阻塞的,在面对高并发的场景时,需要消耗大量的线程来维持连接。CPU在大量的线程之间频繁切换,性能损耗很大。一旦单机的连接超过1万,甚至达到几万的时候,服务器的性能会急剧下降。
NIO的Selector却很好地解决了这个问题,用主线程(一个线程或者是CPU个数的线程)保持所有的连接,管理和读取客户端连接的数据,将读取的数据交给后面的线程处理,后续线程处理完业务逻辑后,将结果交给主线程发送响应给客户端,这样少量的线程就可以处理大量连接的请求。
上述NonBlockingEchoServer例子,使用Selector注册Channel,然后调用它的select方法。这个select方法会一直阻塞到某个注册的通道有事件就绪。一旦这个方法返回,线程就可以处理这些事件。事件包括例如有新连接进来(OP_ACCEPT)、数据接收(OP_READ)等。
运行,可以看到控制台输出内容如下。
NonBlockingEchoServer已启动,端口:
2.实战:开发NIO版本的Echo客户端
下面是使用原生NIO API来开发Echo协议的客户端的示例。
| package com.waylau.java.demo.nio; | |
| import java.io.BufferedReader; | |
| import java.io.IOException; | |
| import java.io.InputStreamReader; | |
| import java.net.InetSocketAddress; | |
| import java.net.UnknownHostException; | |
| import java.nio.ByteBuffer; | |
| import java.nio.channels.SocketChannel; | |
| public class NonBlockingEchoClient { | |
| /** | |
| * @param args | |
| */ | |
| public static void main(String[] args) { | |
| if (args.length !=) { | |
| System.err.println("用法: java NonBlockingEchoClient <host name> <port | |
| number>"); | |
| System.exit(); | |
| } | |
| String hostName = args[]; | |
| int portNumber = Integer.parseInt(args[]); | |
| SocketChannel socketChannel = null; | |
| try { | |
| socketChannel = SocketChannel.open(); | |
| socketChannel.connect(new InetSocketAddress(hostName, portNumber)); | |
| } catch (IOException e) { | |
| System.err.println("NonBlockingEchoClient异常: " + e.getMessage()); | |
| System.exit(); | |
| }ByteBuffer writeBuffer = ByteBuffer.allocate(); | |
| ByteBuffer readBuffer = ByteBuffer.allocate(); | |
| try (BufferedReader stdIn = | |
| new BufferedReader(new InputStreamReader(System.in))) { | |
| String userInput; | |
| while ((userInput = stdIn.readLine()) != null) { | |
| writeBuffer.put(userInput.getBytes()); | |
| writeBuffer.flip(); | |
| writeBuffer.rewind(); | |
| // 写消息到管道 | |
| socketChannel.write(writeBuffer); | |
| // 管道读消息 | |
| socketChannel.read(readBuffer); | |
| // 清理缓冲区 | |
| writeBuffer.clear(); | |
| readBuffer.clear(); | |
| System.out.println("echo: " + userInput); | |
| } | |
| } catch (UnknownHostException e) { | |
| System.err.println("不明主机,主机名为: " + hostName); | |
| System.exit(); | |
| } catch (IOException e) { | |
| System.err.println("不能从主机中获取I/O,主机名为:" | |
| + hostName); | |
| System.exit(); | |
| } | |
| } | |
| } |
NonBlockingEchoClient的SocketChannel的使用与NonBlockingEchoServer的SocketChannel的使用基本类似。启动客户端,命令如下。
$ java NonBlockingEchoClient.java localhost
当NonBlockingEchoClient客户端与NonBlockingEchoServer服务器建立连接之后,客户端就可以与服务器进行交互了。
当我们在客户端输入“a”字符时,服务器也会将“a”发送回客户端,客户端输入的任务内容,服务器也会原样返回。
NonBlockingEchoServer控制台输出内容如下。
NonBlockingEchoServer已启动,端口:
NonBlockingEchoServer接受客户端的连接:
| java.nio.channels.SocketChannel[connected local= | |
| /.0.0.1:7 remote=/127.0.0.1:56515] | |
| NonBlockingEchoServer -> /.0.0.1:56515:java.nio.HeapByteBuffer[pos=0 lim=0 cap=100] | |
| /.0.0.1:56515 -> NonBlockingEchoServer:java.nio.HeapByteBuffer[pos=1 lim=100 cap= | |
| ] | |
| NonBlockingEchoServer -> /.0.0.1:56515:java.nio.HeapByteBuffer[pos=1 lim=1 cap= | |
| ] | |
| /.0.0.1:56515 -> NonBlockingEchoServer:java.nio.HeapByteBuffer[pos=12 lim=100 cap= | |
| ] | |
| NonBlockingEchoServer -> /.0.0.1:56515:java.nio.HeapByteBuffer[pos=12 lim=12 cap= | |
| ] |
Java AIO
从Java 1.7开始,Java提供了AIO(异步I/O)。Java AIO也被称为“NIO.2”,提供了异步I/O的方式,用法与标准I/O有非常大的差异。
Java AIO采用“发布/订阅”模式,即应用程序向操作系统注册I/O监听,然后继续做自己的事情。当操作系统发生I/O事件,并且准备好数据后,再主动通知应用程序,触发相应的函数。
与同步I/O一样,Java的AIO也是由操作系统进行支持的。微软的Windows系统提供了一种异步I/O技术——I/O完成端口(I/O CompletionPort,IOCP),而在Linux平台下并没有这种异步I/O技术,所以使用的是epoll对异步I/O进行模拟。
Java AIO API同Java NIO一样,都是位于java.nio包下。下面介绍Java AIO版本实现的支持Echo协议的客户端及服务器。
1.实战:开发AIO版本的Echo服务器
下面是使用原生Java AIO API来开发Echo协议的服务器的示例。
| package com.waylau.java.demo.aio; | |
| import java.io.IOException; | |
| import java.net.InetSocketAddress; | |
| import java.net.StandardSocketOptions; | |
| import java.nio.ByteBuffer; | |
| import java.nio.channels.AsynchronousServerSocketChannel; | |
| import java.nio.channels.AsynchronousSocketChannel; | |
| import java.util.concurrent.ExecutionException; | |
| import java.util.concurrent.Future; | |
| public class AsyncEchoServer {public static int DEFAULT_PORT =; | |
| /** | |
| * @param args | |
| */ | |
| public static void main(String[] args) { | |
| int port; | |
| try { | |
| port = Integer.parseInt(args[]); | |
| } catch (RuntimeException ex) { | |
| port = DEFAULT_PORT; | |
| } | |
| AsynchronousServerSocketChannel serverChannel; | |
| try { | |
| serverChannel = AsynchronousServerSocketChannel.open(); | |
| InetSocketAddress address = new InetSocketAddress(port); | |
| serverChannel.bind(address); | |
| // 设置阐述 | |
| serverChannel.setOption(StandardSocketOptions.SO_RCVBUF, * 1024); | |
| serverChannel.setOption(StandardSocketOptions.SO_REUSEADDR, true); | |
| System.out.println("AsyncEchoServer已启动,端口:" + port); | |
| } catch (IOException ex) { | |
| ex.printStackTrace(); | |
| return; | |
| } | |
| while (true) { | |
| // 可连接 | |
| Future<AsynchronousSocketChannel> future = serverChannel.accept(); | |
| AsynchronousSocketChannel socketChannel = null; | |
| try { | |
| socketChannel = future.get(); | |
| } catch (InterruptedException | ExecutionException e) { | |
| System.out.println("AsyncEchoServer异常!" + e.getMessage()); | |
| } | |
| System.out.println("AsyncEchoServer接受客户端的连接:" + socketChannel); | |
| // 分配缓存区 | |
| ByteBuffer buffer = ByteBuffer.allocate(); | |
| try { | |
| while (socketChannel.read(buffer).get() != -) { | |
| buffer.flip(); | |
| socketChannel.write(buffer).get(); | |
| System.out.println("AsyncEchoServer -> " + | |
| socketChannel.getRemoteAddress() + | |
| ":" + buffer.toString()); | |
| if (buffer.hasRemaining()) { | |
| buffer.compact(); | |
| } else { | |
| buffer.clear(); | |
| } | |
| } | |
| socketChannel.close(); | |
| } catch (InterruptedException | |
| | ExecutionException | |
| | IOException e) { | |
| System.out.println("AsyncEchoServer异常!" | |
| + e.getMessage()); | |
| } | |
| }} | |
| } |
上述例子AsyncEchoServer实现了Echo协议,AsynchronousServerSocketChannel与Server SocketChannel的职责类似。
相比较而言,AsynchronousServerSocketChannel实现了异步的I/O,而无须再使用Selector,因此整体代码比ServerSocketChannel要简化很多。
运行代码后可以看到控制台输出内容如下。
AsyncEchoServer已启动,端口:
2.实战:开发AIO版本的Echo客户端
下面是使用原生AIO API来开发Echo协议的客户端的示例。
| package com.waylau.java.demo.aio; | |
| import java.io.BufferedReader; | |
| import java.io.IOException; | |
| import java.io.InputStreamReader; | |
| import java.net.InetSocketAddress; | |
| import java.net.UnknownHostException; | |
| import java.nio.ByteBuffer; | |
| import java.nio.channels.AsynchronousSocketChannel; | |
| public class AsyncEchoClient { | |
| /** | |
| * @param args | |
| */ | |
| public static void main(String[] args) { | |
| if (args.length !=) { | |
| System.err.println("用法: java AsyncEchoClient <host name> <port number>"); | |
| System.exit(); | |
| } | |
| String hostName = args[]; | |
| int portNumber = Integer.parseInt(args[]); | |
| AsynchronousSocketChannel socketChannel = null; | |
| try { | |
| socketChannel = AsynchronousSocketChannel.open(); | |
| socketChannel.connect(new InetSocketAddress(hostName, portNumber)); | |
| } catch (IOException e) { | |
| System.err.println("AsyncEchoClient异常: " | |
| + e.getMessage()); | |
| System.exit(); | |
| } | |
| ByteBuffer writeBuffer = ByteBuffer.allocate(); | |
| ByteBuffer readBuffer = ByteBuffer.allocate();try (BufferedReader stdIn = new BufferedReader(new InputStreamReader | |
| (System.in))) { | |
| String userInput; | |
| while ((userInput = stdIn.readLine()) != null) { | |
| writeBuffer.put(userInput.getBytes()); | |
| writeBuffer.flip(); | |
| writeBuffer.rewind(); | |
| // 写消息到管道 | |
| socketChannel.write(writeBuffer); | |
| // 管道读消息 | |
| socketChannel.read(readBuffer); | |
| // 清理缓冲区 | |
| writeBuffer.clear(); | |
| readBuffer.clear(); | |
| System.out.println("echo: " + userInput); | |
| } | |
| } catch (UnknownHostException e) { | |
| System.err.println("不明主机,主机名为: " + hostName); | |
| System.exit(); | |
| } catch (IOException e) { | |
| System.err.println("不能从主机中获取I/O,主机名为:" | |
| + hostName); | |
| System.exit(); | |
| } | |
| } | |
| } |
AsyncEchoClient的AsynchronousSocketChannel的使用与NonBlockingEchoClient的SocketChannel的使用基本类似。启动客户端,命令如下。
$ java AsyncEchoClient.java localhost
当AsyncEchoClient客户端与AsyncEchoServer服务器建立连接之后,客户端就可以与服务器进行交互了。
当我们在客户端输入“a”字符时,服务器也会将“a”发送回客户端,客户端输入的任务内容,服务器也会原样返回。
AsyncEchoServer控制台输出内容如下。
AsyncEchoServer已启动,端口:
AsyncEchoServer接受客户端的连接:
| sun.nio.ch.WindowsAsynchronousSocketChannelImpl | |
| [connected local=/.0.0.1:7 remote=/127.0.0.1:57573] | |
| AsyncEchoServer -> /.0.0.1:57573:java.nio.HeapByteBuffer[pos=1 lim=1 cap=100] | |
| AsyncEchoServer -> /.0.0.1:57573:java.nio.HeapByteBuffer[pos=12 lim=12 cap=100]本节示例,可以在java-io-mode项目下找到。 |