目录
- 正文
- 一、效果展示
- 二、快速使用及属性介绍
- 快速使用
- 具体代码
- 主要方法介绍
- 1、搜索框监听
- 2、搜索列表点击事件
- 3、改变最近(历史)搜索item背景
- 4、动态设置热门搜索热度
- 属性介绍
- SearchLayout(搜索框属性)
- SearchList(搜索列表属性)
- 三、具体代码实现
正文
今天带来一个非常实用的自定义搜索框,包含了搜索框、热门搜索列表、最近搜索列表等常见的功能,有类似的,大家可以直接复用,将会大大节约您的开发时间,有一点,很负责任的告诉大家,实现这个没什么技术含量,就是很简单的自定义组合View,本文除了使用介绍,我也会把具体的实现过程分享给大家。
今天的内容大概如下:
- 1、效果展示
- 2、快速使用及属性介绍
- 3、具体代码实现
- 4、开源地址及总结
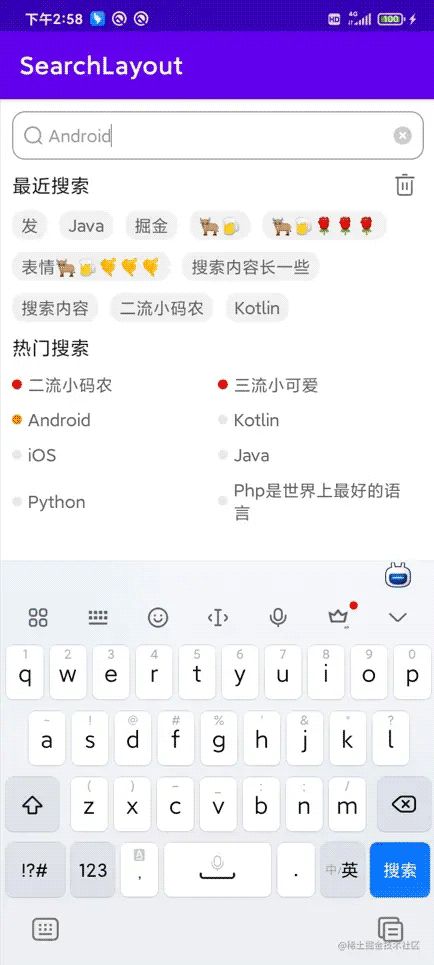
一、效果展示
效果很常见,就是平常需求中的效果,上面是搜索框,下面是最近和热门搜索列表,为了方便大家在实际需求中使用,配置了很多属性,也进行了上下控件的拆分,也就是上边搜索框和下面的搜索列表的拆分,可以按需进行使用。
二、快速使用及属性介绍
快速使用
目前已经发布至远程Maven,大家可以进行远程依赖使用。
1、在你的根项目下的build.gradle文件下,引入maven。
| allprojects { | |
| repositories { | |
| maven { url "https://gitee.com/AbnerAndroid/almighty/raw/master" } | |
| } | |
| } |
2、在你需要使用的Module中build.gradle文件下,引入依赖。
| dependencies { | |
| implementation 'com.vip:search:.0.0' | |
| } |
具体代码
1、xml中引入SearchLayout(搜索框)和SearchList(搜索列表),在实际开发中,根据需求可选择使用,二者是互不关联的。
| <androidx.constraintlayout.widget.ConstraintLayout xmlns:android="http://schemas.android.com/apk/res/android" | |
| xmlns:app="http://schemas.android.com/apk/res-auto" | |
| xmlns:tools="http://schemas.android.com/tools" | |
| android:layout_width="match_parent" | |
| android:layout_height="match_parent" | |
| android:paddingLeft="dp" | |
| android:paddingRight="dp" | |
| tools:context=".MainActivity"> | |
| <com.vip.search.SearchLayout | |
| android:id="@+id/search_layout" | |
| android:layout_width="match_parent" | |
| android:layout_height="dp" | |
| android:layout_marginTop="dp" | |
| app:layout_constraintLeft_toLeftOf="parent" | |
| app:layout_constraintTop_toTopOf="parent" | |
| app:search_bg="@drawable/shape_stroke_" /> | |
| <com.vip.search.SearchList | |
| android:id="@+id/search_list" | |
| android:layout_width="match_parent" | |
| android:layout_height="wrap_content" | |
| android:layout_marginTop="dp" | |
| app:is_hot_flex_box_or_grid="true" | |
| app:is_visibility_history_clear="true" | |
| app:layout_constraintTop_toBottomOf="@id/search_layout" /> | |
| </androidx.constraintlayout.widget.ConstraintLayout> |
2、代码逻辑,以下是测试代码,如用到实际项目,请以实际项目获取控件为主。
| class MainActivity : AppCompatActivity() { | |
| override fun onCreate(savedInstanceState: Bundle?) { | |
| super.onCreate(savedInstanceState) | |
| setContentView(R.layout.activity_main) | |
| val searchLayout = findViewById<SearchLayout>(R.id.search_layout) | |
| val searchList = findViewById<SearchList>(R.id.search_list) | |
| searchLayout.setOnTextSearchListener({ | |
| //搜索内容改变 | |
| }, { | |
| //软键盘点击了搜索 | |
| searchList.doSearchContent(it) | |
| }) | |
| //设置用于测试的热门搜索列表 | |
| searchList.setHotList(getHotList()) | |
| //热门搜索条目点击事件 | |
| searchList.setOnHotItemClickListener { s, i -> | |
| Toast.makeText(this, s, Toast.LENGTH_SHORT).show() | |
| } | |
| //历史搜索条目点击事件 | |
| searchList.setOnHistoryItemClickListener { s, i -> | |
| Toast.makeText(this, s, Toast.LENGTH_SHORT).show() | |
| } | |
| } | |
| /** | |
| * AUTHOR:AbnerMing | |
| * INTRODUCE:模拟热门搜索列表 | |
| */ | |
| private val mTestHotList = arrayListOf( | |
| "二流小码农", "三流小可爱", "Android", | |
| "Kotlin", "iOS", "Java", "Python", "Php是世界上最好的语言" | |
| ) | |
| private fun getHotList(): ArrayList<SearchBean> { | |
| return ArrayList<SearchBean>().apply { | |
| mTestHotList.forEachIndexed { index, s -> | |
| val bean = SearchBean() | |
| bean.content = s | |
| bean.isShowLeftIcon = true | |
| val drawable: Drawable? = if (index <) { | |
| ContextCompat.getDrawable(this@MainActivity, R.drawable.shape_circle_select) | |
| } else if (index ==) { | |
| ContextCompat.getDrawable(this@MainActivity, R.drawable.shape_circle_ordinary) | |
| } else { | |
| ContextCompat.getDrawable(this@MainActivity, R.drawable.shape_circle_normal) | |
| } | |
| drawable?.setBounds(, 0, drawable.minimumWidth, drawable.minimumHeight) | |
| bean.leftIcon = drawable | |
| add(bean) | |
| } | |
| } | |
| } | |
| } |
主要方法介绍
1、搜索框监听
拿到searchLayout控件之后,调用setOnTextSearchListener方法即可,第一个方法是搜索内容发生变化会回调,第二个方法是,点击了软键盘的搜索按钮会回调,如果要在最近搜索里展示,直接调用doSearchContent方法即可。
| searchLayout.setOnTextSearchListener({ | |
| //搜索内容改变 | |
| }, { | |
| //软键盘点击了搜索 | |
| searchList.doSearchContent(it) | |
| }) |
2、搜索列表点击事件
热门搜索调用setOnHotItemClickListener方法,历史搜索也就是最近搜索调用setOnHistoryItemClickListener方法,都是两个参数,第一个是文本内容,第二个是索引,也就是点的是哪一个。
| //热门搜索条目点击事件 | |
| searchList.setOnHotItemClickListener { s, i -> | |
| Toast.makeText(this, s, Toast.LENGTH_SHORT).show() | |
| } | |
| //历史搜索条目点击事件 | |
| searchList.setOnHistoryItemClickListener { s, i -> | |
| Toast.makeText(this, s, Toast.LENGTH_SHORT).show() | |
| } |
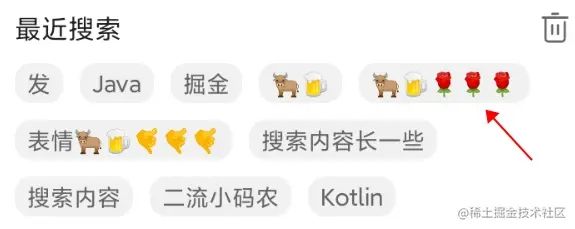
3、改变最近(历史)搜索item背景
有的老铁说了,默认的背景我不喜欢,能否可以动态设置,必须能!
默认背景
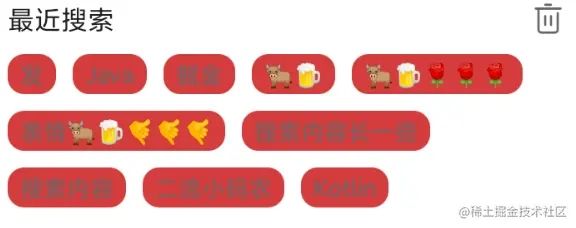
设置背景,通过setHistoryItemBg方法。
searchList.setHistoryItemBg(R.drawable.shape_solid_dc3c_10)
效果展示
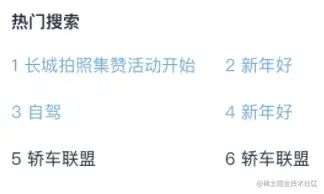
4、动态设置热门搜索热度
可能在很多需求中,需要展示几个热度,有的是按照颜色区分,如下图:
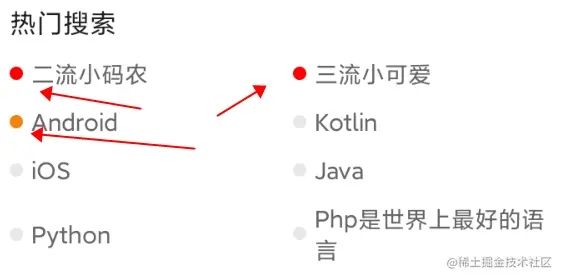
实现起来很简单,在设置热门列表(setHotList)的时候,针对传递的对象设置leftIcon即可。测试代码如下:
| private fun getHotList(): ArrayList<SearchBean> { return ArrayList<SearchBean>().apply { | |
| mTestHotList.forEachIndexed { index, s -> | |
| val bean = SearchBean() | |
| bean.content = s | |
| bean.isShowLeftIcon = true | |
| val drawable: Drawable? = if (index <) { | |
| ContextCompat.getDrawable(this@MainActivity, R.drawable.shape_circle_select) | |
| } else if (index ==) { | |
| ContextCompat.getDrawable(this@MainActivity, R.drawable.shape_circle_ordinary) | |
| } else { | |
| ContextCompat.getDrawable(this@MainActivity, R.drawable.shape_circle_normal) | |
| } | |
| drawable?.setBounds(, 0, drawable.minimumWidth, drawable.minimumHeight) | |
| bean.leftIcon = drawable | |
| add(bean) | |
| } | |
| } | |
| } |
具体的哪个数据展示什么颜色,直接设置即可,想怎么展示就怎么展示。当然了除了展示不同的热度之外,还有一些其他的变量,isShowLeftIcon为是否展示文字左边的icon,textColor为当前文字的颜色,根据不同的颜色,我们也可以实现下面的效果。
除了常见的方法之外,还提供了很多的属性操作,具体的大家可以看下面,按需使用即可。
属性介绍
为了让功能灵活多变,也为了满足更多的需求样式,目前自定义了很多属性,大家可以按自己的需要进行设置,或者直接去GitHub中下载源码更改也可以。
SearchLayout(搜索框属性)
属性 | 类型 | 概述 |
search_icon | reference | 搜索图标,可直接从drawable或者mipmap中设置 |
search_icon_width | dimension | 搜索图标的宽 |
search_icon_height | dimension | 搜索图标的高 |
search_icon_left | dimension | 搜索图标距离左边的距离 |
search_icon_delete | reference | 搜索删除图标,右侧的删除 |
search_icon_delete_width | dimension | 搜索删除图标的宽 |
search_icon_delete_height | dimension | 搜索删除图标的高 |
search_icon_delete_right | dimension | 搜索删除图标距离右边的距离 |
search_hint | string | 搜索框占位字符 |
search_hint_color | color | 搜索框占位字符颜色 |
search_color | color | 搜索框文字颜色 |
search_size | dimension | 搜索框文字大小 |
search_text_cursor | reference | 搜索框光标 |
search_bg | reference | 整个搜索框背景 |
SearchList(搜索列表属性)
属性 | 类型 | 概述 |
is_hot_flex_box_or_grid | boolean | 热门搜索列表样式,是网格还是流式布局 |
is_hot_center | boolean | 热门搜索列表样式,内容是否居中 |
hot_grid_span_count | integer | 热门搜索列表样式,如果是网格布局,条目列数,默认2 |
hot_item_top_margin | integer | 热门搜索列表 item距离上边的距离 |
hot_item_color | color | 热门搜索列表 item 文字颜色 |
hot_item_size | dimension | 热门搜索列表 item 文字大小 |
hot_item_line | integer | 热门搜索列表 item 文字展示几行 |
hot_item_bg | reference | 热门搜索列表 item 背景 |
hot_item_margin_top | reference | 热门搜索列表 item 距离上边的距离 |
hot_padding_left | dimension | 热门搜索列表 内边距,左 |
hot_padding_top | dimension | 热门搜索列表 内边距,上 |
hot_padding_right | dimension | 热门搜索列表 内边距,右 |
hot_padding_bottom | dimension | 热门搜索列表 内边距,下 |
is_history_flex_box_or_grid | boolean | 历史搜索列表样式,是网格还是流式布局 |
history_flex_box_count | integer | 历史搜索列表,最多展示几个item,默认10 |
is_history_center | boolean | 历史搜索列表样式,内容是否居中 |
history_grid_span_count | integer | 历史搜索列表样式,如果是网格布局,条目列数,默认2 |
history_item_top_margin | integer | 历史搜索列表 item距离上边的距离 |
history_item_color | color | 历史搜索列表 item 文字颜色 |
history_item_size | dimension | 历史搜索列表 item 文字大小 |
history_item_margin_top | dimension | 历史搜索列表 item 距离上边的距离 |
is_visibility_history_clear | boolean | 历史搜索右边是否展示清除小按钮 |
history_clear_icon | reference | 历史搜索右边的清除小按钮 |
history_clear_text | string | 历史搜索右边的清除文字 |
history_clear_size | dimension | 历史搜索右边的清除文字大小 |
history_clear_color | color | 历史搜索右边的清除文字颜色 |
history_padding_left | dimension | 历史搜索列表 内边距,左 |
history_padding_top | dimension | 历史搜索列表 内边距,上 |
history_padding_right | dimension | 历史搜索列表 内边距,右 |
history_padding_bottom | dimension | 历史搜索列表 内边距,下 |
三、具体代码实现
关于这个组合View的实现方式,我是分为了两个View,大家在上边的使用中应该也看到了,一个是搜索框SearchLayout,一个是搜索框下面的搜索列表展示SearchList,开头就阐述了,没啥技术含量,简单的罗列下代码实现吧。
SearchLayout是一个组合View,中间是一个EditText,左右两边是一个ImageView,也就是搜索图标和删除图标,如下图:

SearchLayout本身没有啥要说的,无非就是把View组合到了一起,在开发的时候,既然要给别人使用,那么就要拓展出很多的动态属性或者方法出来,这是很重要的,所以,在封装的时候,自定义属性无比的重要,需要精确和认真,这一块没啥好说的,有一点需要注意,也就是EditText绑定软键盘搜索,除了设置属性android:imeOptions="actionSearch",也要设置,android:singleLine="true",方可生效。
SearchList其实也没啥好说的,也是一个组合View,使用的是上下两个RecyclerView来实现的,至于流失布局,采用的是google提供的flexbox,设置布局管理器即可。
recyclerView.layoutManager = FlexboxLayoutManager(mContext)
除了这个之外,可能需要阐述的也就是最近搜索的存储机制了,存储呢,Android中提供了很多的存储方式,比如数据库,SharedPreferences,SD卡,还有DataStore,MMKV等,无论哪一种吧,选择适合的即可,这个开源中,不想引入其他的三方了,直接使用的是SharedPreferences。
具体的实现方式,把搜索的内容,转成json串,以json串的形式进行存储,这里借助了原生的JSONArray和JSONObject。流程就是,触发搜索内容后,先从SharedPreferences取出之前存储的内容,放到JSONArray中,当前搜索内容如果存在JSONArray中,那边就要执行删除原来的,再把新的内容插入到第一个的位置,如果不存在JSONArray中,直接添加即可,随后再转成字符串存储即可。
当然了,一般在正常的需求开发中,最近搜索列表肯定不是无限展示的,都有固定的展示个数,比如10个,比如15个,所以,当超过指定的个数,也就是指定的阀门后,就要执行删除的操作。
| val searchHistory = getSearchHistory() | |
| if (!TextUtils.isEmpty(it)) { | |
| val jsonArray: JSONArray = if (TextUtils.isEmpty(searchHistory)) { | |
| JSONArray() | |
| } else { | |
| JSONArray(searchHistory) | |
| } | |
| val json = JSONObject() | |
| json.put("content", it) | |
| //如果出现了一样的,删除后,加到第一个 | |
| var isEqual = false | |
| var equalPosition = | |
| for (i in until jsonArray.length()) { | |
| val item = jsonArray.getJSONObject(i) | |
| val content = item.getString("content") | |
| if (it == content) { | |
| isEqual = true | |
| equalPosition = i | |
| break | |
| } | |
| } | |
| //有一样的 | |
| if (isEqual) { | |
| jsonArray.remove(equalPosition) | |
| } else { | |
| //超过了指定的阀门之后,就不在扩充 | |
| if (jsonArray.length() >= mHistoryListSize) { | |
| jsonArray.remove() | |
| } | |
| } | |
| jsonArray.put(json) | |
| SearchSharedPreUtils.put(mContext!!, "search_history", jsonArray.toString()) | |
| } | |
| getSearchHistory()?.let { | |
| eachSearchHistory(it) | |
| } | |
| //两个有一个不为空,展示 | |
| if (!TextUtils.isEmpty(it) || !TextUtils.isEmpty(searchHistory)) { | |
| showOrHideHistoryLayout(View.VISIBLE) | |
| } |
当然了,存储的逻辑,有很多的实现的方式,这里并不是最优的,只是提供了一种思路,大家可以按照自己的方式来操作。