Jest 是流行的前端单元测试框架,可以用它来写 Node 代码或者组件的单测。
Jest 用起来并不难,但很多人用了多年依然不知道它是怎么实现的。
今天我们就一起来写一个简易版 Jest,写完之后你就知道它的实现原理了。
当然,我们先用一下:
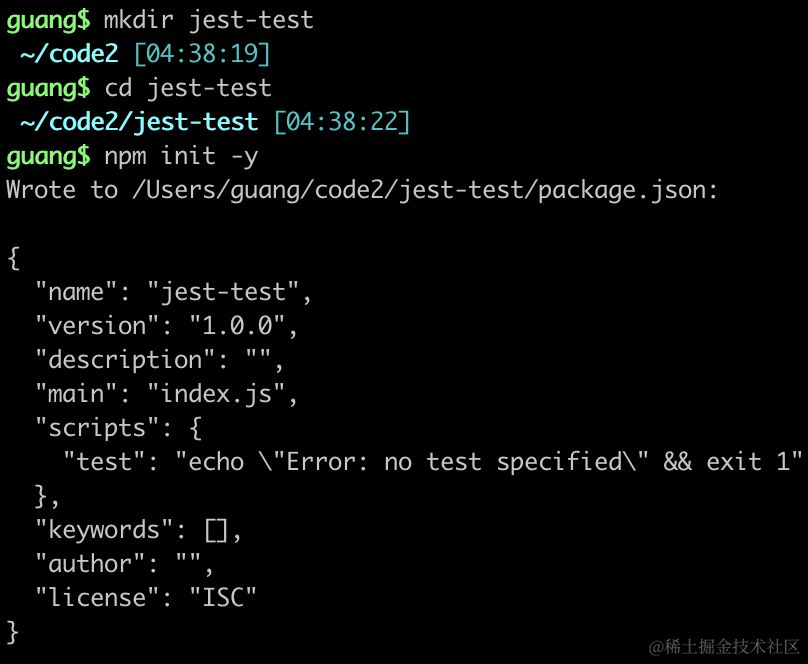
| mkdir jest-test | |
| cd jest-test | |
| npm init -y |
创建个项目。
安装 jest 和它的 ts 类型:
npm install --save-dev jest @types/jest
创建一个 sum.js
| function sum(a, b) { | |
| return a + b; | |
| } | |
| module.exports = sum; |
还有它的单测文件 sum.test.js
| const sum = require('./sum'); | |
| test('sum test', () => { | |
| expect(sum(1, 2)).toBe(3); | |
| }); |
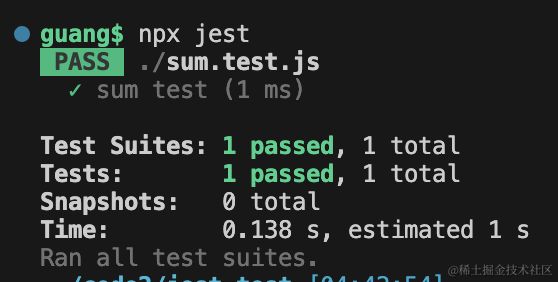
用 jest 跑下单测:
npx jest
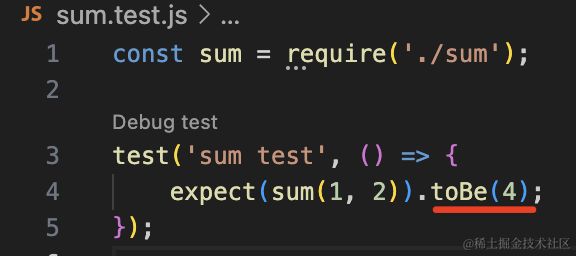
改成 4 再跑下:
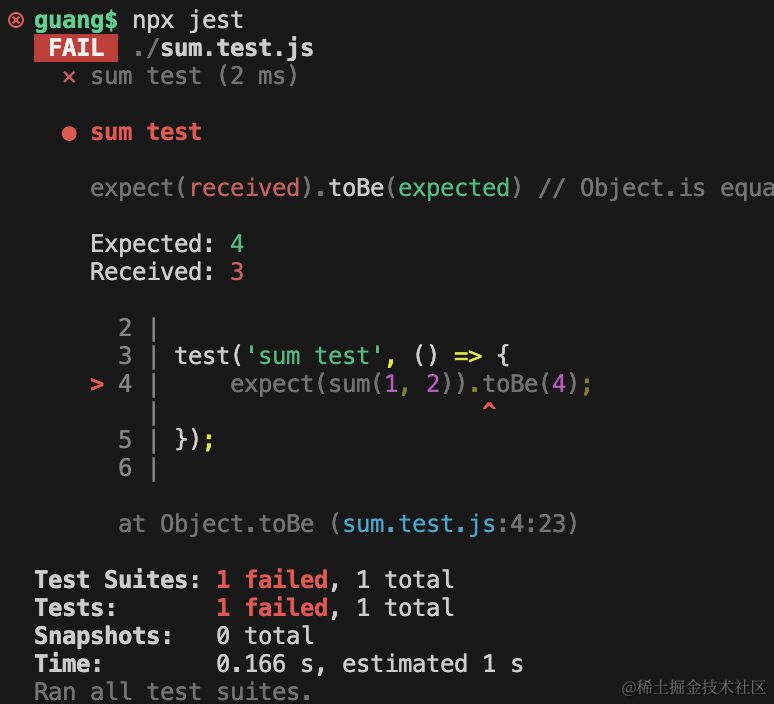
单测通过时,会打印成功,没通过时会打印错误信息。
这个 expect 的 api 叫做 Matcher(匹配器)。
Matcher 有很多 api:
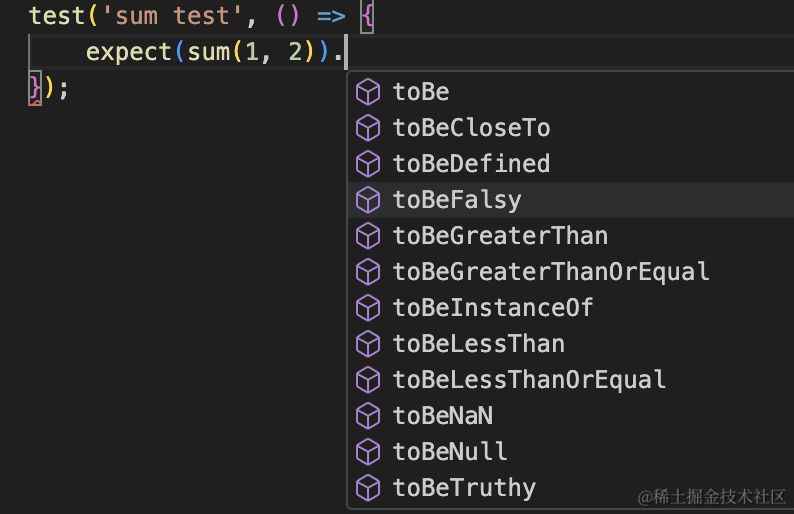
比如大于、小于、是否是某个类的实例、是否包含等等,能满足你的各种断言需求。
那当你测试的代码里依赖外部环境的部分,比如要读一个文件、要发送一个请求,这时候怎么测呢?
这种就需要 Mock 了。
比如这样:
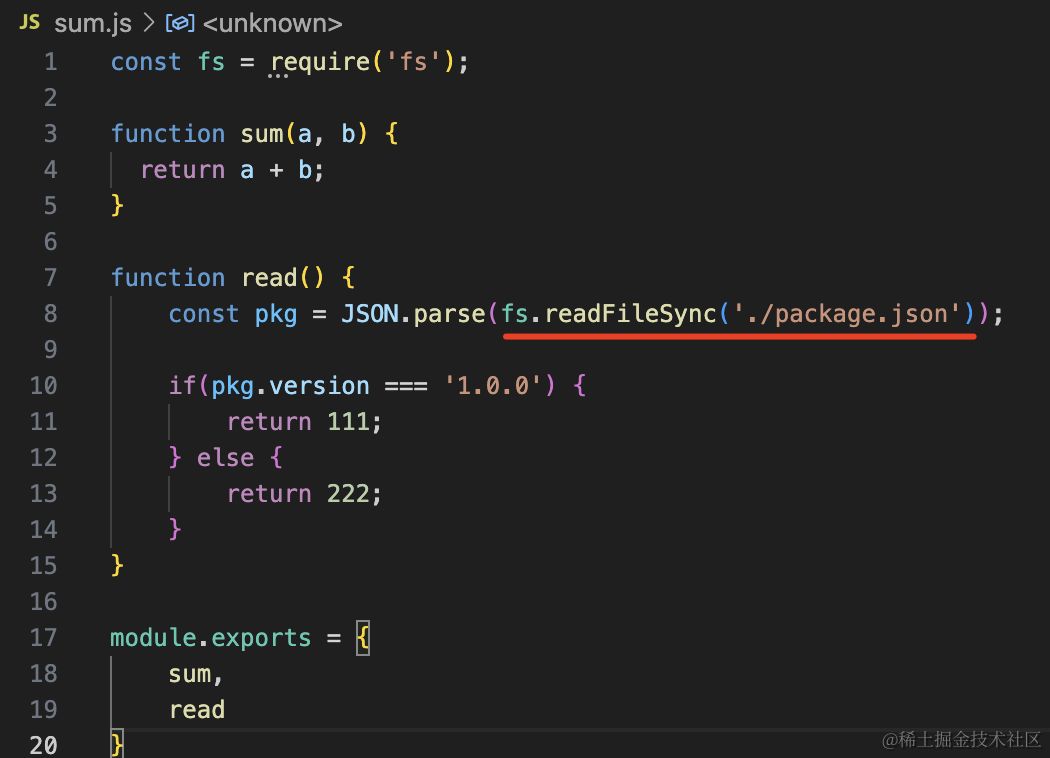
| function read() { | |
| const pkg = JSON.parse(fs.readFileSync('./package.json')); | |
| if(pkg.version === '1.0.0') { | |
| return 111; | |
| } else { | |
| return 222; | |
| } | |
| } |
这里 read 函数依赖了 fs 模块的 api。
想测试这个函数的不同分支,就可以 mock 它依赖的 fs 模块。
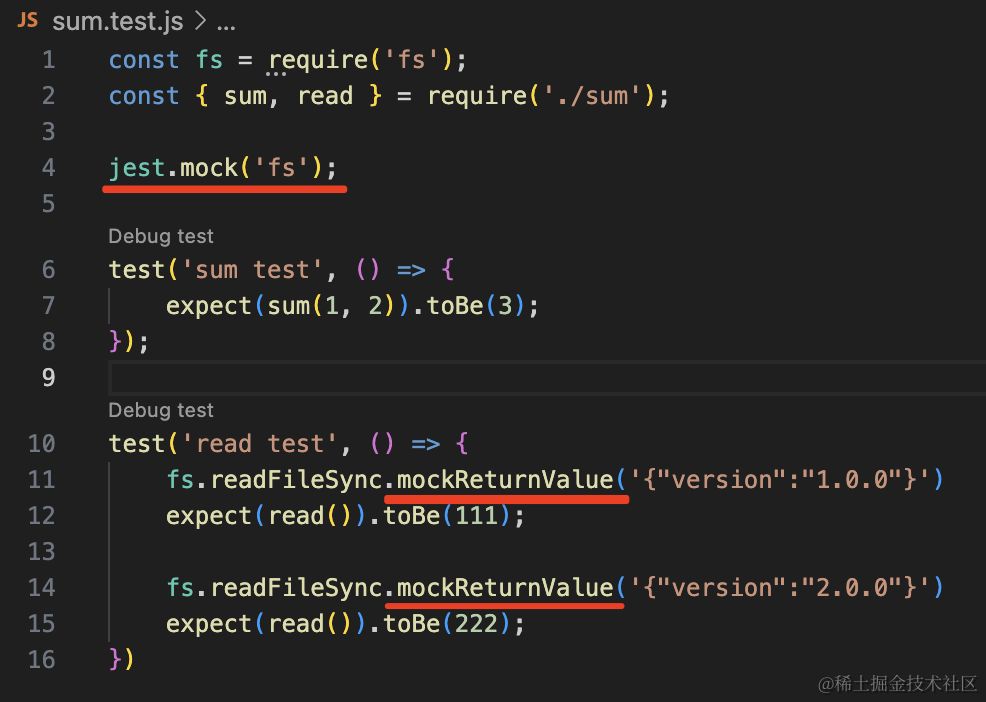
| const fs = require('fs'); | |
| const { sum, read } = require('./sum'); | |
| jest.mock('fs'); | |
| test('sum test', () => { | |
| expect(sum(1, 2)).toBe(3); | |
| }); | |
| test('read test', () => { | |
| fs.readFileSync.mockReturnValue('{"version":"1.0.0"}') | |
| expect(read()).toBe(111); | |
| fs.readFileSync.mockReturnValue('{"version":"2.0.0"}') | |
| expect(read()).toBe(222); | |
| }) |
这里用 jest.mock 对模块做了 mock,然后就可以自由修改它的 readFileSync 函数的返回值了。
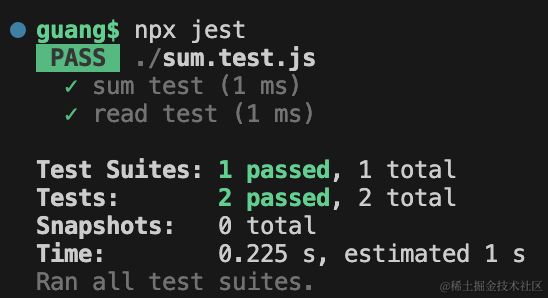
这种 mock 模块的功能非常常用,比如你用 axios 发的请求,会在它返回什么值的时候做什么处理,这时候就可以 mock axios 模块,自由决定返回值。
此外,也可以 mock 函数:
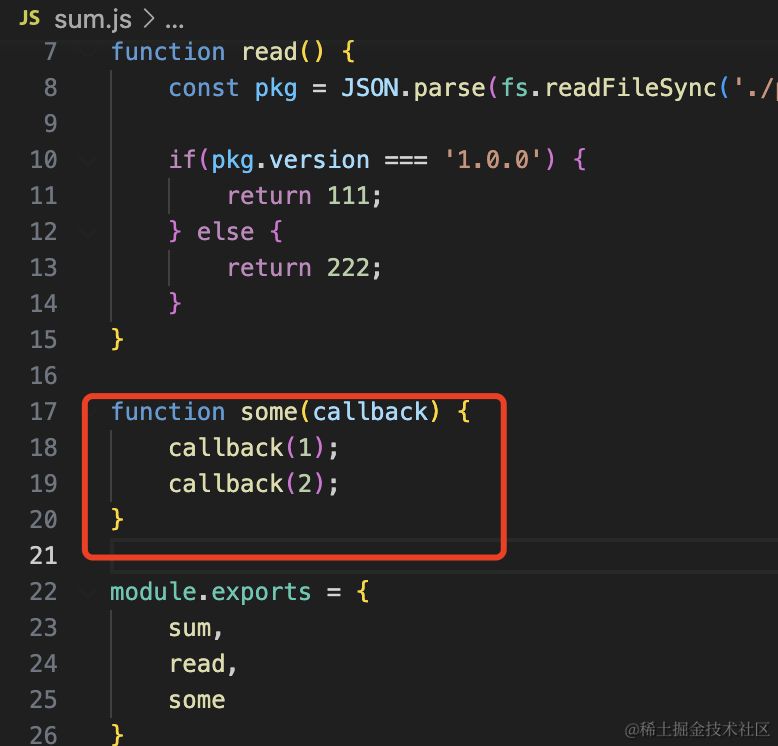
可以拿到 mock 的函数被调用了几次,第几次调用的参数是什么:
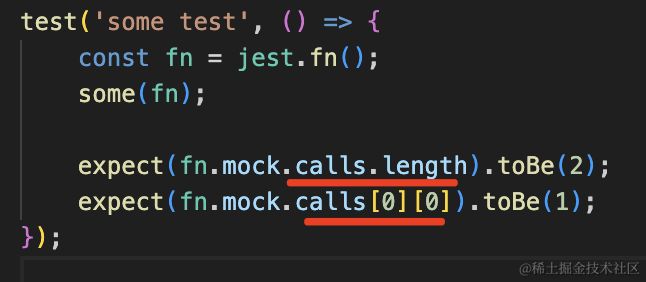
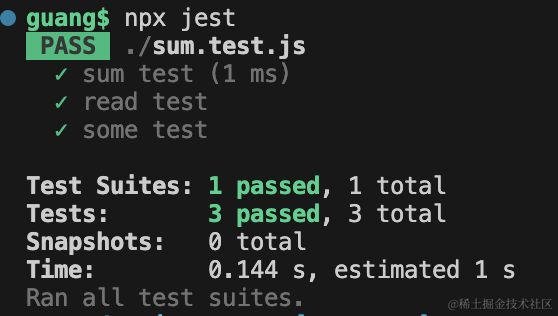
此外,jest 还有 beforeAll、afterAll、beforeEach、afterEach 这些钩子函数,可以在全部单测、每个单测执行前后来执行一些逻辑:
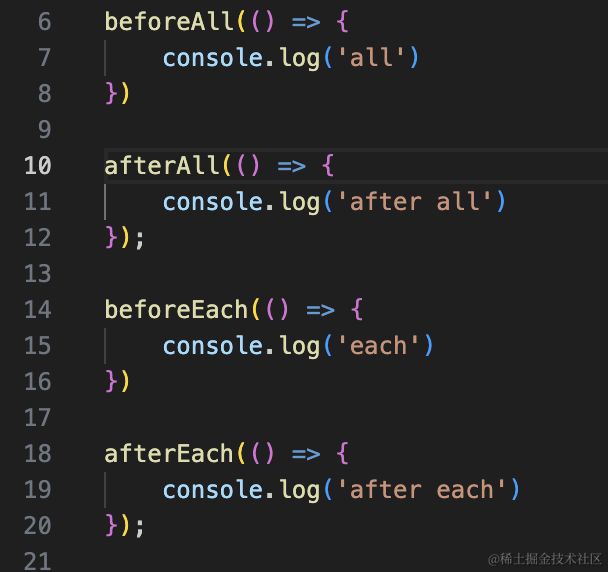
综上,Matcher、Mock、钩子函数,这些就是 Jest 常用的功能了。
此外,jest 支持覆盖率检测:
npx jest --coverage
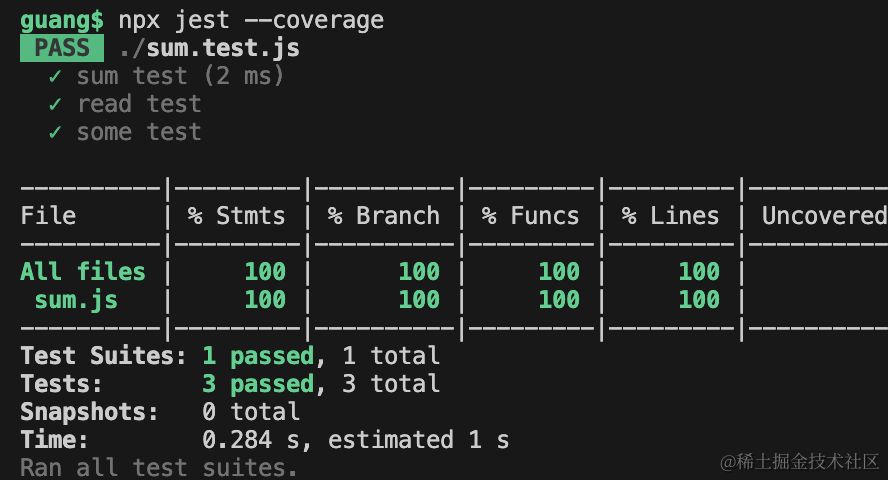
现在是 100%,我们加一点代码:
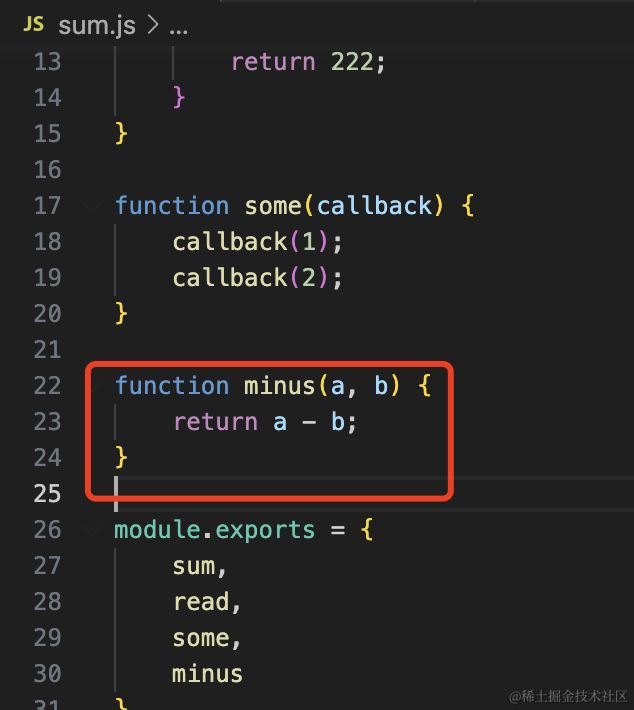
因为 minus 这个函数没有测试,所以函数覆盖率就降低了:
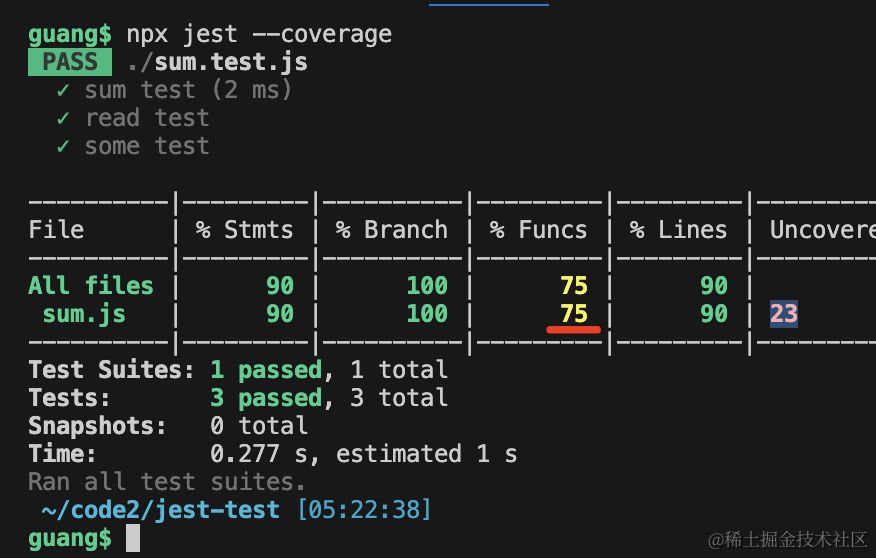
那问题来了,这些 Matcher、Mock、覆盖率检测等功能,是怎么实现的呢?
我们能不能自己写一个类似的呢?
这个还是需要一些前置知识的,我们一点点来看:
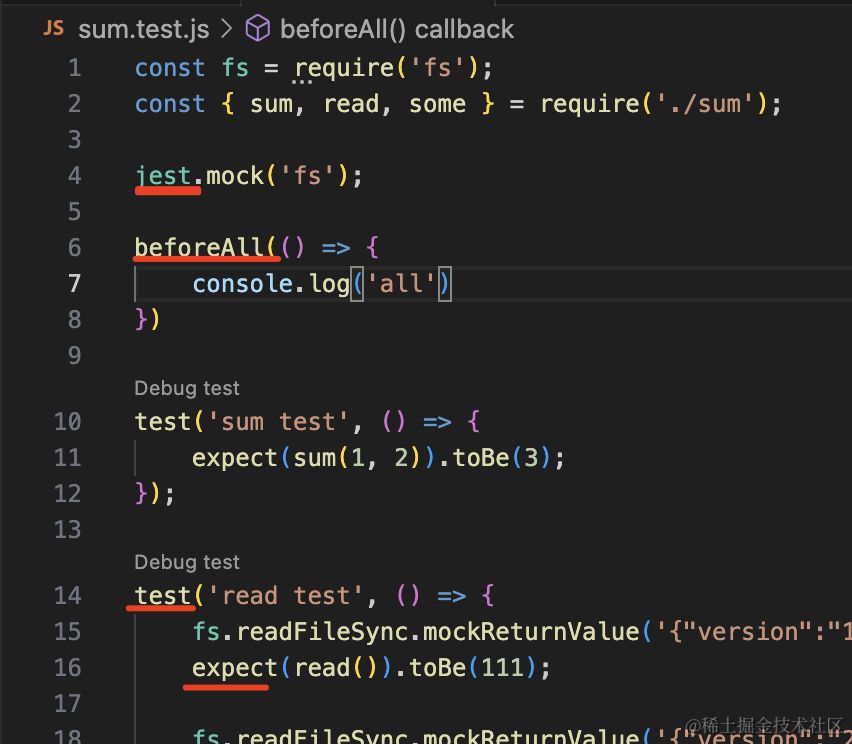
首先, jest、beforeAll、test、expect 这些 api 我们都没有从 jest 包导入,为什么就是全局可用的呢?
这是因为 jest 使用 node 的 vm 来跑的代码:
| const vm = require('vm'); | |
| const context = { | |
| console, | |
| guang: 111, | |
| dong: 222 | |
| } | |
| vm.createContext(context); | |
| vm.runInContext('console.log(guang + dong)', context); |
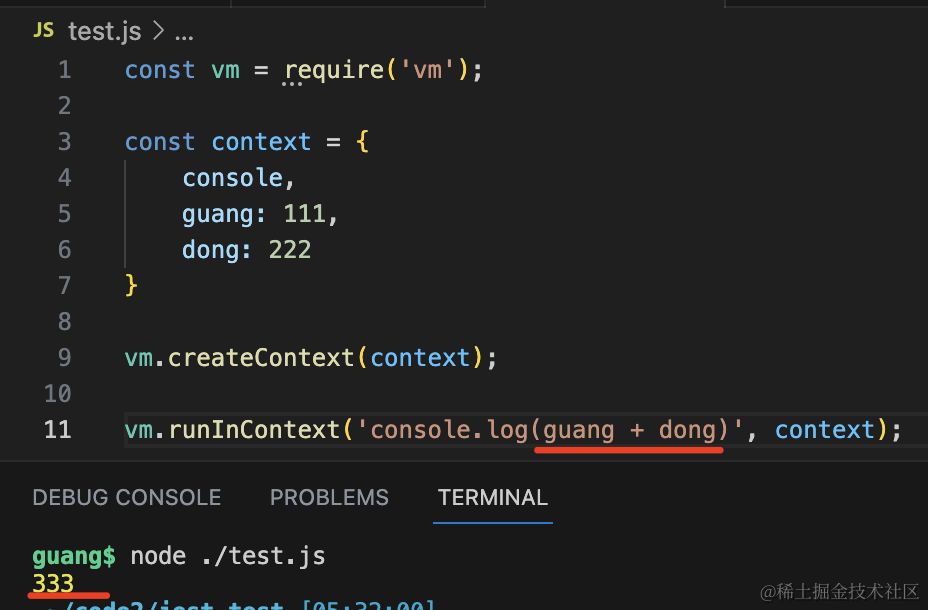
它可以自己指定一个全局上下文,通过 vm 的跑的代码只能全局访问这些 api。
jest 就是通过这种方式跑的代码,注入了 jest、test、expect 等全局 api。
还有,为什么可以 mock 测试的模块依赖的模块,可以任意修改它的内容呢?
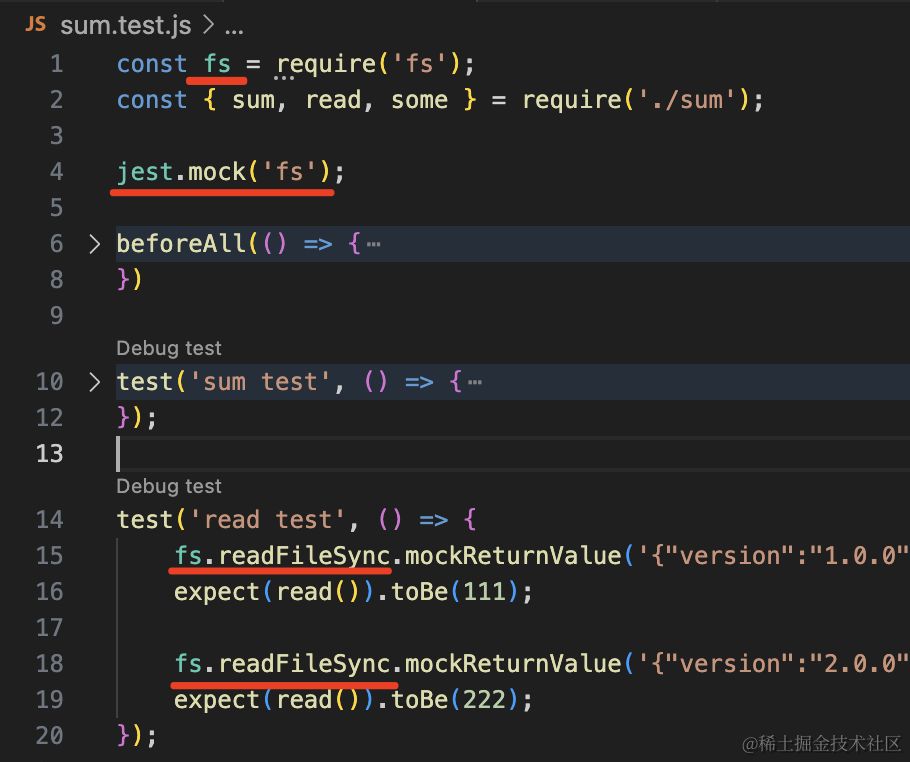
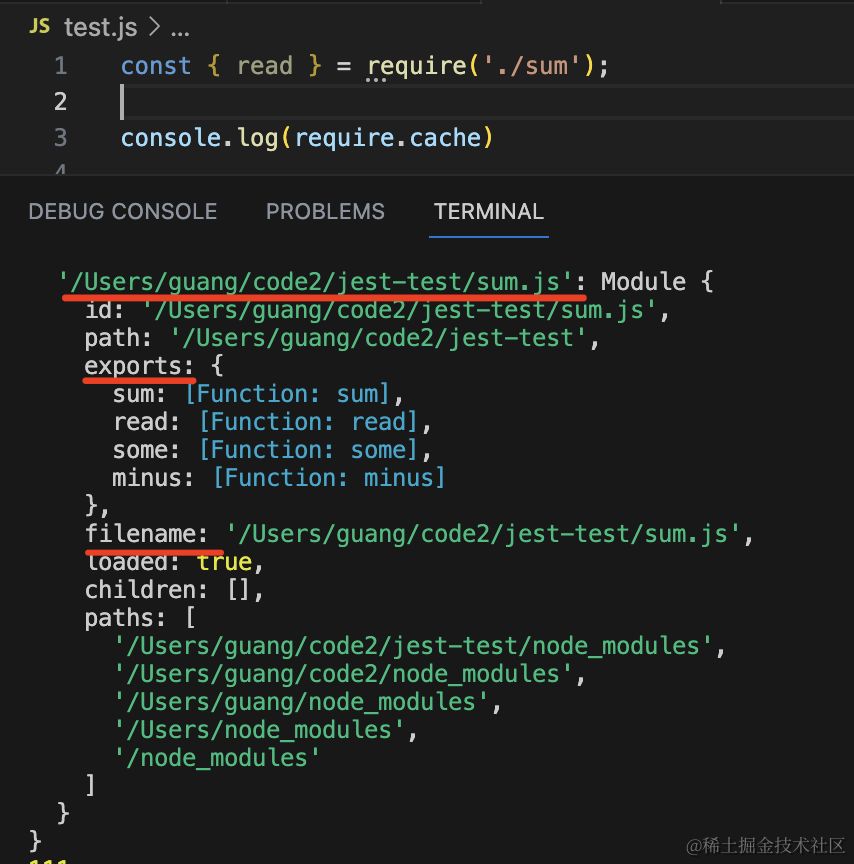
这是因为 node 会把引入的模块放在 require.cache 里缓存,key 为文件绝对路径。
所以只要把 require.cache 里这个模块的 exports 改了,那不就是改了模块内容了么?
| require.cache['fs'] = { | |
| id: 'fs', | |
| filename: 'fs', | |
| loaded: true, | |
| exports: { | |
| readFileSync(filename) { | |
| return 'xxx'; | |
| } | |
| } | |
| } | |
| const fs = require('fs'); | |
| console.log(fs.readFileSync('./package.json')); |
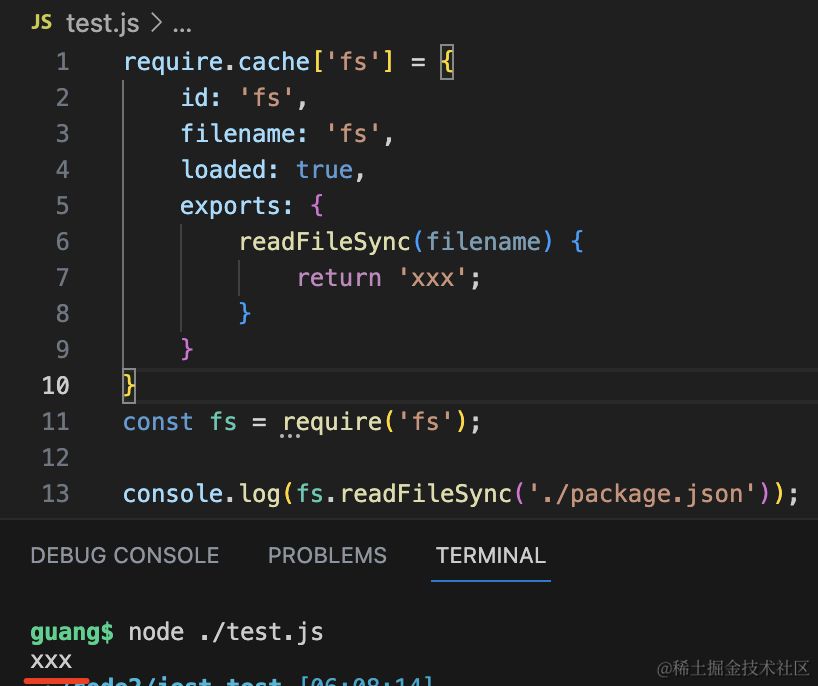
当然,这个和 jest 的行为不完全一样,这里必须在修改 require.cache 之后再 require 一次才会生效。
而 jest 那个不是:
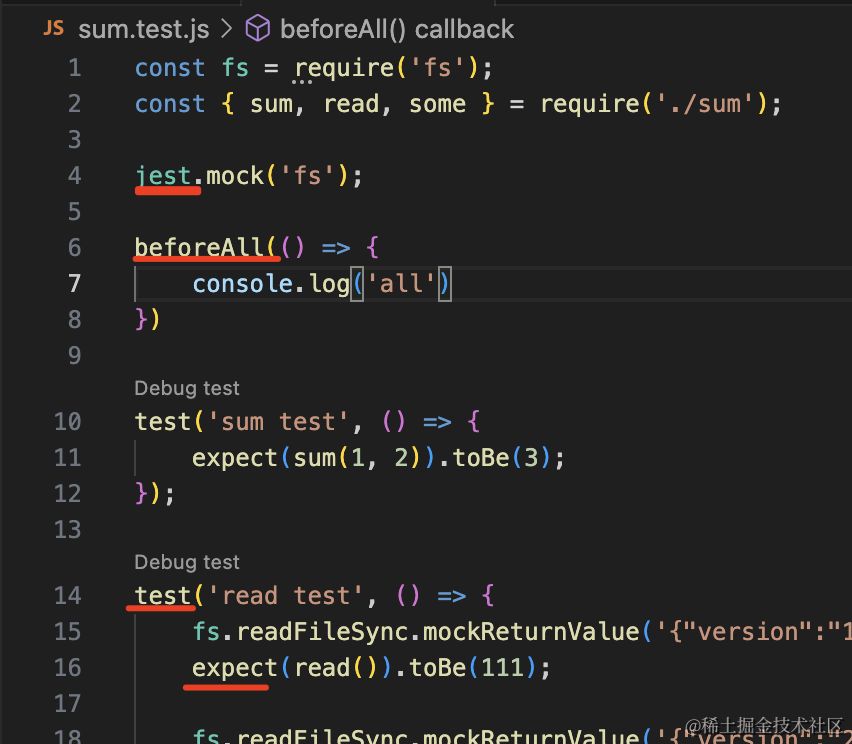
这是怎么做到的呢?
因为 jest 注入 vm 的 require 是自己实现的:

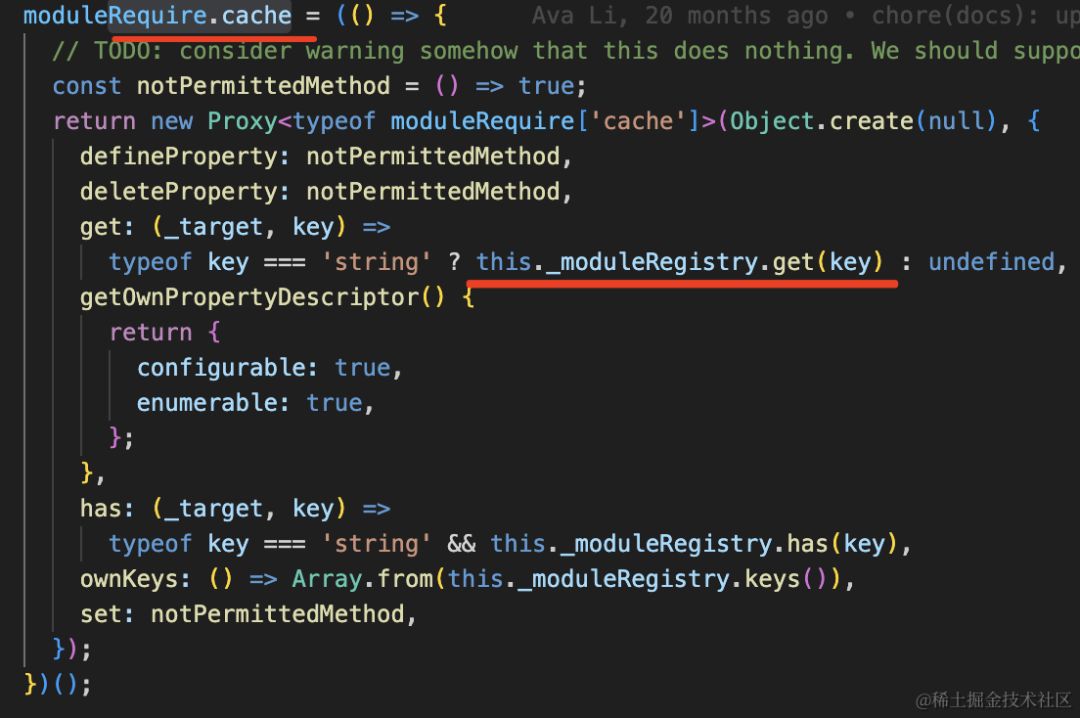
它实现 require.cache 的时候是用的 Proxy 动态代理了 get 方法,动态读取了注册的模块的值。
总之,jest 的 require 并不完全是 node 的 require,所以它能实现 mock 等功能也不奇怪。
理清了这些之后,我们就可以动手写了。
创建 my-jest.js
| const jest = { | |
| fn(impl = () => {}) { | |
| const mockFn = (...args) => { | |
| mockFn.mock.calls.push(args); | |
| return impl(...args); | |
| }; | |
| mockFn.originImpl = impl; | |
| mockFn.mock = { calls: [] }; | |
| return mockFn; | |
| }, | |
| mock(mockPath, mockExports = {}) { | |
| const path = require.resolve(mockPath); | |
| require.cache[path] = { | |
| id: path, | |
| filename: path, | |
| loaded: true, | |
| exports: mockExports, | |
| }; | |
| } | |
| }; |
jest.mock 是模块 mock,而 jest.fn 是函数 mock。
也就是这个:
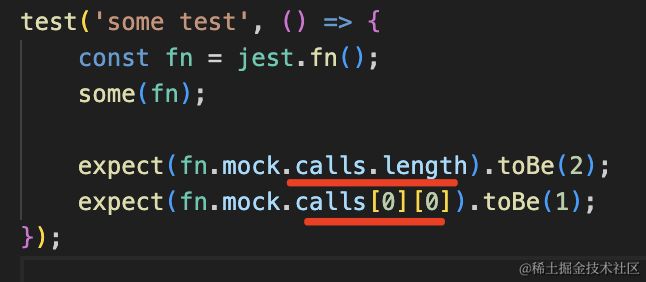
它的实现就是返回一个函数,记录每次函数调用的参数。
然后实现 test、beforeAll、beforeEach 等 api:
| const createState = () => { | |
| global["STATE"] = { | |
| testBlock: [], | |
| beforeEachBlock: [], | |
| beforeAllBlock: [], | |
| afterEachBlock: [], | |
| afterAllBlock: [], | |
| reports: [] | |
| }; | |
| }; | |
| createState(); |
在全局放一个 STATE 变量,保存 test、beforeAll、beforeEach 等块。
| const dispatch = event => { | |
| const { fn, type, name, pass } = event; | |
| switch (type) { | |
| case "ADD_TEST": | |
| const { testBlock } = global["STATE"]; | |
| testBlock.push({ fn, name }); | |
| break; | |
| case "BEFORE_EACH": | |
| const { beforeEachBlock } = global["STATE"]; | |
| beforeEachBlock.push(fn); | |
| break; | |
| case "BEFORE_ALL": | |
| const { beforeAllBlock } = global["STATE"]; | |
| beforeAllBlock.push(fn); | |
| break; | |
| case "AFTER_EACH": | |
| const { afterEachBlock } = global["STATE"]; | |
| afterEachBlock.push(fn); | |
| break; | |
| case "AFTER_ALL": | |
| const { afterAllBlock } = global["STATE"]; | |
| afterAllBlock.push(fn); | |
| break; | |
| case "COLLECT_REPORT": | |
| const { reports } = global["STATE"]; | |
| reports.push({ name, pass }); | |
| break; | |
| } | |
| }; | |
| const test = (name, fn) => dispatch({ type: "ADD_TEST", fn, name }); | |
| const afterAll = (fn) => dispatch({ type: "AFTER_ALL", fn }); | |
| const afterEach = (fn) => dispatch({ type: "AFTER_EACH", fn }); | |
| const beforeAll = (fn) => dispatch({ type: "BEFORE_ALL", fn }); | |
| const beforeEach = (fn) => dispatch({ type: "BEFORE_EACH", fn }); |
test、beforeAll、beforeEach 这些 api 就是往全局 STATE 的不同数组里 push 函数。
然后运行的时候就是从这些数组里把函数取出来跑:
| const vm = require("vm"); | |
| const fs = require("fs"); | |
| const testPath = process.argv.slice(2)[0]; | |
| const code = fs.readFileSync(testPath, { encoding: 'utf8'}); | |
| const context = { | |
| console, | |
| jest, | |
| require, | |
| afterAll, | |
| afterEach, | |
| beforeAll, | |
| beforeEach, | |
| test, | |
| }; | |
| (async () => { | |
| vm.createContext(context); | |
| vm.runInContext(code, context); | |
| const { testBlock, beforeEachBlock, beforeAllBlock, afterEachBlock, afterAllBlock } = global["STATE"]; | |
| for(let i = 0; i< beforeAllBlock.length; i++) { | |
| await beforeAllBlock[i](); | |
| } | |
| for(let i = 0; i< testBlock.length; i++) { | |
| const item = testBlock[i]; | |
| const { fn, name } = item; | |
| try { | |
| await beforeEachBlock.map(async (beforeEach) => await beforeEach()); | |
| await fn.apply(this); | |
| dispatch({ type: "COLLECT_REPORT", name, pass: 1 }); | |
| await afterEachBlock.map(async (afterEach) => await afterEach()); | |
| console.log(`${name} passed`); | |
| } catch (error) { | |
| dispatch({ type: "COLLECT_REPORT", name, pass: 0 }); | |
| console.error(error); | |
| console.log(`${name} error`); | |
| } | |
| } | |
| for(let i = 0; i< afterAllBlock.length; i++) { | |
| await afterAllBlock[i](); | |
| } | |
| const { reports } = global["STATE"]; | |
| let passNum = 0; | |
| reports.forEach(item => { | |
| passNum += item.pass; | |
| }) | |
| console.log(`All Tests: ${passNum}/${reports.length} passed`); | |
| })(); | |
从命令行传入的文件路径读取内容,然后用 vm.runInContext 执行它。
执行之后,test、beforeAll、beforeEach 等传入的函数就收集到了 STATE 里。
然后按照 beforeAll、beforeEach、fn、afterEach、afterAll 的顺序执行就好了。
记录每次是否通过,最后打印通过的单测数。
那 expect 呢?
expect 就是不同的 Matcher(匹配器),如果不匹配就抛异常:
| const expect = (actual) => ({ | |
| toBe(expected) { | |
| if (actual !== expected) { | |
| throw new Error(`${actual} is not equal to ${expected}`); | |
| } | |
| }, | |
| toBeGreaterThan(expected) { | |
| if(actual <= expected) { | |
| throw new Error(`${actual} is not greater than to ${expected}`); | |
| } | |
| } | |
| }); |
我们先试试看:
| const { sum } = require('./sum'); | |
| test('sum test1', () => { | |
| expect(sum(1, 2)).toBeGreaterThan(2); | |
| }); | |
| test('sum test2', () => { | |
| expect(sum(1, 2)).toBe(3); | |
| }); |
创建个单测文件,然后用我们写的 jest 跑一下:
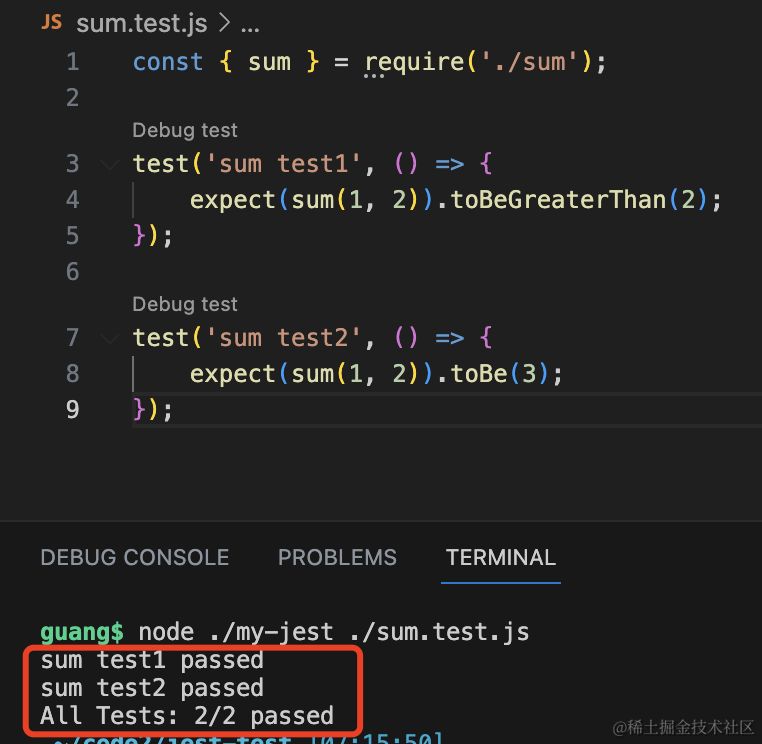
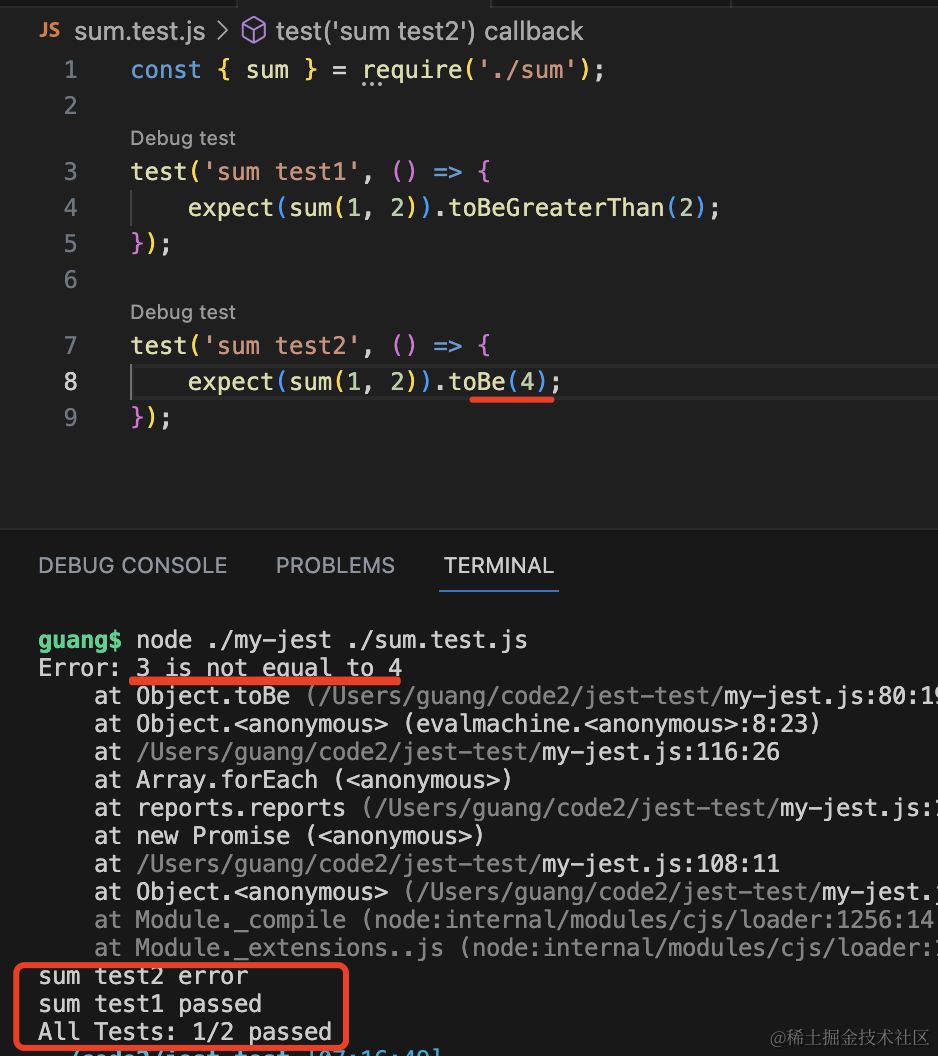
单测通过和不通过的情况都没问题。
我们再来试试 mock:
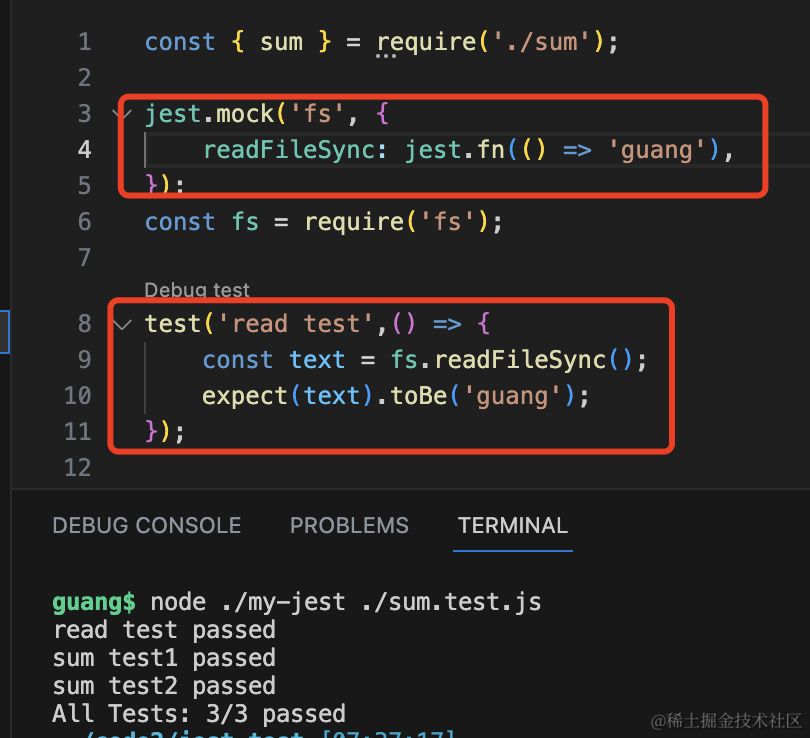
mock 模块和函数都没问题。
然后是 beforeAll 和 beforeEach:
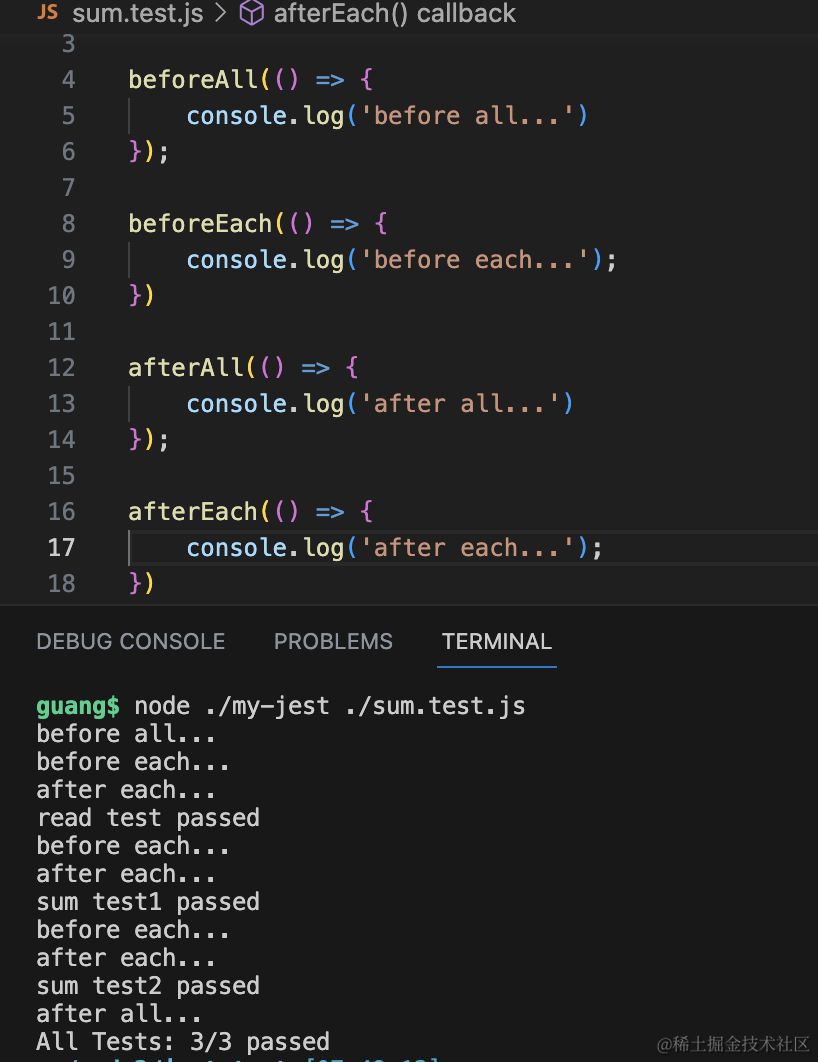
image.png
也没啥问题。
现阶段全部代码如下:
| const vm = require("vm"); | |
| const fs = require("fs"); | |
| const testPath = process.argv.slice(2)[0]; | |
| const code = fs.readFileSync(testPath, { encoding: 'utf8'}); | |
| const dispatch = event => { | |
| const { fn, type, name, pass } = event; | |
| switch (type) { | |
| case "ADD_TEST": | |
| const { testBlock } = global["STATE"]; | |
| testBlock.push({ fn, name }); | |
| break; | |
| case "BEFORE_EACH": | |
| const { beforeEachBlock } = global["STATE"]; | |
| beforeEachBlock.push(fn); | |
| break; | |
| case "BEFORE_ALL": | |
| const { beforeAllBlock } = global["STATE"]; | |
| beforeAllBlock.push(fn); | |
| break; | |
| case "AFTER_EACH": | |
| const { afterEachBlock } = global["STATE"]; | |
| afterEachBlock.push(fn); | |
| break; | |
| case "AFTER_ALL": | |
| const { afterAllBlock } = global["STATE"]; | |
| afterAllBlock.push(fn); | |
| break; | |
| case "COLLECT_REPORT": | |
| const { reports } = global["STATE"]; | |
| reports.push({ name, pass }); | |
| break; | |
| } | |
| }; | |
| const createState = () => { | |
| global["STATE"] = { | |
| testBlock: [], | |
| beforeEachBlock: [], | |
| beforeAllBlock: [], | |
| afterEachBlock: [], | |
| afterAllBlock: [], | |
| reports: [] | |
| }; | |
| }; | |
| createState(); | |
| const jest = { | |
| fn(impl = () => { }) { | |
| const mockFn = (...args) => { | |
| mockFn.mock.calls.push(args); | |
| return impl(...args); | |
| }; | |
| mockFn.originImpl = impl; | |
| mockFn.mock = { calls: [] }; | |
| return mockFn; | |
| }, | |
| mock(mockPath, mockExports = {}) { | |
| const path = require.resolve(mockPath, { paths: ["."] }); | |
| require.cache[path] = { | |
| id: path, | |
| filename: path, | |
| loaded: true, | |
| exports: mockExports, | |
| }; | |
| } | |
| }; | |
| const test = (name, fn) => dispatch({ type: "ADD_TEST", fn, name }); | |
| const afterAll = (fn) => dispatch({ type: "AFTER_ALL", fn }); | |
| const afterEach = (fn) => dispatch({ type: "AFTER_EACH", fn }); | |
| const beforeAll = (fn) => dispatch({ type: "BEFORE_ALL", fn }); | |
| const beforeEach = (fn) => dispatch({ type: "BEFORE_EACH", fn }); | |
| const expect = (actual) => ({ | |
| toBe(expected) { | |
| if (actual !== expected) { | |
| throw new Error(`${actual} is not equal to ${expected}`); | |
| } | |
| }, | |
| toBeGreaterThan(expected) { | |
| if(actual <= expected) { | |
| throw new Error(`${actual} is not greater than to ${expected}`); | |
| } | |
| } | |
| }); | |
| const context = { | |
| console, | |
| jest, | |
| expect, | |
| require, | |
| afterAll, | |
| afterEach, | |
| beforeAll, | |
| beforeEach, | |
| test, | |
| }; | |
| (async () => { | |
| vm.createContext(context); | |
| vm.runInContext(code, context); | |
| const { testBlock, beforeEachBlock, beforeAllBlock, afterEachBlock, afterAllBlock } = global["STATE"]; | |
| for(let i = 0; i< beforeAllBlock.length; i++) { | |
| await beforeAllBlock[i](); | |
| } | |
| for(let i = 0; i< testBlock.length; i++) { | |
| const item = testBlock[i]; | |
| const { fn, name } = item; | |
| try { | |
| await beforeEachBlock.map(async (beforeEach) => await beforeEach()); | |
| await fn.apply(this); | |
| dispatch({ type: "COLLECT_REPORT", name, pass: 1 }); | |
| await afterEachBlock.map(async (afterEach) => await afterEach()); | |
| console.log(`${name} passed`); | |
| } catch (error) { | |
| dispatch({ type: "COLLECT_REPORT", name, pass: 0 }); | |
| console.error(error); | |
| console.log(`${name} error`); | |
| } | |
| } | |
| for(let i = 0; i< afterAllBlock.length; i++) { | |
| await afterAllBlock[i](); | |
| } | |
| const { reports } = global["STATE"]; | |
| let passNum = 0; | |
| reports.forEach(item => { | |
| passNum += item.pass; | |
| }) | |
| console.log(`All Tests: ${passNum}/${reports.length} passed`); | |
| })(); | |
有的同学可能会说,jest 的错误打印不是这样的呀:
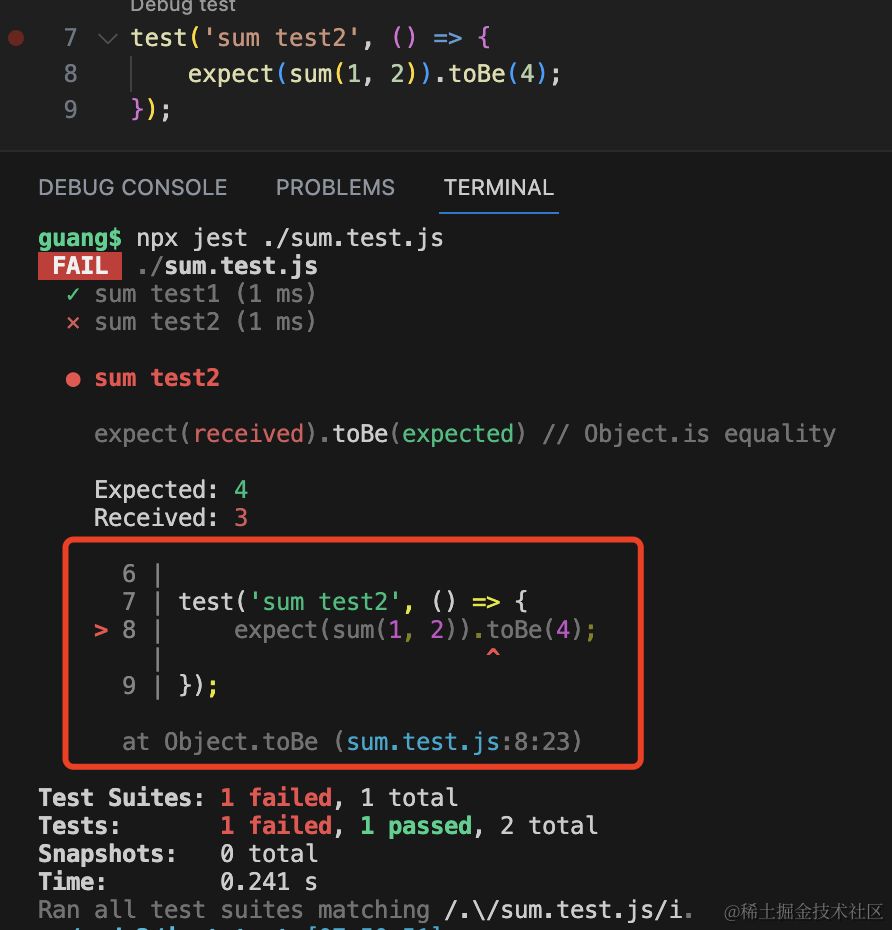
它会标记出具体的代码位置。
这个也很容易实现,直接用 @babel/code-frame 包就行:
| const { codeFrameColumns } = require('@babel/code-frame'); | |
| const rawLines = `class Foo { | |
| constructor() { | |
| console.log("hello"); | |
| } | |
| }`; | |
| const location = { | |
| start: { line: 3, column: 8 }, | |
| end: { line: 3, column: 9 }, | |
| }; | |
| const result = codeFrameColumns(rawLines, location, { | |
| highlightCode: true | |
| }); | |
| console.log(result); |
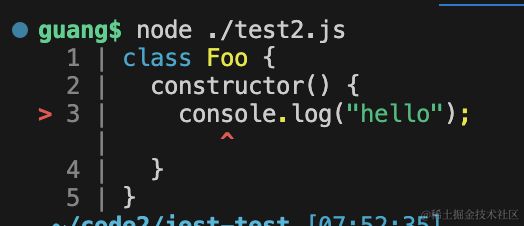
只要传入开始和结束的行列号,就会打印这样的格式,很方便。
那么问题来了,如何获得出错位置的行列号呢?
答案很巧妙,就是通过错误堆栈:

用正则匹配出来就行。
jest 内部也是这么实现的:
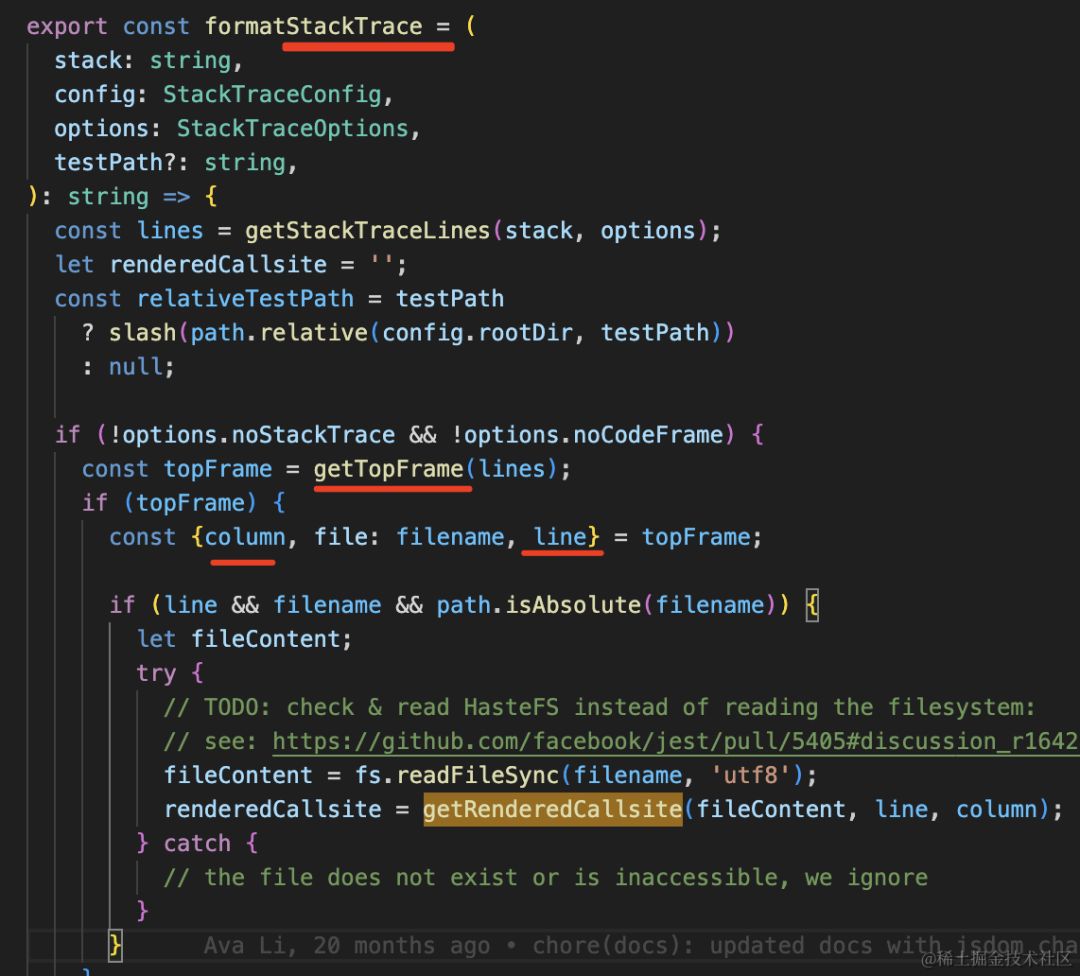
拿到错误 stack 的顶层 frame,解析出文件名和行列号。
还有一个问题,覆盖率是怎么实现的呢?
其实这个不是 jest 自己实现的,它是用的 istanbul。
istanbul 实现覆盖率检测是通过 AST 给函数加入一些埋点代码,也叫函数插桩。
比如这样的代码:
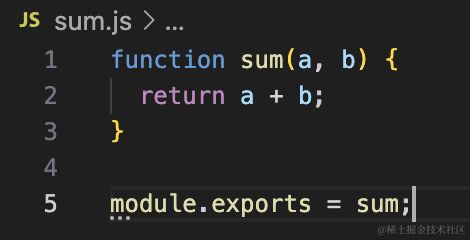
我们用 istanbul 的 babel 插件处理下:
| const babel = require('@babel/core'); | |
| const babelPluginIstanbul = require('babel-plugin-istanbul'); | |
| const res = babel.transformFileSync('./sum.js', { | |
| plugins: [ | |
| [babelPluginIstanbul, { | |
| inputSourceMap: true | |
| }] | |
| ] | |
| }); | |
| console.log(res.code); |
就变成了这样:
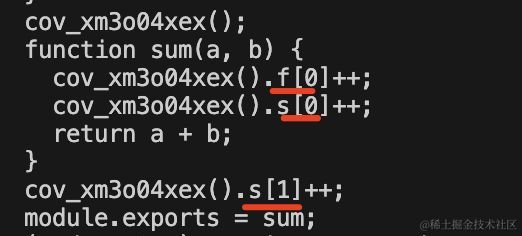
这些 ++ 很容易看懂就是计数,每执行一次都会计数。
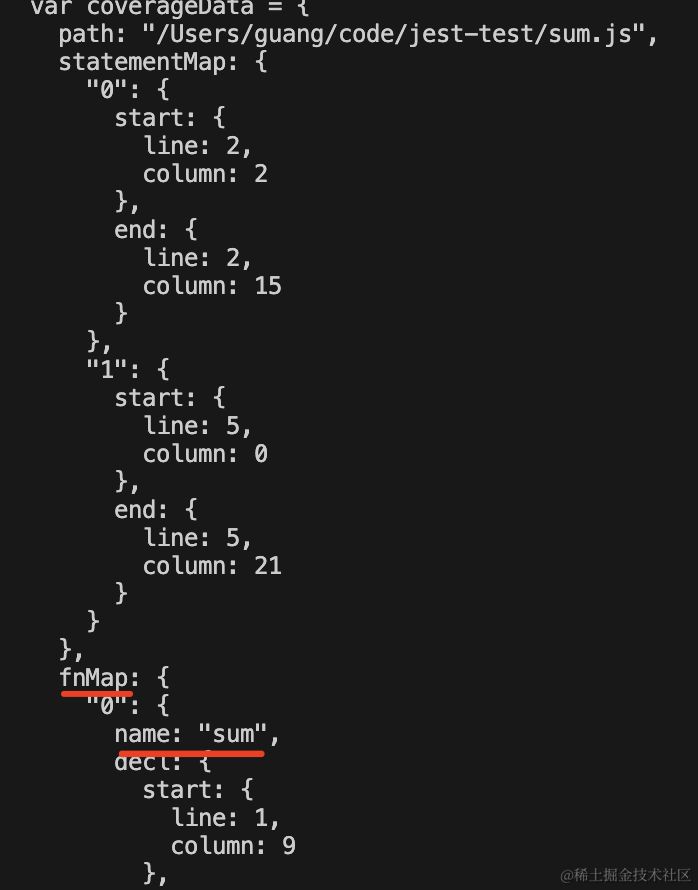
而上面还有个 map 记录着所有函数、语句的信息和执行次数:
比如 sum 这个函数的开始结束的行列号:
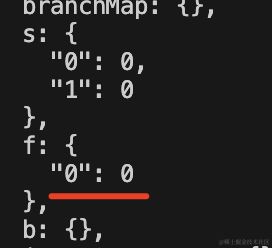
它的执行次数。
那这样当插桩后的代码执行之后,覆盖率的数据不就收集到了么?
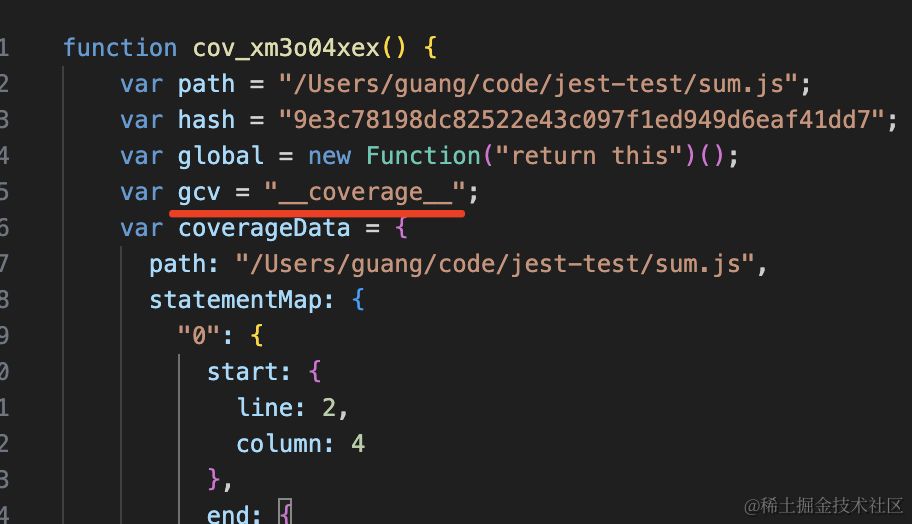
也就是这个全局变量 global['__coverage']。
接下来就把这个覆盖率数据打印出来就好了。
这里需要用到 istanbul-lib-report 和 istanbul-lib-coverage 这俩包:
代码直接用文档中的实例代码就行。
比较多,不用细看:
| const babel = require('@babel/core'); | |
| const babelPluginIstanbul = require('babel-plugin-istanbul'); | |
| const res = babel.transformFileSync('./sum.js', { | |
| plugins: [ | |
| [babelPluginIstanbul, { | |
| inputSourceMap: true | |
| }] | |
| ] | |
| }); | |
| eval(res.code); | |
| const libReport = require('istanbul-lib-report'); | |
| const reports = require('istanbul-reports'); | |
| var libCoverage = require('istanbul-lib-coverage'); | |
| var map = libCoverage.createCoverageMap(); | |
| var summary = libCoverage.createCoverageSummary(); | |
| map.merge(global['__coverage__']); | |
| map.files().forEach(function(f) { | |
| var fc = map.fileCoverageFor(f), | |
| s = fc.toSummary(); | |
| summary.merge(s); | |
| }); | |
| const context = libReport.createContext({ | |
| coverageMap: map, | |
| }) | |
| const report = reports.create('text') | |
| report.execute(context) |
只看效果就行:
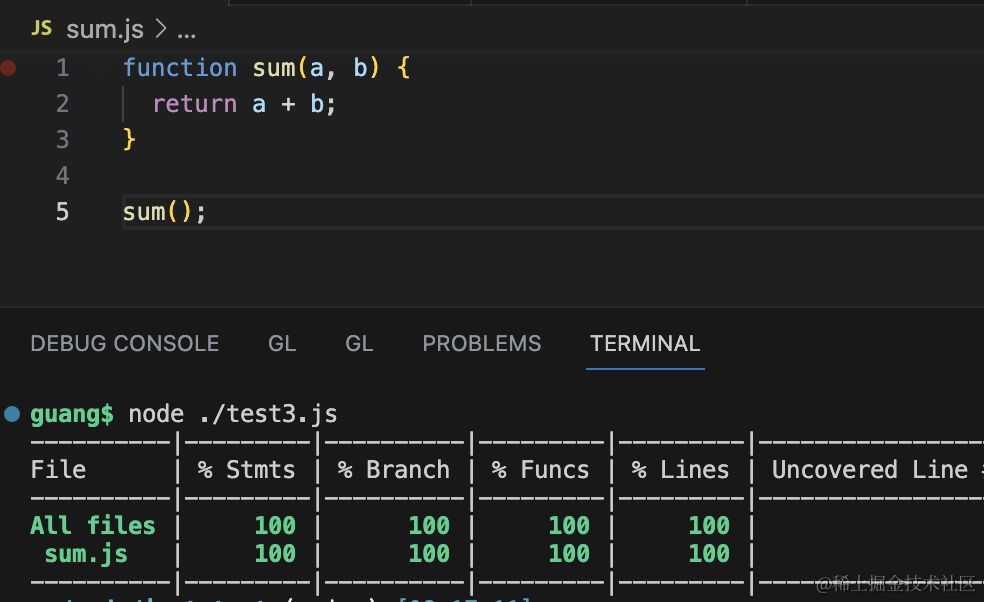
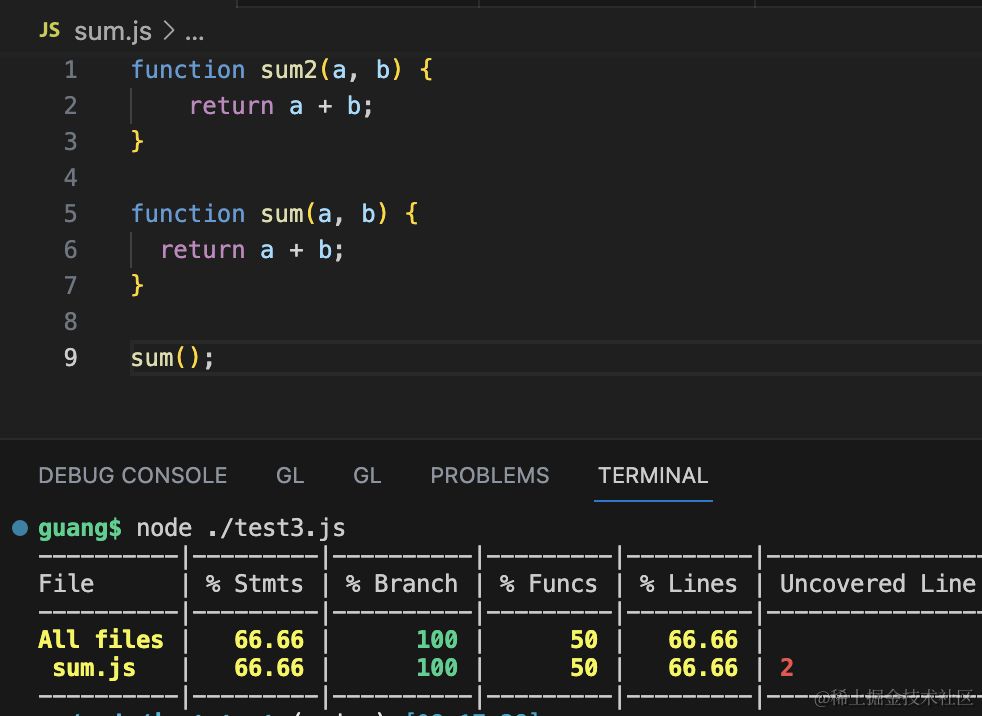
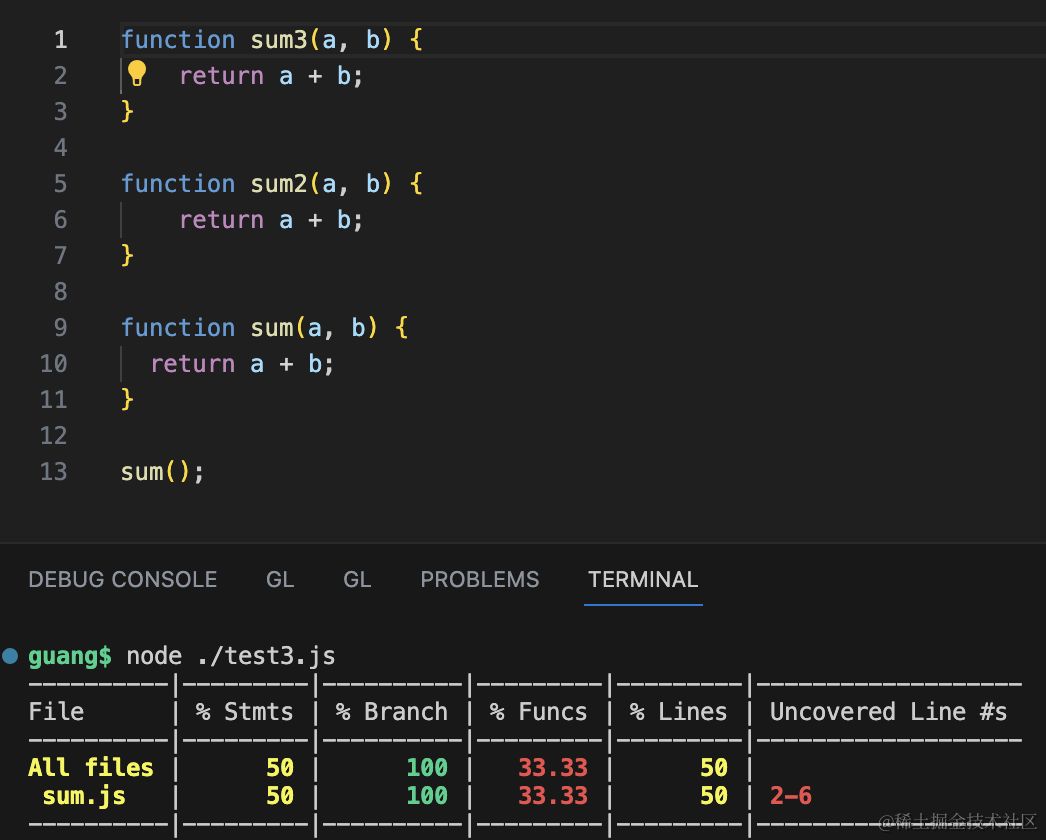
可以看到,测试覆盖率是准的。
jest 就是用的这个:
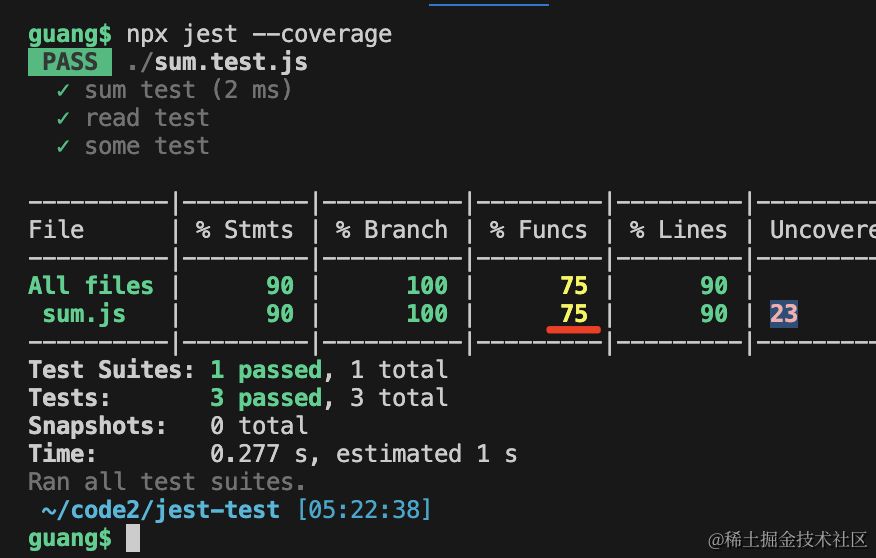
至此,我们对 jest 的实现原理就有了一个相对全面的了解。
总结
我们先用了一下 Jest,然后探究了下它的实现原理。
Jest 的核心功能就是 Matcher(expect 函数),Mock(函数 mock 和模块 mock),再就是钩子函数。
能在测试文件里直接用 test、jest、beforeAll、expect 等 api 是因为 Jest 是用 vm.runInContext 来运行的代码,可以自己指定全局上下文。
包括 require 也是 Jest 自己实现的版本,所以可以实现 Mock 的功能,当然,我们直接修改 require.cache 也可以实现类似功能。
我们实现了支持单测运行、支持钩子函数、支持 Mock 的简易版 Jest。
还有一些功能没实现:
比如错误打印代码位置,这个用 @babel/code-frame + 解析错误堆栈的行列号来实现。
比如覆盖率检测,这个直接用 istanbul 就行,它是通过函数插桩拿到覆盖率数据,放在一个 __corverage__ 的全局变量上,然后用别的包把它打印出来就行。
相信写完这个简易版 Jest,你会对 Jest 有一个更全面和深入的理解。