目录
- 介绍
- 设计
- 项目结构
- UI端代码
- 后端代码
- 运行效果
介绍
在上一篇“SimpleAdapter“章节中,我们看到了把:ListView和Listview内部详细页面进行分离的Adapter的设计手法。
可是,这个SimpleAdapter的构造函数不够录活、苦涩难懂。很难满足我们实际大多生产场景的开发。
因此,今天我们就要来看一个更人性化的“自定义BaseAdapter“。实际生产应用场景开发中充斥着自定义BaseAdapter,因此必须要提及它并且围绕着这个extends BaseAdapter我们要持续说不少高级特性。
先来看一下课程最终要实现的目标
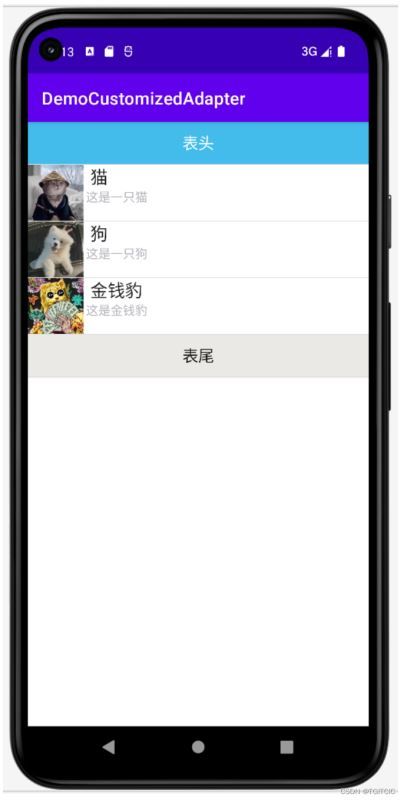
有喵、有汪、有金钱。还多了表头和表尾。
我们这次就要使用真正的面向业务逻辑、面向对象的手法来实现这个界面。
设计
上述界面其实和上一篇例子相仿,使用到了:1个ImageView、两个TextView。
只不过这次我们用的是标准MVC模式的自定义Adapter。
项目结构

是不是很详尽?保姆式教程,不详尽不称为“保姆”。
先来看UI端代码
UI端代码
这一块和上一篇几乎相似,没有什么太多变化
activity_main.xml文件
很简单,没有任何神密可言,就一个“光杆”Listview的存在。
| <LinearLayout xmlns:android="http://schemas.android.com/apk/res/android" | |
| xmlns:tools="http://schemas.android.com/tools" | |
| android:layout_width="match_parent" | |
| android:layout_height="match_parent" | |
| android:orientation="vertical" | |
| tools:context=".MainActivity"> | |
| <ListView | |
| android:id="@+id/listView" | |
| android:layout_width="match_parent" | |
| android:layout_height="match_parent" /> | |
| </LinearLayout> |
customized_layout.xml文件
内容也是very easy,属于“常规损人和”,和上一篇无异。
| <LinearLayout xmlns:android="http://schemas.android.com/apk/res/android" | |
| android:layout_width="match_parent" | |
| android:layout_height="match_parent"> | |
| <!-- 定义一个用于显示头像的ImageView --> | |
| <ImageView | |
| android:id="@+id/touxiang" | |
| android:layout_width="dp" | |
| android:layout_height="dp" | |
| android:baselineAlignBottom="true" | |
| android:paddingLeft="dp" /> | |
| <!-- 定义一个竖直方向的LinearLayout,把QQ呢称与说说的文本框设置出来 --> | |
| <LinearLayout | |
| android:layout_width="match_parent" | |
| android:layout_height="wrap_content" | |
| android:orientation="vertical"> | |
| <TextView | |
| android:id="@+id/name" | |
| android:layout_width="wrap_content" | |
| android:layout_height="wrap_content" | |
| android:paddingLeft="dp" | |
| android:textColor="#D1D1C" | |
| android:textSize="sp" /> | |
| <TextView | |
| android:id="@+id/description" | |
| android:layout_width="wrap_content" | |
| android:layout_height="wrap_content" | |
| android:paddingLeft="px" | |
| android:textColor="#BB4B9" | |
| android:textSize="sp" /> | |
| </LinearLayout> | |
| </LinearLayout> |
后端代码
PetBean.java
| package org.mk.android.demo.democustomizedadapter; | |
| import java.io.Serializable; | |
| public class PetBean implements Serializable { | |
| private String name = ""; | |
| private int imgId; | |
| private String description = ""; | |
| public int getImgId() { | |
| return imgId; | |
| } | |
| public void setImgId(int imgId) { | |
| this.imgId = imgId; | |
| } | |
| public String getDescription() { | |
| return description; | |
| } | |
| public void setDescription(String description) { | |
| this.description = description; | |
| } | |
| public String getName() { | |
| return name; | |
| } | |
| public void setName(String name) { | |
| this.name = name; | |
| } | |
| public PetBean(int touxiang, String name, String description) { | |
| this.imgId = touxiang; | |
| this.name = name; | |
| this.description = description; | |
| } | |
| } |
这个Java Bean里分别就对应着一个ImageView,两个TextView。
始终记得,把Image传递给到Adapter用的是一个int值,它来源于:R.drawable.图片名称(不带.即postfix)。
PetAdapter.java
| package org.mk.android.demo.democustomizedadapter; | |
| import android.content.Context; | |
| import android.view.LayoutInflater; | |
| import android.view.View; | |
| import android.view.ViewGroup; | |
| import android.widget.BaseAdapter; | |
| import android.widget.ImageView; | |
| import android.widget.TextView; | |
| import java.util.List; | |
| public class PetAdapter extends BaseAdapter { | |
| private List<PetBean> data; | |
| private Context ctx; | |
| public PetAdapter(List<PetBean> data, Context ctx) { | |
| this.data = data; | |
| this.ctx = ctx; | |
| } | |
| public int getCount() { | |
| if (data != null) { | |
| return data.size(); | |
| } | |
| return; | |
| } | |
| public Object getItem(int i) { | |
| return null; | |
| } | |
| public long getItemId(int i) { | |
| return i; | |
| } | |
| public View getView(int i, View view, ViewGroup viewGroup) { | |
| MyViewHolder viewHolder=null; | |
| if (view == null) { | |
| view = LayoutInflater.from(ctx).inflate(R.layout.customized_layout, viewGroup, false); | |
| viewHolder=new MyViewHolder(); | |
| viewHolder.touxiang = (ImageView) view.findViewById(R.id.touxiang); | |
| viewHolder.name = (TextView) view.findViewById(R.id.name); | |
| viewHolder.description = (TextView) view.findViewById(R.id.description); | |
| view.setTag(viewHolder); | |
| }else{ | |
| viewHolder=(MyViewHolder)view.getTag(); | |
| } | |
| if (data != null) { | |
| viewHolder.touxiang.setBackgroundResource(data.get(i).getImgId()); | |
| viewHolder.name.setText(data.get(i).getName()); | |
| viewHolder.description.setText(data.get(i).getDescription()); | |
| return view; | |
| } | |
| return null; | |
| } | |
| static class MyViewHolder { | |
| public ImageView touxiang; | |
| public TextView name; | |
| public TextView description; | |
| } | |
| } |
代码导读
整个自定义的Adapter是extends自BaseAdapter,这个BaseAdapter在extends后有几个方法需要进行覆盖:
1.构造函数,构造函数里需要两个参数:
- 第一个参数,构造函数里把自定义的数据源在上一例里我们用的是List<Map<String,Object>>(不够面向对象),而这边就是List<我们的ViewBean>传进去;
- Context,如果在MainActivity.java里,我们就可以用这样的形式来传这个参数:Context ctx = MainActivity.this;
2.public int getCount() ,它返回的就是你的ListView里有多少行的这个size即我们在构造方法里传入的这个List<ViewBean>的size;
3.public Object getItem(int i),这个方法我们在后一步,高级定制化Adapter里会进一步用到,目前在此我们直接return null就完事了,不用作纠结;
4.public long getItemId(int i),这边的int i其实是position,我们可以这么干:直接return i即可,它其实是一种“一行行从List<ViewBean>取出数据做渲染”用的;
5.public View getView(int i, View view, ViewGroup viewGroup) ,这个函数是核心,它的故事长了,来看一步步导读:
这个方法的作用就是一条条把List<ViewBean>数据取出来作渲染用的,它依赖于这一句话:LayoutInflater.from(ctx).inflate(R.layout.customized_layout,
viewGroup, false);这个语句被调用的次数=List.size(),每调用一次这条语句,Android界面会渲染一次(一次开销);
每一个ListView内的行显示的内容根据List<ViewBean>里每一行不同的内容会有不同的显示,在这边的一行指的就是:一个ImageView+两个TextView的渲染。因此你要做的就是一个个“控制件名.set属性(List里取出相应的该行的这个数组的属性件)”,因此才有了如此的写法:name.setText(data.get(i).getName());如:description.setText(data.get(i).getDescription());如:touxiang.setBackgroundResource(data.get(i).getImgId());这样的东西。随便说一句:此处的i带的正是getView里的(int i...)里的这个i,这个i对应着你的List<ViewBean>里当前的“游标”;
全部一个个set完了后,把这个view return出去;
接着我们来说,这块代码看似没逻辑那为什么会有:View Holder?这是一个什么鬼?前面我们提到了一句:
LayoutInflater.from(ctx).inflate(R.layout.customized_layout, viewGroup, false);这个语句被调用的次数=List.size(),每调用一次这条语句,Android界面会渲染一次,这个动作其实是很开销资源的。比如说我的List<ViewBean>里有100条数据,Android会界面渲染100次。其实这个渲染只是一个“一次性”的事,在这边只要渲染一次就够了,其余99次是多余重复的。渲染太多会造成这个Android极其吃手机的“运存”。所以我们使用了一个小技巧:只在这个View为空时做一次渲染。渲染过后就不要再渲染了,直接填充界面控件内的属性值就行了。因此才有了第一个if (view == null) {的判断。
那么ViewHolder呢?还是没有解释ViewHolder的作用。我们前面解决了这个LayoutInflater.from(ctx).inflate的重复调用问题,但是读者们知道吗?你在getView方法里的findViewById(R.id.description)这样的东西也是会每次被重复调用一次的,举例来说:你有3个控件,在List<ViewBean>里有3行数据,你以为你只调用了3次findViewById?其实是调用了总计3*3=9次,即调用第二个控件的findViewById时它依旧会重复调用第一个控件的findViewById。这个动作也是开销Android的运存和cpu的。那么我们同样为了减少findViewById的重复调用,因此我们使用一个MyViewHolder,让其和我们的ViewBean(此处就是PetBean)一样的结构,它专门是用于保存已经被调用过findViewById的状态(TAG)。然后使用view.setTag和view.getTag来做状态保留。如果这个Tag存在那么不用再findViewById一次了。如果不存在再findViewById一次;
接着我们就来看交程序交互后端代码MainActivity.java
MainActivity.java
| package org.mk.android.demo.democustomizedadapter; | |
| import androidx.appcompat.app.AppCompatActivity; | |
| import android.content.Context; | |
| import android.os.Bundle; | |
| import android.view.LayoutInflater; | |
| import android.view.View; | |
| import android.widget.ListView; | |
| import java.util.ArrayList; | |
| import java.util.List; | |
| public class MainActivity extends AppCompatActivity { | |
| private List<PetBean> data = null; | |
| private Context ctx; | |
| private PetAdapter adapter = null; | |
| private ListView listView; | |
| protected void onCreate(Bundle savedInstanceState) { | |
| super.onCreate(savedInstanceState); | |
| setContentView(R.layout.activity_main); | |
| ctx = MainActivity.this; | |
| listView = (ListView) findViewById(R.id.listView); | |
| data = new ArrayList<PetBean>(); | |
| data.add(new PetBean(R.drawable.cat,"猫","这是一只猫")); | |
| data.add(new PetBean(R.drawable.dog,"狗","这是一只狗")); | |
| data.add(new PetBean(R.drawable.jingqianbao,"金钱豹","这是金钱豹")); | |
| adapter = new PetAdapter((List<PetBean>) data, ctx); | |
| final LayoutInflater inflater = LayoutInflater.from(this); | |
| View headView = inflater.inflate(R.layout.view_header, null, false); | |
| View footView = inflater.inflate(R.layout.view_footer, null, false); | |
| listView.addHeaderView(headView); | |
| listView.addFooterView(footView); | |
| listView.setAdapter(adapter); | |
| } | |
| } |
我们这次为我们的ListView增加了一个表头,一个表尾。表头表尾分别对应着两个layout xml文件,它们位于我们项目的res\layout目录下。
注:
记得在调用addHeaderView和addFootView的动作必须位于setAdapter(adapter)语句前;
表头样式-view_header.xml
| <LinearLayout xmlns:android="http://schemas.android.com/apk/res/android" | |
| android:layout_width="match_parent" | |
| android:layout_height="match_parent" | |
| android:orientation="vertical" | |
| android:gravity="center"> | |
| <TextView | |
| android:layout_width="match_parent" | |
| android:layout_height="dp" | |
| android:textSize="sp" | |
| android:text="表头" | |
| android:gravity="center" | |
| android:background="#BBEB" | |
| android:textColor="#FFFFFF"/> | |
| </LinearLayout> |
表尾样式-view_footer.xml
| <LinearLayout xmlns:android="http://schemas.android.com/apk/res/android" | |
| android:layout_width="match_parent" | |
| android:layout_height="match_parent" | |
| android:orientation="vertical" | |
| android:gravity="center"> | |
| <TextView | |
| android:layout_width="match_parent" | |
| android:layout_height="dp" | |
| android:textSize="sp" | |
| android:text="表尾" | |
| android:gravity="center" | |
| android:background="#ECEE6" | |
| android:textColor="#C0C0C"/> | |
| </LinearLayout> |
运行效果

自己动一下手试试就能找到自定义Adapter的感觉。自定义Adapter的作用很大、使用场景也很多。我们后面会继续强化自定义Adapter的业务场景的使用。