前言
Three.js是一款基于原生WebGL封装通用Web 3D引擎,在小游戏、产品展示、物联网、数字孪生、智慧城市园区、机械、建筑、全景看房、GIS等各个领域基本上都有three.js的身影。
本文需要对 threejs 的一些基本概念和 api 有一定了解。
如果对 threejs 这部分还不了解的可以看下官方文档和一些中文文档进行学习。
官方文档地址:threejs.org/ 中文文档地址:www.webgl3d.cn/pages/aac9a…
本文主要主要讲述对 threejs 的一些 api 进行基本的封装,在 vue3 项目中来实现一个可视化的3d项目。包含了一些常用的功能,场景、灯光、摄像机初始化,模型、天空盒的加载,以及鼠标点击和悬浮的事件交互。
项目截图:

Github 地址:github.com/fh332393900…
项目预览地址:stevenfeng.cn/threejs-dem…
基础功能
1.场景 Viewer 类
首先我们第一步需要初始化场景、摄像机、渲染器、灯光等。这些功能只需要加载一次,我们都放到 Viewer 类中可以分离关注点,在业务代码中就不需要关注这一部分逻辑。业务代码中我们只需要关注数据与交互即可。
1.1 初始化场景和摄像机
| js | |
| 复制代码 | |
| private initScene() { | |
| this.scene = new Scene(); | |
| } | |
| private initCamera() { | |
| // 渲染相机 | |
| this.camera = new PerspectiveCamera(25, window.innerWidth / window.innerHeight, 1, 2000); | |
| //设置相机位置 | |
| this.camera.position.set(4, 2, -3); | |
| //设置相机方向 | |
| this.camera.lookAt(0, 0, 0); | |
| } |
1.2 初始化摄像机控制器
| js | |
| 复制代码 | |
| private initControl() { | |
| this.controls = new OrbitControls( | |
| this.camera as Camera, | |
| this.renderer?.domElement | |
| ); | |
| this.controls.enableDamping = false; | |
| this.controls.screenSpacePanning = false; // 定义平移时如何平移相机的位置 控制不上下移动 | |
| this.controls.minDistance = 2; | |
| this.controls.maxDistance = 1000; | |
| this.controls.addEventListener('change', ()=>{ | |
| this.renderer.render(this.scene, this.camera); | |
| }); | |
| } |
1.3 初始化灯光
这里放了一个环境灯光和平行灯光,这里是写在 Viewer 类里面的,如果想灵活一点,也可以抽出去。
| js | |
| 复制代码 | |
| private initLight() { | |
| const ambient = new AmbientLight(0xffffff, 0.6); | |
| this.scene.add(ambient); | |
| const light = new THREE.DirectionalLight( 0xffffff ); | |
| light.position.set( 0, 200, 100 ); | |
| light.castShadow = true; | |
| light.shadow.camera.top = 180; | |
| light.shadow.camera.bottom = -100; | |
| light.shadow.camera.left = -120; | |
| light.shadow.camera.right = 400; | |
| light.shadow.camera.near = 0.1; | |
| light.shadow.camera.far = 400; | |
| // 设置mapSize属性可以使阴影更清晰,不那么模糊 | |
| light.shadow.mapSize.set(1024, 1024); | |
| this.scene.add(light); | |
| } |
1.4 初始化渲染器
| js | |
| 复制代码 | |
| private initRenderer() { | |
| // 获取画布dom | |
| this.viewerDom = document.getElementById(this.id) as HTMLElement; | |
| // 初始化渲染器 | |
| this.renderer = new WebGLRenderer({ | |
| logarithmicDepthBuffer: true, | |
| antialias: true, // true/false表示是否开启反锯齿 | |
| alpha: true, // true/false 表示是否可以设置背景色透明 | |
| precision: 'mediump', // highp/mediump/lowp 表示着色精度选择 | |
| premultipliedAlpha: true, // true/false 表示是否可以设置像素深度(用来度量图像的分辨率) | |
| // preserveDrawingBuffer: false, // true/false 表示是否保存绘图缓冲 | |
| // physicallyCorrectLights: true, // true/false 表示是否开启物理光照 | |
| }); | |
| this.renderer.clearDepth(); | |
| this.renderer.shadowMap.enabled = true; | |
| this.renderer.outputColorSpace = SRGBColorSpace; // 可以看到更亮的材质,同时这也影响到环境贴图。 | |
| this.viewerDom.appendChild(this.renderer.domElement); | |
| } |
Viewer 里面还加了一些 addAxis 添加坐标轴、addStats 性能监控等辅助的公用方法。具体可以看仓库完整代码。
1.5 鼠标事件
里面主要使用了 mitt 这个库,来发布订阅事件。
threejs里面的鼠标事件主要通过把屏幕坐标转换成 3D 坐标。通过raycaster.intersectObjects方法转换。
| js | |
| 复制代码 | |
| /**注册鼠标事件监听 */ | |
| public initRaycaster() { | |
| this.raycaster = new Raycaster(); | |
| const initRaycasterEvent: Function = (eventName: keyof HTMLElementEventMap): void => { | |
| const funWrap = throttle( | |
| (event: any) => { | |
| this.mouseEvent = event; | |
| this.mouse.x = (event.clientX / window.innerWidth) * 2 - 1; | |
| this.mouse.y = - (event.clientY / window.innerHeight) * 2 + 1; | |
| // @ts-expect-error | |
| this.emitter.emit(Events[eventName].raycaster, this.getRaycasterIntersectObjects()); | |
| }, | |
| 50 | |
| ); | |
| this.viewerDom.addEventListener(eventName, funWrap, false); | |
| }; | |
| // 初始化常用的几种鼠标事件 | |
| initRaycasterEvent('click'); | |
| initRaycasterEvent('dblclick'); | |
| initRaycasterEvent('mousemove'); | |
| } | |
| /**自定义鼠标事件触发的范围,给定一个模型组,对给定的模型组鼠标事件才生效 */ | |
| public setRaycasterObjects (objList: THREE.Object3D[]): void { | |
| this.raycasterObjects = objList; | |
| } | |
| private getRaycasterIntersectObjects(): THREE.Intersection[] { | |
| if (!this.raycasterObjects.length) return []; | |
| this.raycaster.setFromCamera(this.mouse, this.camera); | |
| return this.raycaster.intersectObjects(this.raycasterObjects, true); | |
| } |
通过 setRaycasterObjects 方法,传递一个触发鼠标事件的模型范围,可以避免在整个场景中都去触发鼠标事件。这里也可以用一个 Map 去存不同模型的事件,在取消订阅时再移除。
使用方式:
| js | |
| 复制代码 | |
| let viewer: Viewer; | |
| viewer = new Viewer('three'); | |
| viewer.initRaycaster(); | |
| viewer.emitter.on(Event.dblclick.raycaster, (list: THREE.Intersection[]) => { | |
| onMouseClick(list); | |
| }); | |
| viewer.emitter.on(Event.mousemove.raycaster, (list: THREE.Intersection[]) => { | |
| onMouseMove(list); | |
| }); |
2.模型加载器 ModelLoder 类
模型的加载我们需要用的threejs里面的,GLTFLoader、DRACOLoader 这两个类。
模型加载器 ModelLoder 初始化的时候需要把 Viewer 的实例传进去。
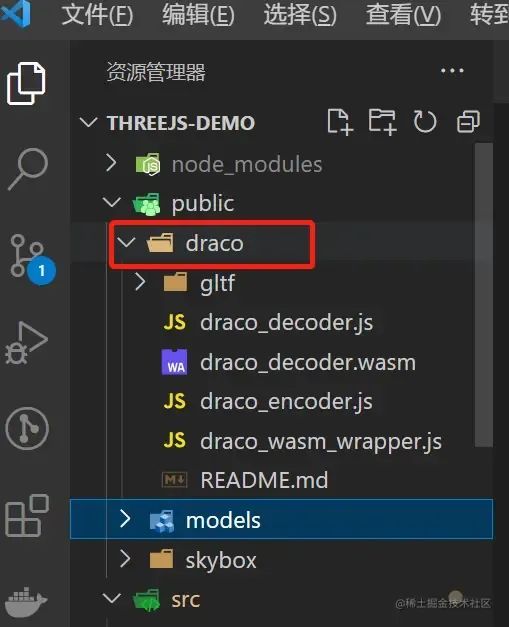
需要注意的是,需要把 draco 从 node_modules 拷贝到项目的 public 目录中去。
实现代码:
| js | |
| 复制代码 | |
| import { GLTFLoader } from 'three/examples/jsm/loaders/GLTFLoader'; | |
| import { DRACOLoader } from 'three/examples/jsm/loaders/DRACOLoader'; | |
| import BaseModel from '../BaseModel'; | |
| import type Viewer from '../Viewer'; | |
| type LoadModelCallbackFn<T = any> = (arg: T) => any; | |
| /**模型加载器 */ | |
| export default class ModelLoder { | |
| protected viewer: Viewer; | |
| private gltfLoader: GLTFLoader; | |
| private dracoLoader: DRACOLoader; | |
| constructor(viewer: Viewer, dracolPath: string = '/draco/') { | |
| this.viewer = viewer; | |
| this.gltfLoader = new GLTFLoader(); | |
| this.dracoLoader = new DRACOLoader(); | |
| // 提供一个DracLoader实例来解码压缩网格数据 | |
| // 没有这个会报错 dracolPath 默认放在public文件夹当中 | |
| this.dracoLoader.setDecoderPath(dracolPath); | |
| this.gltfLoader.setDRACOLoader(this.dracoLoader); | |
| } | |
| /**模型加载到场景 */ | |
| public loadModelToScene(url: string, callback: LoadModelCallbackFn<BaseModel>) { | |
| this.loadModel(url, model => { | |
| this.viewer.scene.add(model.object); | |
| callback && callback(model); | |
| }); | |
| } | |
| private loadModel(url: string, callback: LoadModelCallbackFn<BaseModel>) { | |
| this.gltfLoader.load(url, gltf => { | |
| const baseModel = new BaseModel(gltf, this.viewer); | |
| callback && callback(baseModel); | |
| }); | |
| } | |
| } |
3.模型 BaseModel 类
这里对模型外面包了一层,做了一些额外的功能,如模型克隆、播放动画、设置模型特性、颜色、材质等方法。
| js | |
| 复制代码 | |
| /** | |
| * 设置模型动画 | |
| * @param i 选择模型动画进行播放 | |
| */ | |
| public startAnima(i = 0) { | |
| this.animaIndex = i; | |
| if (!this.mixer) this.mixer = new THREE.AnimationMixer(this.object); | |
| if (this.gltf.animations.length < 1) return; | |
| this.mixer.clipAction(this.gltf.animations[i]).play(); | |
| // 传入参数需要将函数与函数参数分开,在运行时填入 | |
| this.animaObject = { | |
| fun: this.updateAnima, | |
| content: this, | |
| }; | |
| this.viewer.addAnimate(this.animaObject); | |
| } | |
| private updateAnima(e: any) { | |
| e.mixer.update(e.clock.getDelta()); | |
| } |
还有一些其他方法的实现,可以看仓库代码。
4.天空盒 SkyBoxs 类
| js | |
| 复制代码 | |
| import * as THREE from 'three'; | |
| import type Viewer from '../Viewer'; | |
| import { Sky } from '../type'; | |
| /** 场景天空盒*/ | |
| export default class SkyBoxs { | |
| protected viewer: Viewer; | |
| constructor (viewer: Viewer) { | |
| this.viewer = viewer; | |
| } | |
| /** | |
| * 添加雾效果 | |
| * @param color 颜色 | |
| */ | |
| public addFog (color = 0xa0a0a0, near = 500, far = 2000) { | |
| this.viewer.scene.fog = new THREE.Fog(new THREE.Color(color), near, far); | |
| } | |
| /** | |
| * 移除雾效果 | |
| */ | |
| public removeFog () { | |
| this.viewer.scene.fog = null; | |
| } | |
| /** | |
| * 添加默认天空盒 | |
| * @param skyType | |
| */ | |
| public addSkybox (skyType: keyof typeof Sky = Sky.daytime) { | |
| const path = `/skybox/${Sky[skyType]}/`; // 设置路径 | |
| const format = '.jpg'; // 设定格式 | |
| this.setSkybox(path, format); | |
| } | |
| /** | |
| * 自定义添加天空盒 | |
| * @param path 天空盒地址 | |
| * @param format 图片后缀名 | |
| */ | |
| private setSkybox (path: string, format = '.jpg') { | |
| const loaderbox = new THREE.CubeTextureLoader(); | |
| const cubeTexture = loaderbox.load([ | |
| path + 'posx' + format, | |
| path + 'negx' + format, | |
| path + 'posy' + format, | |
| path + 'negy' + format, | |
| path + 'posz' + format, | |
| path + 'negz' + format, | |
| ]); | |
| // 需要把色彩空间编码改一下 | |
| cubeTexture.encoding = THREE.sRGBEncoding; | |
| this.viewer.scene.background = cubeTexture; | |
| } | |
| } |
5.模型轮廓辅助线
通过 BoxHelper 可以实现简单的鼠标选中的特效。
也可以通过 OutlinePass 实现发光的特效。
这里有一篇关于 threejs 中轮廓线、边框线、选中效果实现的N种方法以及性能评估的文章:zhuanlan.zhihu.com/p/462329055
| js | |
| 复制代码 | |
| import { | |
| BoxHelper, | |
| Color, | |
| Object3D | |
| } from 'three'; | |
| import type Viewer from '../Viewer'; | |
| export default class BoxHelperWrap { | |
| protected viewer: Viewer; | |
| public boxHelper: BoxHelper; | |
| constructor (viewer: Viewer, color?: number) { | |
| this.viewer = viewer; | |
| const boxColor = color === undefined ? 0x00ffff : color; | |
| this.boxHelper = new BoxHelper(new Object3D(), new Color(boxColor)); | |
| // // @ts-expect-error | |
| // this.boxHelper.material.depthTest = false; | |
| this.initBoxHelperWrap(); | |
| } | |
| private initBoxHelperWrap () { | |
| this.viewer.scene.add(this.boxHelper); | |
| } | |
| public setVisible (visible: boolean): void { | |
| this.boxHelper.visible = visible; | |
| } | |
| public attach (obj: Object3D): void { | |
| this.boxHelper.setFromObject(obj); | |
| this.setVisible(true); | |
| } | |
| public dispose (): void { | |
| const parent = this.boxHelper.parent; | |
| if (parent !== null) { | |
| parent.remove(this.boxHelper); | |
| } | |
| Object.keys(this).forEach(key => { | |
| // @ts-expect-error | |
| this[key] = null; | |
| }); | |
| } | |
| } |
使用方式:
| js | |
| 复制代码 | |
| let modelLoader = new ModelLoader(viewer); | |
| boxHelperWrap = new BoxHelperWrap(viewer); | |
| boxHelperWrap.setVisible(false); |
推荐项目
以上功能的封装主要参考了以下几个比较不错的项目
github.com/alwxkxk/iot…
gitee.com/303711888/t…
还有一个用 vue3 hooks来写的
github.com/fengtianxi0…
最后
最后,欢迎大家交流探讨,如果本文对您有帮助的话,可以点赞👍和star⭐