本文我们将介绍如何操作或赋值给html属性,更改样式

v-bind
从一个例子来看我们为什么要使用v-bind绑定:
| //index.html | |
| <html lang="en"><head><meta charset="UTF-8" /><meta name="viewport" content="width=device-width, initial-scale=1.0" /><meta http-equiv="X-UA-Compatible" content="ie=edge" /><title>vue模板和组件</title></head><body><div id="databinding"> | |
| {{ title }}<br /><a href="hreflink" target="_blank"> Click Me </a> <br /><a href="{{ hreflink }}" target="_blank">Click Me </a> <br /><a v-bind:href="hreflink" target="_blank">Click Me </a> <br /></div><script src="https://cdn.jsdelivr.net/npm/vue"></script><script type="text/javascript" src="js/app.js"></script></body> | |
| </html> | |
| //app.js | |
| var vm = new Vue({ | |
| el: '#databinding', | |
| data: { | |
| title: "数据绑定", | |
| hreflink: "http://www.google.com" | |
| } | |
| }); |
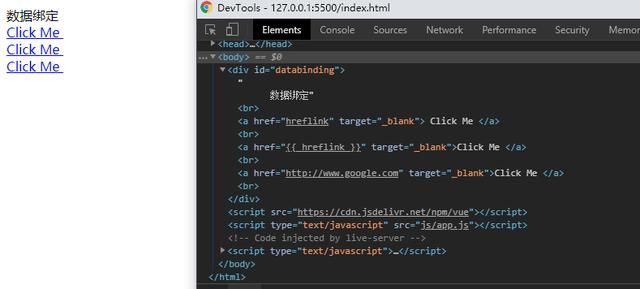
当我们打开Chrome浏览器控制台的后发现,生成的html中只有第三个是对的,也就是说只有使用了v-bind的才真正的绑定了数据
绑定class
要绑定class 我们就需要用v-bind:class,我们还是直接看一个示例
| //indedx.html | |
| <style> | |
| .active { | |
| background: red; | |
| } | |
| </style> | |
| <div id="classbinding"><div v-bind:class="{active:isactive}"><b>{{ title }}</b></div></div> | |
| //app.js | |
| var vm = new Vue({ | |
| el: '#classbinding', | |
| data: { | |
| title: "CLASS BINDING", | |
| isactive: true | |
| } | |
| }); |
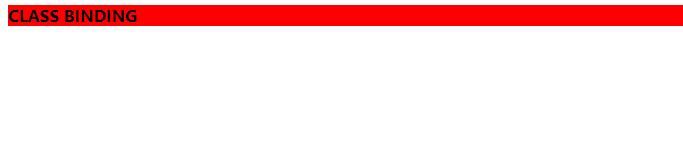
代码中我们定义了一个.active,如果变量isactive是true则应用颜色,否则不应用
绑定多个class
同样的我们可以给html绑定多个class
| //index.html | |
| <style> | |
| .info { | |
| color: #00529b; | |
| background-color: #bde5f8; | |
| } | |
| div { | |
| margin: 10px 0; | |
| padding: 12px; | |
| } | |
| .active { | |
| color: #4f8a10; | |
| background-color: #dff2bf; | |
| } | |
| .displayError { | |
| color: #d8000c; | |
| background-color: #ffbaba; | |
| } | |
| </style><div id="classbinding"><divclass="info"v-bind:class="{ active: isActive, 'displayError': hasError }"> | |
| {{ title }} | |
| </div></div> | |
| //app.js | |
| var vm = new Vue({ | |
| el: '#classbinding', | |
| data: { | |
| title: "This is class binding example", | |
| isActive: false, | |
| hasError: false | |
| } | |
| }); |
绑定数组
同样的我们可以绑定一个数组,代码如下
| //index.html | |
| <style> | |
| .info { | |
| color: #00529b; | |
| background-color: #bde5f8; | |
| } | |
| div { | |
| margin: 10px 0; | |
| padding: 12px; | |
| font-size: 25px; | |
| } | |
| .active { | |
| color: #4f8a10; | |
| background-color: #dff2bf; | |
| } | |
| .displayError { | |
| color: #d8000c; | |
| background-color: #ffbaba; | |
| } | |
| </style><div id="classbinding"><div v-bind:class="[infoclass, errorclass]">{{ title }}</div></div> | |
| //app.js | |
| var vm = new Vue({ | |
| el: '#classbinding', | |
| data: { | |
| title: "This is class binding example", | |
| infoclass: 'info', | |
| errorclass: 'displayError' | |
| } | |
| }); |
组件模板以及组件添加class
| //index.html | |
| <style> | |
| .info { | |
| color: #00529b; | |
| background-color: #bde5f8; | |
| } | |
| div { | |
| margin: 10px 0; | |
| padding: 12px; | |
| font-size: 25px; | |
| } | |
| .active { | |
| color: #4f8a10; | |
| background-color: #dff2bf; | |
| } | |
| .displayError { | |
| color: #d8000c; | |
| background-color: #ffbaba; | |
| } | |
| </style><div id="classbinding"><new_component class="active"></new_component></div> | |
| //app.js | |
| var vm = new Vue({ | |
| el: '#classbinding', | |
| data: { | |
| title: "This is class binding example", | |
| infoclass: 'info', | |
| errorclass: 'displayError', | |
| isActive: false, | |
| haserror: true | |
| }, | |
| components: { | |
| 'new_component': { | |
| template: '<div class = "info">Class Binding for component</div>' | |
| } | |
| } | |
| }); |
绑定style
我们也可以绑定style
| //index.html | |
| <div id="databinding"> | |
| <div v-bind:style="{ color: activeColor, fontSize: fontSize + 'px' }"> | |
| {{ title }} | |
| </div> | |
| </div> | |
| //app.js | |
| var vm = new Vue({ | |
| el: '#databinding', | |
| data: { | |
| title: "Inline style Binding", | |
| activeColor: 'red', | |
| fontSize: '30' | |
| } | |
| }); |
分配一个style对象
| //index.html | |
| <div id = "databinding"> | |
| <div v-bind:style = "styleobj">{{title}}</div> | |
| </div> | |
| //app.js | |
| var vm = new Vue({ | |
| el: '#databinding', | |
| data: { | |
| title : "Inline style Binding", | |
| styleobj : { | |
| color: 'red', | |
| fontSize :'40px' | |
| } | |
| } | |
| }); |
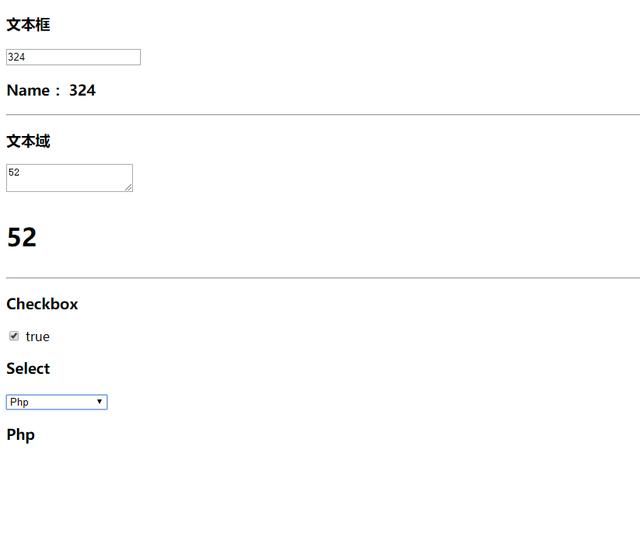
表单输入绑定
| //index.html | |
| <div id="databinding"> | |
| <h3>文本框</h3><input v-model="name" placeholder="" /><h3>Name :{{ name }}</h3><hr /><h3>文本域</h3><textarea v-model="textmessage" placeholder=""></textarea><h1><p>{{ textmessage }}</p></h1><hr /><h3>Checkbox</h3><input type="checkbox" id="checkbox" v-model="checked" /> {{ checked }} | |
| <h3>Select</h3> | |
| <select v-model="languages"><option disabled value="">Please select one</option><option>Java</option><option>Javascript</option><option>Php</option><option>C</option><option>C++</option></select><h3>{{ languages }}</h3> | |
| </div> | |
| //app.js | |
| var vm = new Vue({ | |
| el: '#databinding', | |
| data: { | |
| name: '', | |
| textmessage: '', | |
| checked: false, | |
| languages: "Java" | |
| } | |
| }); |
修饰符
| //index.html | |
| <div id="databinding"> | |
| <span style="font-size:25px;">年龄:</span><input v-model.number="age" type="number" /><br /><span style="font-size:25px;">延迟:</span><input v-model.lazy="msg" /><h3>{{ msg }}</h3><br /><span style="font-size:25px;">实时 : </span | |
| ><input v-model.trim="message" /><h3>{{ message }}</h3> | |
| </div> | |
| //app.js | |
| var vm = new Vue({ | |
| el: '#databinding', | |
| data: { | |
| age: 0, | |
| msg: '', | |
| message: '' | |
| } | |
| }); |
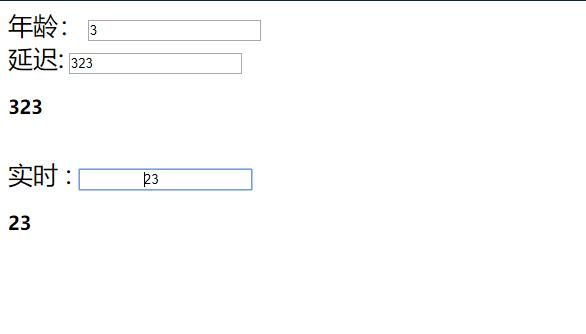
当我们使用了数字修饰符之后,如number表示只能是数字,lazy表示在离开文本框后出现显示,trim删除在开头和结尾输入的任何空格。
总结一下
本篇我们介绍了Vue的绑定,包括数据、属性、以及修饰符等,如果对你有帮助,请点个关注吧!谢谢!