我们通过上几章的学习,我们做一个小练习,
效果图
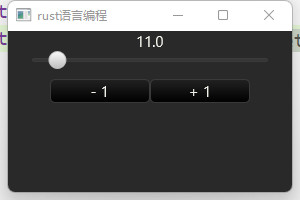
实现一个效果,通过 按钮对滑块的操作,并且label显示滑块位置。
我们接下来开始实现这个小练习,我们使用的组件有 Button(按钮)、Slider(滑块)、Label(文本)、Flex(布局)。
让我们创建一个rust项目
cargo new lens_demo
让我们添加包
| [dependencies] | |
| druid = { git = "https://github.com/linebender/druid.git"} |
添加我们需要用到的引用
| use druid::widget::{Button,Label,Slider,Flex}; | |
| use druid::widget::Widget; | |
| use druid::{Env, WindowDesc, AppLauncher, Data, Lens, WidgetExt}; |
创建我们的Data Lens
| struct AppState{ | |
| current:f64, | |
| } |
创建界面和启动程序
| fn ui_builder() -> impl Widget<AppState> { | |
| //创建label显示滑块的位置数字 绑定了current | |
| let label = Label::new(|app_state:&AppState,_env:&Env|{ format!("{:.1}",app_state.current)}); | |
| //创建滑块,with_range 设置滑块的开始位置结束位置,lens绑定了current,fix_width设置滑块的宽度 | |
| let slider = Slider::new().with_range(1., 100.).lens(AppState::current).fix_width(250.); | |
| //创建减一按钮,fix_width 设置按钮的宽度,on_click 绑定点击事件, | |
| let button_reduce = Button::new("- 1").fix_width(100.).on_click(|_,app_state: &mut AppState,_|{ | |
| //对值进行判断,不能小于1,修改current的值 | |
| if app_state.current - 1. < 1. { | |
| app_state.current = 1.; | |
| }else{ | |
| app_state.current -= 1.; | |
| } | |
| }); | |
| let button_increase = Button::new("+ 1").fix_width(100.).on_click(|_,app_state: &mut AppState,_|{ | |
| if app_state.current + 1. > 100. { | |
| app_state.current = 100.; | |
| }else{ | |
| app_state.current += 1.; | |
| } | |
| }); | |
| //创建布局垂直排列 | |
| Flex::column() | |
| .with_child( | |
| //水平排列 | |
| Flex::row() | |
| //添加显示位置的label | |
| .with_child(label) | |
| ) | |
| .with_child( | |
| //水平排列 | |
| Flex::row() | |
| //添加滑块 | |
| .with_child(slider) | |
| ) | |
| .with_child( | |
| //水平排列 | |
| Flex::row() | |
| //添加按钮 | |
| .with_child(button_reduce) | |
| .with_child(button_increase).padding(10.) | |
| ) | |
| } | |
| fn main() { | |
| let win = WindowDesc::new(ui_builder()).window_size((300.,200.)).title("rust语言编程"); | |
| let _app = AppLauncher::with_window(win).launch(AppState{current:1.}); | |
| } |