目录
- 前言
- 一、pom中引入Flowable相关框架
- 二、相关配置文件
- 1.application.properties配置文件
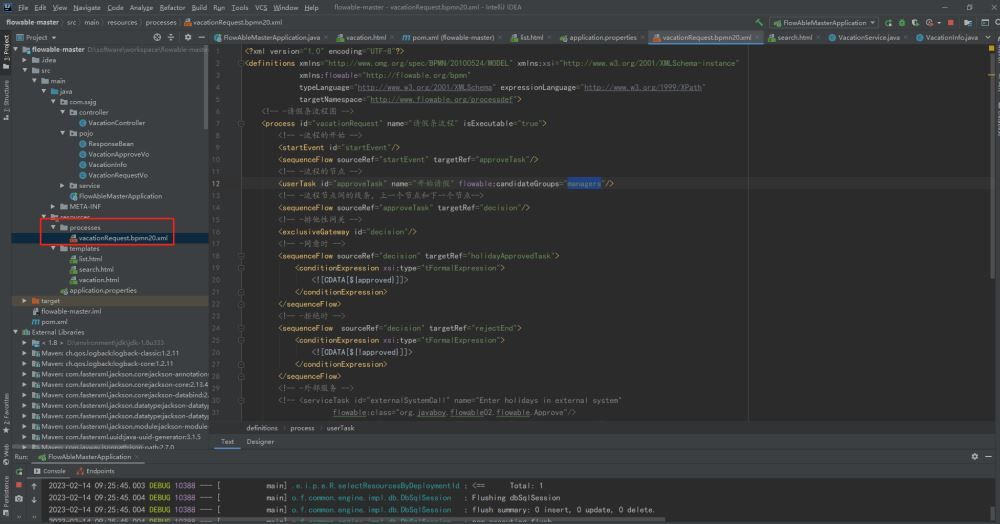
- 2.审批流程xml文件,默认放置在resources下的processess文件夹下
- 三、控制层代码块
- 四、Service层,请假条新增、审批、查询的业务处理
- 五、POJO相关类
- 六、页面代码,页面文件放在resources的templates文件夹下
- 1.提交请假条申请页面vacation.html
- 2.审批请假条页面list.html
- 3.已审批请假条查询页面search.html
- 七、启动并测试
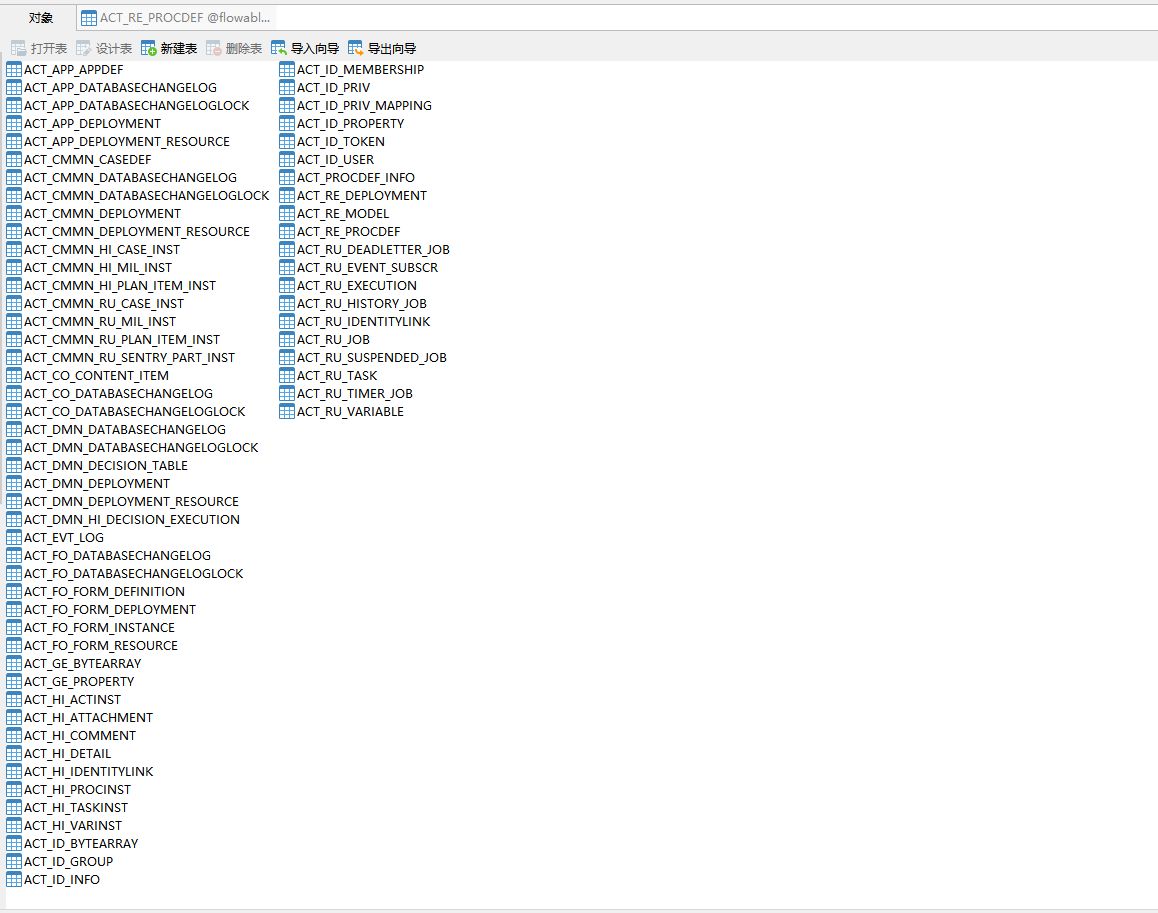
- 1.第一次运行,系统会自动创建flowable需要数据表结构
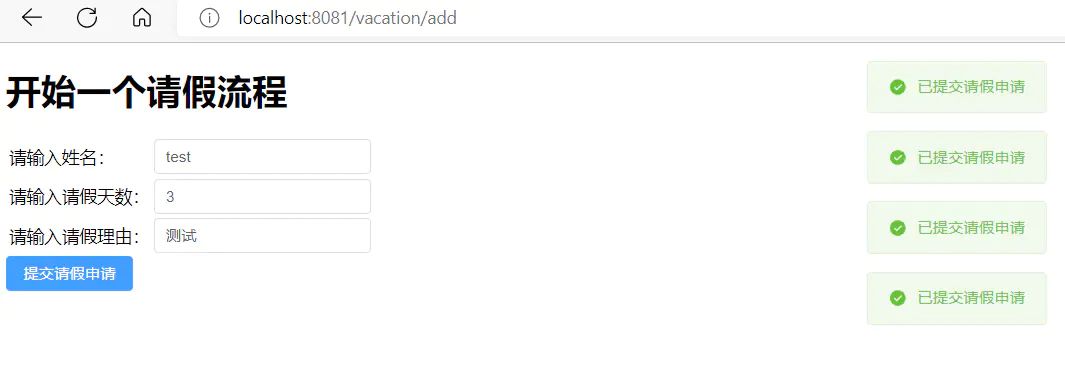
- 2.输入url地址:localhost:8081/vacation/add,建立几个请假条
- 3.作为请假人,查询一下自己提交的假条审批了.
前言
Flowable可以十分灵活地加入你的应用/服务/构架。可以将JAR形式发布的Flowable库加入应用或服务,来嵌入引擎。
以JAR形式发布使Flowable可以轻易加入任何Java环境:Java SE;Tomcat、Jetty或Spring之类的servlet容器;
JBoss或WebSphere之类的Java EE服务器,等等。 另外,也可以使用Flowable REST API进行HTTP调用。
也有许多Flowable应用(Flowable Modeler, Flowable Admin, Flowable IDM 与 Flowable Task),提供了直接可用的UI示例,可以使用流程与任务。
一、pom中引入Flowable相关框架
本Demo使用的SpringBoot版本是2.7.5
| <parent> | |
| <groupId>org.springframework.boot</groupId> | |
| <artifactId>spring-boot-starter-parent</artifactId> | |
| <version>.7.5</version> | |
| <relativePath/> <!-- lookup parent from repository --> | |
| </parent> | |
| <dependency> | |
| <groupId>org.springframework.boot</groupId> | |
| <artifactId>spring-boot-starter-web</artifactId> | |
| </dependency> | |
| <!-- 工作流flowable架包 --> | |
| <dependency> | |
| <groupId>org.flowable</groupId> | |
| <artifactId>flowable-spring-boot-starter</artifactId> | |
| <version>.4.0</version> | |
| </dependency> | |
| <!-- mysql数据库连接架包 --> | |
| <dependency> | |
| <groupId>mysql</groupId> | |
| <artifactId>mysql-connector-java</artifactId> | |
| <version>.0.11</version> | |
| </dependency> | |
| <!-- mybatis ORM 架包 --> | |
| <dependency> | |
| <groupId>org.mybatis.spring.boot</groupId> | |
| <artifactId>mybatis-spring-boot-starter</artifactId> | |
| <version>.2.2</version> | |
| </dependency> | |
| <!-- thymeleaf架包 --> | |
| <dependency> | |
| <groupId>org.springframework.boot</groupId> | |
| <artifactId>spring-boot-starter-thymeleaf</artifactId> | |
| </dependency> | |
| <dependency> | |
| <groupId>org.projectlombok</groupId> | |
| <artifactId>lombok</artifactId> | |
| </dependency> | |
| <dependency> | |
| <groupId>org.springframework.boot</groupId> | |
| <artifactId>spring-boot-starter-test</artifactId> | |
| <scope>test</scope> | |
| </dependency> |
二、相关配置文件
1.application.properties配置文件
| server.port= | |
| #数据库配置 | |
| spring.datasource.url=jdbc:mysql://localhost:/flowable01?autoReconnect=true&useUnicode=true&characterEncoding=utf8&useSSL=false&serverTimezone=GMT%2B8 | |
| spring.datasource.username=root | |
| spring.datasource.password=song@ | |
| spring.datasource.driver-class-name=com.mysql.cj.jdbc.Driver | |
| #开启调试信息 | |
| logging.level.org.flowable=DEBUG | |
| #业务流程涉及的表自动生成 | |
| flowable.database-schema-update=true | |
| flowable.async-executor-activate=false |
2.审批流程xml文件,默认放置在resources下的processess文件夹下

vacationRequest.bpmn20.xml 内容如下:
三、控制层代码块
| package com.sxjg.controller; | |
| import com.sxjg.pojo.ResponseBean; | |
| import com.sxjg.pojo.VacationApproveVo; | |
| import com.sxjg.pojo.VacationRequestVo; | |
| import com.sxjg.service.VacationService; | |
| import org.springframework.beans.factory.annotation.Autowired; | |
| import org.springframework.web.bind.annotation.*; | |
| import org.springframework.web.servlet.ModelAndView; | |
| /** | |
| * @project 请假流程测试 | |
| * @Description | |
| * @Author songwp | |
| * @Date/2/13 20:06 | |
| * @Version.0.0 | |
| **/ | |
| ("vacation") | |
| public class VacationController { | |
| VacationService vacationService; | |
| /** | |
| * 请假条新增页面 | |
| * @return | |
| */ | |
| ("/add") | |
| public ModelAndView add(){ | |
| return new ModelAndView("vacation"); | |
| } | |
| /** | |
| * 请假条审批列表 | |
| * @return | |
| */ | |
| ("/aList") | |
| public ModelAndView aList(){ | |
| return new ModelAndView("list"); | |
| } | |
| /** | |
| * 请假条查询列表 | |
| * @return | |
| */ | |
| ("/sList") | |
| public ModelAndView sList(){ | |
| return new ModelAndView("search"); | |
| } | |
| /** | |
| * 请假请求方法 | |
| * @param vacationRequestVO | |
| * @return | |
| */ | |
| public ResponseBean askForLeave( VacationRequestVo vacationRequestVO) { | |
| return vacationService.askForLeave(vacationRequestVO); | |
| } | |
| /** | |
| * 获取待审批列表 | |
| * @param identity | |
| * @return | |
| */ | |
| ("/list") | |
| public ResponseBean leaveList(String identity) { | |
| return vacationService.leaveList(identity); | |
| } | |
| /** | |
| * 拒绝或同意请假 | |
| * @param vacationVO | |
| * @return | |
| */ | |
| ("/handler") | |
| public ResponseBean askForLeaveHandler( VacationApproveVo vacationVO) { | |
| return vacationService.askForLeaveHandler(vacationVO); | |
| } | |
| /** | |
| * 请假查询 | |
| * @param name | |
| * @return | |
| */ | |
| ("/search") | |
| public ResponseBean searchResult(String name) { | |
| return vacationService.searchResult(name); | |
| } | |
| } |
四、Service层,请假条新增、审批、查询的业务处理
| package com.sxjg.service; | |
| import com.sxjg.pojo.ResponseBean; | |
| import com.sxjg.pojo.VacationApproveVo; | |
| import com.sxjg.pojo.VacationInfo; | |
| import com.sxjg.pojo.VacationRequestVo; | |
| import java.util.ArrayList; | |
| import java.util.Date; | |
| import java.util.HashMap; | |
| import java.util.List; | |
| import java.util.Map; | |
| import org.flowable.engine.HistoryService; | |
| import org.flowable.engine.RuntimeService; | |
| import org.flowable.engine.TaskService; | |
| import org.flowable.engine.history.HistoricProcessInstance; | |
| import org.flowable.task.api.Task; | |
| import org.flowable.variable.api.history.HistoricVariableInstance; | |
| import org.springframework.beans.factory.annotation.Autowired; | |
| import org.springframework.stereotype.Service; | |
| import org.springframework.transaction.annotation.Transactional; | |
| /** | |
| * @project 请假流程测试 | |
| * @Description | |
| * @Author songwp | |
| * @Date/2/13 20:08 | |
| * @Version.0.0 | |
| **/ | |
| public class VacationService { | |
| RuntimeService runtimeService; | |
| TaskService taskService; | |
| HistoryService historyService; | |
| /** | |
| * 申请请假 | |
| * @param vacationRequestVO | |
| * @return | |
| */ | |
| public ResponseBean askForLeave(VacationRequestVo vacationRequestVO) { | |
| Map<String, Object> variables = new HashMap<>(); | |
| variables.put("name", vacationRequestVO.getName()); | |
| variables.put("days", vacationRequestVO.getDays()); | |
| variables.put("reason", vacationRequestVO.getReason()); | |
| try { | |
| //指定业务流程 | |
| runtimeService.startProcessInstanceByKey("vacationRequest", vacationRequestVO.getName(), variables); | |
| return ResponseBean.ok("已提交请假申请"); | |
| } catch (Exception e) { | |
| e.printStackTrace(); | |
| } | |
| return ResponseBean.error("提交申请失败"); | |
| } | |
| /** | |
| * 审批列表 | |
| * @param identity | |
| * @return | |
| */ | |
| public ResponseBean leaveList(String identity) { | |
| List<Task> tasks = taskService.createTaskQuery().taskCandidateGroup(identity).list(); | |
| List<Map<String, Object>> list = new ArrayList<>(); | |
| for (int i =; i < tasks.size(); i++) { | |
| Task task = tasks.get(i); | |
| Map<String, Object> variables = taskService.getVariables(task.getId()); | |
| variables.put("id", task.getId()); | |
| list.add(variables); | |
| } | |
| return ResponseBean.ok("加载成功", list); | |
| } | |
| /** | |
| * 操作审批 | |
| * @param vacationVO | |
| * @return | |
| */ | |
| public ResponseBean askForLeaveHandler(VacationApproveVo vacationVO) { | |
| try { | |
| boolean approved = vacationVO.getApprove(); | |
| Map<String, Object> variables = new HashMap<String, Object>(); | |
| variables.put("approved", approved); | |
| variables.put("employee", vacationVO.getName()); | |
| Task task = taskService.createTaskQuery().taskId(vacationVO.getTaskId()).singleResult(); | |
| taskService.complete(task.getId(), variables); | |
| if (approved) { | |
| //如果是同意,还需要继续走一步 | |
| Task t = taskService.createTaskQuery().processInstanceId(task.getProcessInstanceId()).singleResult(); | |
| taskService.complete(t.getId()); | |
| } | |
| return ResponseBean.ok("操作成功"); | |
| } catch (Exception e) { | |
| e.printStackTrace(); | |
| } | |
| return ResponseBean.error("操作失败"); | |
| } | |
| /** | |
| * 请假列表 | |
| * @param name | |
| * @return | |
| */ | |
| public ResponseBean searchResult(String name) { | |
| List<VacationInfo> vacationInfos = new ArrayList<>(); | |
| List<HistoricProcessInstance> historicProcessInstances = historyService.createHistoricProcessInstanceQuery().processInstanceBusinessKey(name).finished().orderByProcessInstanceEndTime().desc().list(); | |
| for (HistoricProcessInstance historicProcessInstance : historicProcessInstances) { | |
| VacationInfo vacationInfo = new VacationInfo(); | |
| Date startTime = historicProcessInstance.getStartTime(); | |
| Date endTime = historicProcessInstance.getEndTime(); | |
| List<HistoricVariableInstance> historicVariableInstances = historyService.createHistoricVariableInstanceQuery() | |
| .processInstanceId(historicProcessInstance.getId()) | |
| .list(); | |
| for (HistoricVariableInstance historicVariableInstance : historicVariableInstances) { | |
| String variableName = historicVariableInstance.getVariableName(); | |
| Object value = historicVariableInstance.getValue(); | |
| if ("reason".equals(variableName)) { | |
| vacationInfo.setReason((String) value); | |
| } else if ("days".equals(variableName)) { | |
| vacationInfo.setDays(Integer.parseInt(value.toString())); | |
| } else if ("approved".equals(variableName)) { | |
| vacationInfo.setStatus((Boolean) value); | |
| } else if ("name".equals(variableName)) { | |
| vacationInfo.setName((String) value); | |
| } | |
| } | |
| vacationInfo.setStartTime(startTime); | |
| vacationInfo.setEndTime(endTime); | |
| vacationInfos.add(vacationInfo); | |
| } | |
| return ResponseBean.ok("ok", vacationInfos); | |
| } | |
| } |
五、POJO相关类
| import lombok.Data; | |
| /** | |
| * 请假条审批 | |
| * @Date | |
| */ | |
| public class VacationApproveVo { | |
| private String taskId; | |
| private Boolean approve; | |
| private String name; | |
| } | |
| import lombok.Data; | |
| /** | |
| * 请假条申请 | |
| * @Date | |
| */ | |
| public class VacationRequestVo { | |
| private String name; | |
| private Integer days; | |
| private String reason; | |
| } | |
| import lombok.Data; | |
| /** | |
| * 响应类 | |
| * @Date | |
| */ | |
| public class ResponseBean { | |
| private Integer status; | |
| private String msg; | |
| private Object data; | |
| public static ResponseBean ok(String msg, Object data) { | |
| return new ResponseBean(, msg, data); | |
| } | |
| public static ResponseBean ok(String msg) { | |
| return new ResponseBean(, msg, null); | |
| } | |
| public static ResponseBean error(String msg, Object data) { | |
| return new ResponseBean(, msg, data); | |
| } | |
| public static ResponseBean error(String msg) { | |
| return new ResponseBean(, msg, null); | |
| } | |
| private ResponseBean() { | |
| } | |
| private ResponseBean(Integer status, String msg, Object data) { | |
| this.status = status; | |
| this.msg = msg; | |
| this.data = data; | |
| } | |
| } | |
| import java.util.Date; | |
| import lombok.Data; | |
| /** | |
| * 请假条DO | |
| * @Date | |
| */ | |
| public class VacationInfo { | |
| private String name; | |
| private Date startTime; | |
| private Date endTime; | |
| private String reason; | |
| private Integer days; | |
| private Boolean status; | |
| } |
六、页面代码,页面文件放在resources的templates文件夹下
1.提交请假条申请页面vacation.html
| <html lang="en"> | |
| <head> | |
| <meta charset="UTF-"> | |
| <title>提交请假条申请页面</title> | |
| <script src="https://unpkg.com/axios/dist/axios.min.js"></script> | |
| <!-- Import style --> | |
| <link rel="stylesheet" href="https://unpkg.com/element-plus/dist/index.css"/> | |
| <script src="https://unpkg.com/vue@"></script> | |
| <!-- Import component library --> | |
| <script src="//unpkg.com/element-plus"></script> | |
| </head> | |
| <body> | |
| <div id="app"> | |
| <h>开始一个请假流程</h1> | |
| <table> | |
| <tr> | |
| <td>请输入姓名:</td> | |
| <td> | |
| <el-input type="text" v-model="afl.name"/> | |
| </td> | |
| </tr> | |
| <tr> | |
| <td>请输入请假天数:</td> | |
| <td> | |
| <el-input type="text" v-model="afl.days"/> | |
| </td> | |
| </tr> | |
| <tr> | |
| <td>请输入请假理由:</td> | |
| <td> | |
| <el-input type="text" v-model="afl.reason"/> | |
| </td> | |
| </tr> | |
| </table> | |
| <el-button type="primary" @click="submit">提交请假申请</el-button> | |
| </div> | |
| <script> | |
| Vue.createApp( | |
| { | |
| data() { | |
| return { | |
| afl: { | |
| name: 'test', | |
| days:, | |
| reason: '测试' | |
| } | |
| } | |
| }, | |
| methods: { | |
| submit() { | |
| let _this = this; | |
| axios.post('/vacation', this.afl) | |
| .then(function (response) { | |
| if (response.data.status ==) { | |
| //提交成功 | |
| _this.$message.success(response.data.msg); | |
| } else { | |
| //提交失败 | |
| _this.$message.error(response.data.msg); | |
| } | |
| }) | |
| .catch(function (error) { | |
| console.log(error); | |
| }); | |
| } | |
| } | |
| } | |
| ).use(ElementPlus).mount('#app') | |
| </script> | |
| </body> | |
| </html> |
2.审批请假条页面list.html
| <html lang="en"> | |
| <head> | |
| <meta charset="UTF-"> | |
| <title>审批请假条页面</title> | |
| <script src="https://unpkg.com/axios/dist/axios.min.js"></script> | |
| <!-- Import style --> | |
| <link rel="stylesheet" href="https://unpkg.com/element-plus/dist/index.css"/> | |
| <script src="https://unpkg.com/vue@"></script> | |
| <!-- Import component library --> | |
| <script src="//unpkg.com/element-plus"></script> | |
| </head> | |
| <body> | |
| <div id="app"> | |
| <div> | |
| <div>请选择你的身份:</div> | |
| <div> | |
| <el-select name="" id="" v-model="identity" @change="initTasks"> | |
| <el-option :value="iden" v-for="(iden,index) in identities" :key="index" :label="iden"></el-option> | |
| </el-select> | |
| <el-button type="primary" @click="initTasks">刷新一下</el-button> | |
| </div> | |
| </div> | |
| <el-table border strip :data="tasks"> | |
| <el-table-column prop="name" label="姓名"></el-table-column> | |
| <el-table-column prop="days" label="请假天数"></el-table-column> | |
| <el-table-column prop="reason" label="请假原因"></el-table-column> | |
| <el-table-column lable="操作"> | |
| <template #default="scope"> | |
| <el-button type="primary" @click="approveOrReject(scope.row.id,true,scope.row.name)">批准</el-button> | |
| <el-button type="danger" @click="approveOrReject(scope.row.id,false,scope.row.name)">拒绝</el-button> | |
| </template> | |
| </el-table-column> | |
| </el-table> | |
| </div> | |
| <script> | |
| Vue.createApp( | |
| { | |
| data() { | |
| return { | |
| tasks: [], | |
| identities: [ | |
| 'managers' | |
| ], | |
| identity: '' | |
| } | |
| }, | |
| methods: { | |
| initTasks() { | |
| let _this = this; | |
| axios.get('/vacation/list?identity=' + this.identity) | |
| .then(function (response) { | |
| _this.tasks = response.data.data; | |
| }) | |
| .catch(function (error) { | |
| console.log(error); | |
| }); | |
| }, | |
| approveOrReject(taskId, approve,name) { | |
| let _this = this; | |
| axios.post('/vacation/handler', {taskId: taskId, approve: approve,name:name}) | |
| .then(function (response) { | |
| _this.$message.success("审批成功"); | |
| _this.initTasks(); | |
| }) | |
| .catch(function (error) { | |
| _this.$message.error("操作失败"); | |
| console.log(error); | |
| }); | |
| } | |
| } | |
| } | |
| ).use(ElementPlus).mount('#app') | |
| </script> | |
| </body> | |
| </html> |
3.已审批请假条查询页面search.html
| <html lang="en"> | |
| <head> | |
| <meta charset="UTF-"> | |
| <title>已审批请假条查询页面</title> | |
| <script src="https://unpkg.com/axios/dist/axios.min.js"></script> | |
| <!-- Import style --> | |
| <link rel="stylesheet" href="https://unpkg.com/element-plus/dist/index.css"/> | |
| <script src="https://unpkg.com/vue@"></script> | |
| <!-- Import component library --> | |
| <script src="//unpkg.com/element-plus"></script> | |
| </head> | |
| <body> | |
| <div id="app"> | |
| <div style="margin-top:px"> | |
| <el-input v-model="name" style="width:px" placeholder="请输入用户名"></el-input> | |
| <el-button type="primary" @click="search">查询</el-button> | |
| </div> | |
| <div> | |
| <el-table border strip :data="historyInfos"> | |
| <el-table-column prop="name" label="姓名"></el-table-column> | |
| <el-table-column prop="startTime" label="提交时间"></el-table-column> | |
| <el-table-column prop="endTime" label="审批时间"></el-table-column> | |
| <el-table-column prop="reason" label="事由"></el-table-column> | |
| <el-table-column prop="days" label="天数"></el-table-column> | |
| <el-table-column label="状态"> | |
| <template #default="scope"> | |
| <el-tag type="success" v-if="scope.row.status">已通过</el-tag> | |
| <el-tag type="danger" v-else>已拒绝</el-tag> | |
| </template> | |
| </el-table-column> | |
| </el-table> | |
| </div> | |
| </div> | |
| <script> | |
| Vue.createApp( | |
| { | |
| data() { | |
| return { | |
| historyInfos: [], | |
| name: 'zhangsan' | |
| } | |
| }, | |
| methods: { | |
| search() { | |
| let _this = this; | |
| axios.get('/vacation/search?name=' + this.name) | |
| .then(function (response) { | |
| if (response.data.status ==) { | |
| _this.historyInfos=response.data.data; | |
| } else { | |
| _this.$message.error(response.data.msg); | |
| } | |
| }) | |
| .catch(function (error) { | |
| console.log(error); | |
| }); | |
| } | |
| } | |
| } | |
| ).use(ElementPlus).mount('#app') | |
| </script> | |
| </body> | |
| </html> |
七、启动并测试

1.第一次运行,系统会自动创建flowable需要数据表结构

2.输入url地址:localhost:8081/vacation/add,建立几个请假条

2.请假条建立好了,审批处理一下

注意:第一次运行这个demo,权限暂且不管,角色也先写死,先把demo跑起来再说。四个请假条两个通过,两个拒绝,操作完成后,在待审批列表不在出现
3.作为请假人,查询一下自己提交的假条审批了.

通过查询结果得知,两个通过,两个拒绝。至此,一个简单的请假条审批流程走完了!!!