目录
- 写在开头
- 开通相关API权限
- 项目初始化
- API 配置声明
- 选取学校位置
- 获取用户的地理位置信息
- 经纬度转化成具体地址
- 计算两个经纬度坐标之间的距离
- 总结
写在开头
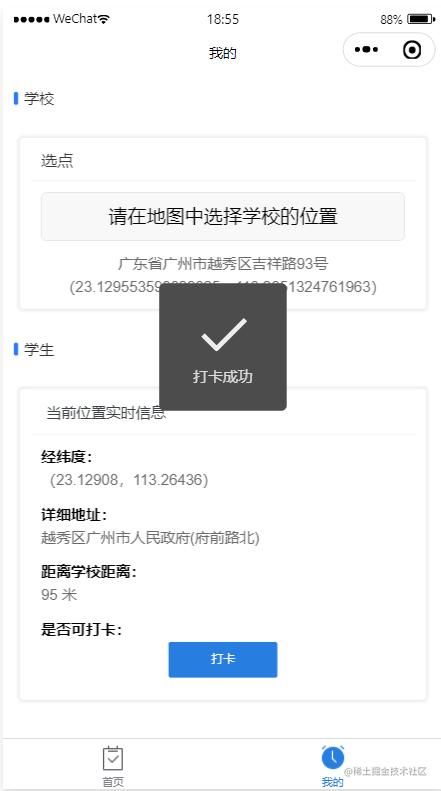
哈喽,隔了几天没写文章,小编又回来了(✪ω✪)。最近接了一个校园的需求,主要功能是希望学生每天进行定位打卡,帮助班导确认学生是否在校的情况。

上面图片是大致的交互过程,定位打卡是个比较常见的功能了,只是很多时候都是在 APP 上完成的,这次需求方是希望专门做个小程序来使用,当然,整个小程序还有其他很多功能模块,本章我们先来分享一下定位打卡功能,前端具体需要做哪些事情。
开通相关API权限
首先,因为这次定位打卡功能使用的是 GPS 来定位的,这就需要获取用户的地理位置信息。在小程序中,要获取用户的地理位置,微信官方提供了部分 API ,但是这些 API 有权限要求,我们需要先登陆 小程序后台 去申请。
登陆后,按路径「开发」-「开发管理」-「接口设置」中找到相关 API ,填写你使用 API 的理由,提交申请即可。
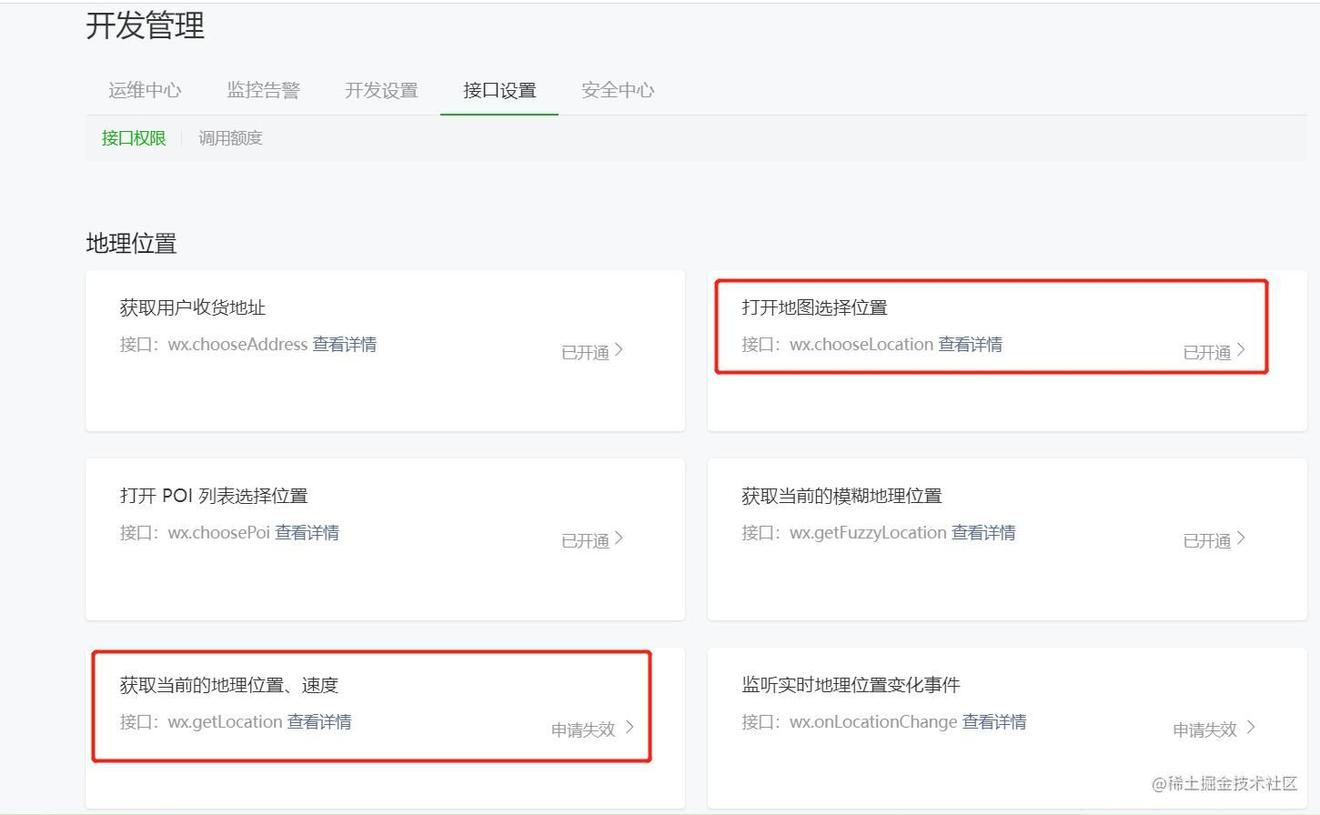
本次的功能小编一共会使用到了以下两个 API :
- wx.chooseLocation:用于打开微信小程序自带的地图,能选择一个位置,获取目标位置的经纬度。
- wx.getLocation:用于获取用户当前所在的地理位置信息,主要为了拿到经纬度;不过,这个 API 有点难申请通过,小编也是申请了三次才过的,真是挺麻烦-.-,好像一般小程序主体是政府、学校或者大企业等机构就比较容易通过(●—●)。
API 权限申请好了后,我们就能进入正题了,开始正式的编码工作。
项目初始化
项目小编直接使用 uniapp 的 HBuilderX 工具创建的,并使用了@dcloudio/uni-ui 作为 UI 库。
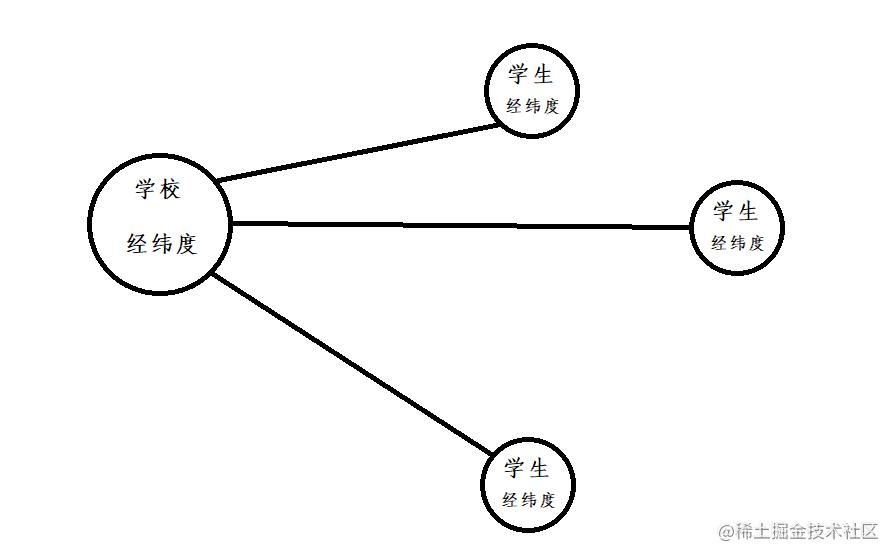
定位打卡功能的具体交互过程很简单,先由管理人员选取学校的位置,获取到学校经纬度信息保存起来,然后学生每次打卡也会获取经纬度坐标,然后计算两个经纬度坐标的距离,就能推算出学生是否在校了。
API 配置声明
项目初始化后,我们还需要进行一步很关键的配置声明,在项目的根目录下,找到 manifest.json 文件,进行如下配置:
| { | |
| ... | |
| "mp-weixin": { | |
| "appid": "", | |
| "setting": { | |
| "urlCheck": false | |
| }, | |
| "usingComponents": true, | |
| "permission": { | |
| "scope.userLocation": { | |
| "desc": "测试-" | |
| } | |
| }, | |
| "requiredPrivateInfos": ["getLocation", "chooseLocation"] | |
| }, | |
| ... | |
| } |
主要是 requiredPrivateInfos 字段的配置,至于为什么可以看看官方说明,传送门 。
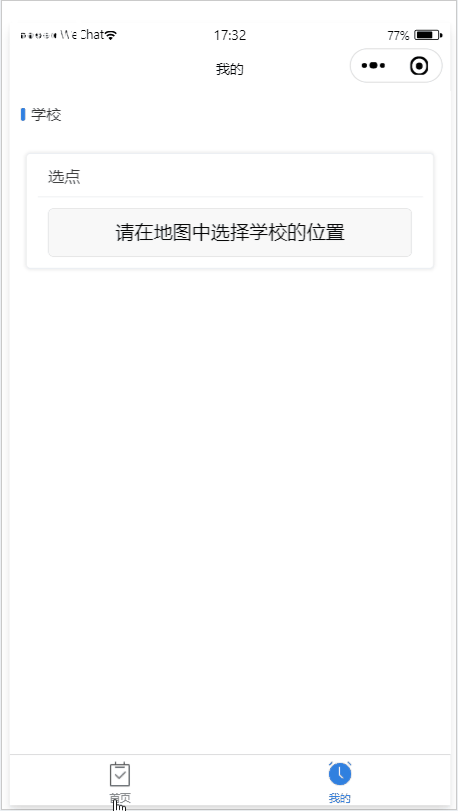
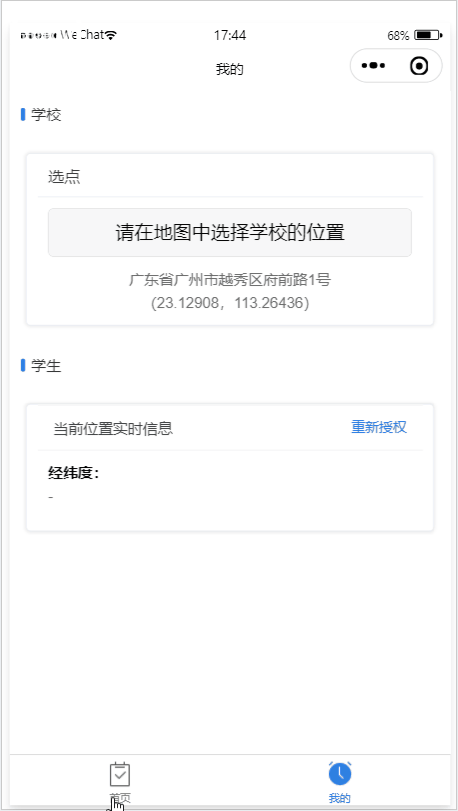
选取学校位置
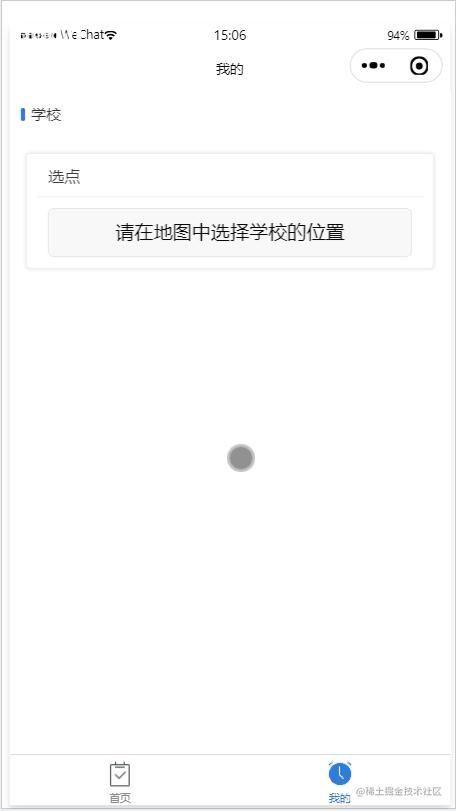
那么,接下来进行我们的第一步,选取学校的位置,代码比较简单,直接来看:
| <template> | |
| <view> | |
| <uni-section title="学校" type="line"> | |
| <uni-card title="选点"> | |
| <button @tap="chooseLocation">请在地图中选择学校的位置</button> | |
| <view v-if="isChooseTarget" class="info"> | |
| <view>{{ schoolInfo.address }}</view> | |
| <view>{{ `(${schoolInfo.latitude},${schoolInfo.longitude})` }}</view> | |
| </view> | |
| </uni-card> | |
| </uni-section> | |
| </view> | |
| </template> | |
| <script> | |
| export default { | |
| data() { | |
| return { | |
| schoolInfo: { | |
| latitude: '', | |
| longitude: '', | |
| address: '', | |
| }, | |
| } | |
| }, | |
| computed: { | |
| isChooseTarget() { | |
| return this.schoolInfo.latitude && this.schoolInfo.longitude | |
| }, | |
| }, | |
| methods: { | |
| // 选点 | |
| chooseLocation() { | |
| uni.chooseLocation({ | |
| success: res => { | |
| this.schoolInfo.latitude = res.latitude; | |
| this.schoolInfo.longitude = res.longitude; | |
| this.schoolInfo.address = res.address; | |
| } | |
| }); | |
| }, | |
| } | |
| } | |
| </script> | |
| <style> | |
| .info{ | |
| display: flex; | |
| justify-content: center; | |
| align-items: center; | |
| flex-direction: column; | |
| margin-top:rpx; | |
| } | |
| </style> |
获取用户的地理位置信息
搞定完学校的位置后,接下来就要来获取学生的地理位置了,主要是使用 wx.chooseLocation 来获取。
不过,因为这个 API 初次调用时,会有一个主动询问动作。
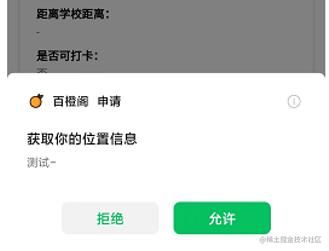
如果你选择允许授权,那么后续你可以直接调用该 API,但是如果选择拒绝,那么调用该 API 就会直接进入错误的回调,并不会有再次主动询问的动作。
那么我们要如何重新授权呢?总不能拒绝后就不能使用了吧?
也就因为这么一个行为,我们还会牵扯出好几个权限相关的 API,才能完成整个权限的闭环操作。
- wx.getSetting:获取用户的当前设置。
- wx.openSetting:调起用户的设置界面。
- wx.authorize:提前向用户发起授权请求。
上面小编简单注释了每个 API 的作用,详细信息还是要参考官方文档为准。
然后,为了更好的组织代码,小编把权限这块相关的进行简单的封装,新建 /utils/location.js 文件:
| /** | |
| * 获取是否授权了定位权限 | |
| * @param { Boolean } launchAuth: 是否发起授权请求, 初次有效 | |
| * @return { Boolean } | |
| */ | |
| export function getLocationAuth(launchAuth) { | |
| return new Promise(resolve => { | |
| uni.getSetting({ | |
| success: res => { | |
| if(launchAuth && res.authSetting['scope.userLocation'] === undefined) { | |
| return uni.authorize({ | |
| scope: 'scope.userLocation', | |
| success: () => { | |
| resolve(true); | |
| }, | |
| fail: () => { | |
| resolve(false); | |
| } | |
| }) | |
| } | |
| resolve(res.authSetting['scope.userLocation']); | |
| }, | |
| fail: err => { | |
| console.err(err); | |
| } | |
| }) | |
| }) | |
| } |
具体的使用:
| <template> | |
| <view> | |
| ... | |
| <uni-section v-if="isChooseTarget" title="学生" type="line"> | |
| <uni-card title="当前位置实时信息"> | |
| <template v-slot:title> | |
| <uni-list> | |
| <uni-list-item title="当前位置实时信息"> | |
| <template v-slot:footer v-if="isAuth ==="> | |
| <text @tap="reGrantAuth" class="text">重新授权</text> | |
| </template> | |
| </uni-list-item> | |
| </uni-list> | |
| </template> | |
| <view class="block"> | |
| <view class="title">经纬度:</view> | |
| <view class="value"> | |
| <text v-if="!loading">{{ jwText || '-' }}</text> | |
| <view v-else class="loading"> | |
| <uni-icons type="spinner-cycle" size=""/> | |
| </view> | |
| </view> | |
| </view> | |
| </uni-card> | |
| </uni-section> | |
| </view> | |
| </template> | |
| <script> | |
| import { getLocationAuth } from '@/utils/location'; | |
| export default { | |
| data() { | |
| return { | |
| ..., | |
| loading: false, | |
| isAuth: -, // -1: 未授权 0: 拒绝授权 1:已授权 | |
| studentInfo: { | |
| latitude: '', | |
| longitude: '', | |
| }, | |
| } | |
| }, | |
| computed: { | |
| ..., | |
| jwText() { | |
| const { latitude, longitude } = this.studentInfo; | |
| if(latitude && longitude) return `(${latitude},${longitude})`; | |
| return '' | |
| }, | |
| }, | |
| async onLoad() { | |
| if(!await getLocationAuth()) { | |
| this.isAuth =; | |
| } | |
| }, | |
| methods: { | |
| chooseLocation() { | |
| uni.chooseLocation({ | |
| success: async res => { | |
| ... | |
| // 判断是否授权 | |
| const authRes = await getLocationAuth(true); | |
| if(authRes) { | |
| // 获取用户当前位置 | |
| this.getLocationInfo(); | |
| this.isAuth =; | |
| }else { | |
| this.isAuth =; | |
| } | |
| } | |
| }); | |
| }, | |
| // 获取当前位置信息 | |
| getLocationInfo() { | |
| this.loading = true; | |
| uni.getLocation({ | |
| type: 'gcj', | |
| success: ({ latitude, longitude }) => { | |
| this.studentInfo.latitude = latitude; | |
| this.studentInfo.longitude = longitude; | |
| this.loading = false; | |
| } | |
| }); | |
| }, | |
| // 重新授权 | |
| reGrantAuth() {} | |
| } | |
| } | |
| </script> | |
| <style> | |
| .info{ | |
| display: flex; | |
| justify-content: center; | |
| align-items: center; | |
| flex-direction: column; | |
| margin-top:rpx; | |
| } | |
| .block{ | |
| margin-bottom:rpx; | |
| } | |
| .title{ | |
| color: #; | |
| font-weight: bold; | |
| } | |
| .value{ | |
| width:%; | |
| min-height:rpx; | |
| } | |
| .text{ | |
| font-size:rpx; | |
| color: #DE1; | |
| } | |
| .loading { | |
| width:rpx; | |
| height:rpx; | |
| transform: rotate(deg); | |
| animation: rotations linear infinite; | |
| } | |
| @keyframes rotation{%{ | |
| transform: rotate(deg); | |
| }%{ | |
| transform: rotate(deg); | |
| } | |
| } | |
| </style> |
上面我们成功获取到用户的当前位置信息,当然,如果用户选择了拒绝,我们也提供了重新授权的方式。
| export default { | |
| ..., | |
| methods: { | |
| ..., | |
| // 重新授权 | |
| async reGrantAuth() { | |
| const authRes = await getLocationAuth(); | |
| if(authRes) { | |
| uni.showToast({ | |
| title: '已授权', | |
| duration:, | |
| icon: 'none' | |
| }); | |
| }else { | |
| wx.openSetting({ | |
| success: (res) => { | |
| if(res.authSetting['scope.userLocation']) { | |
| this.getLocationInfo(); | |
| this.isAuth =; | |
| } | |
| }, | |
| }) | |
| } | |
| }, | |
| } | |
| } |
经纬度转化成具体地址
上面我们已经拿到了学生用户的当前经纬度坐标了,本来我们接下来只要计算两个经纬度坐标之间的距离就能完成功能了,奈何需求方还想要学生具体位置的中文信息,这就比较麻烦了,唉,但是麻烦也得做,否则没饭吃呀-.-。
这个需求本质就是让我们把经纬度转成具体地址,这里需要使用额外的插件来处理,方式有很多,小编选择 腾讯的位置服务。
我们直接按照他官网的介绍操作即可。
具体使用:
| <template> | |
| <view> | |
| ... | |
| <uni-section v-if="isChooseTarget" title="学生" type="line"> | |
| <uni-card title="当前位置实时信息"> | |
| ... | |
| <view class="block"> | |
| <view class="title">详细地址:</view> | |
| <view class="value"> | |
| <text v-if="!loading">{{ studentInfo.address || '-' }}</text> | |
| <view v-else class="loading"> | |
| <uni-icons type="spinner-cycle" size=""/> | |
| </view> | |
| </view> | |
| </view> | |
| </uni-card> | |
| </uni-section> | |
| </view> | |
| </template> | |
| <script> | |
| import { getLocationAuth } from '@/utils/location'; | |
| const QQMapWX = require('@/utils/qqmap-wx-jssdk.min.js'); | |
| export default { | |
| data() { | |
| return { | |
| ... | |
| studentInfo: { | |
| latitude: '', | |
| longitude: '', | |
| address: '', | |
| }, | |
| mapInstance: null, | |
| } | |
| }, | |
| computed: { ... }, | |
| async onLoad() { | |
| this.mapInstance = new QQMapWX({ | |
| key: '你的密钥', | |
| }); | |
| if(!await getLocationAuth()) { | |
| this.isAuth =; | |
| } | |
| }, | |
| methods: { | |
| chooseLocation() { ... }, | |
| getLocationInfo() { | |
| this.loading = true; | |
| uni.getLocation({ | |
| type: 'gcj', | |
| success: ({ latitude, longitude }) => { | |
| this.studentInfo.latitude = latitude; | |
| this.studentInfo.longitude = longitude; | |
| // 经纬度转成具体地址 | |
| this.mapInstance.reverseGeocoder({ | |
| location: { latitude, longitude }, | |
| success: res => { | |
| console.log(res) | |
| this.studentInfo.address = res.result.formatted_addresses.recommend; | |
| this.loading = false; | |
| } | |
| }); | |
| } | |
| }); | |
| }, | |
| // 重新授权 | |
| async reGrantAuth() { ... }, | |
| } | |
| } | |
| </script> |

计算两个经纬度坐标之间的距离
具体位置也搞定后,就剩下最终的功能,计算两个经纬度坐标之间的距离,这听起来好像很难,但实际很简单,网上有大把现成的方法,我们直接抄个来耍就行了。
| /** | |
| * 根据经纬度获取两点距离 | |
| * @param la 第一个坐标点的纬度 如:24.445676 | |
| * @param lo 第一个坐标点的经度 如:118.082745 | |
| * @param la 第二个坐标点的纬度 | |
| * @param lo 第二个坐标点的经度 | |
| * @return { Object } { km: 千米/公里, m: 米 } | |
| * @tips 注意经度和纬度参数别传反了, 一般经度为~180、纬度为0~90 | |
| */ | |
| export function calcDistanceLL(la, lo1, la2, lo2) { | |
| let La = la1 * Math.PI / 180.0; | |
| let La = la2 * Math.PI / 180.0; | |
| let La = La1 - La2; | |
| let Lb = lo1 * Math.PI / 180.0 - lo2 * Math.PI / 180.0; | |
| let s = * Math.asin(Math.sqrt(Math.pow(Math.sin(La3 / 2), 2) + Math.cos(La1) * Math.cos(La2) * Math.pow(Math.sin( | |
| Lb / 2), 2))); | |
| s = s *.137; | |
| s = Math.round(s *) / 10000; | |
| return { | |
| km: s, | |
| m: Math.round(s *) | |
| }; | |
| } |
具体使用:
| <template> | |
| <view> | |
| ... | |
| <uni-section v-if="isChooseTarget" title="学生" type="line"> | |
| <uni-card title="当前位置实时信息"> | |
| ... | |
| <view class="block"> | |
| <view class="title">距离学校距离:</view> | |
| <view class="value"> | |
| <text v-if="!loading">{{ distanceToText || '-' }}</text> | |
| <view v-else class="loading"> | |
| <uni-icons type="spinner-cycle" size=""/> | |
| </view> | |
| </view> | |
| </view> | |
| <view class="block"> | |
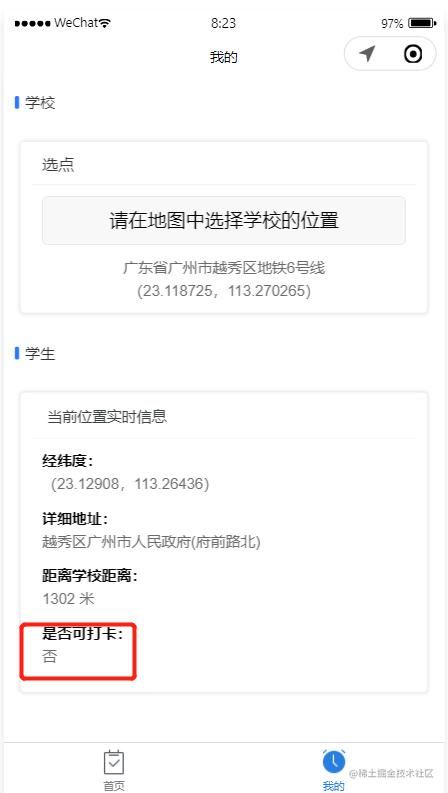
| <view class="title">是否可打卡:</view> | |
| <view class="value"> | |
| <text v-if="studentInfo.distance > || studentInfo.distance === ''">否</text> | |
| <view @click="punchClock" v-else class="button yd-flex-h-hC-vC">打卡</view> | |
| </view> | |
| </view> | |
| </uni-card> | |
| </uni-section> | |
| </view> | |
| </template> | |
| <script> | |
| import { getLocationAuth, calcDistanceLL } from '@/utils/location'; | |
| const QQMapWX = require('@/utils//qqmap-wx-jssdk.min.js'); | |
| export default { | |
| data() { | |
| return { | |
| ... | |
| studentInfo: { | |
| latitude: '', | |
| longitude: '', | |
| address: '', | |
| distance: '', | |
| }, | |
| mapInstance: null, | |
| } | |
| }, | |
| computed: { | |
| distanceToText() { | |
| if(this.mainInfo.distance !== '') { | |
| return `${this.mainInfo.distance} 米`; | |
| } | |
| return ''; | |
| }, | |
| }, | |
| async onLoad() { | |
| this.mapInstance = new QQMapWX({ | |
| key: '你的密钥', | |
| }); | |
| if(!await getLocationAuth()) { | |
| this.isAuth =; | |
| } | |
| }, | |
| methods: { | |
| punchClock() { | |
| uni.showToast({ | |
| title: '打卡成功', | |
| duration:, | |
| }); | |
| }, | |
| chooseLocation() { ... }, | |
| getLocationInfo() { | |
| this.loading = true; | |
| uni.getLocation({ | |
| type: 'gcj', | |
| success: ({ latitude, longitude }) => { | |
| this.studentInfo.latitude = latitude; | |
| this.studentInfo.longitude = longitude; | |
| // 经纬度转成具体地址 | |
| this.mapInstance.reverseGeocoder({ | |
| location: { latitude, longitude }, | |
| success: res => { | |
| this.studentInfo.address = res.result.formatted_addresses.recommend; | |
| // 计算两个经纬度之间的距离 | |
| const distance = calcDistanceLL( | |
| this.schoolInfo.latitude, | |
| this.schoolInfo.longitude, | |
| latitude, | |
| longitude, | |
| ); | |
| this.studentInfo.distance = distance.m; | |
| this.loading = false; | |
| } | |
| }); | |
| } | |
| }); | |
| }, | |
| // 重新授权 | |
| async reGrantAuth() { ... }, | |
| } | |
| } | |
| </script> | |
| <style> | |
| ... | |
| .button{ | |
| height:rpx; | |
| color: #fff; | |
| line-height:; | |
| background-color: #DE1; | |
| border-radius:rpx; | |
| font-size:rpx; | |
| width:%; | |
| margin: auto; | |
| } | |
| </style> |
至此,本篇文章就写完啦,撒花撒花。