1.安装vuex
cnpm install vuex --save
2.在使用vuex开发的时候使用的比较繁琐,我们单独起一个文件夹
src/stroe/index.js
| import Vue from 'vue' | |
| import Vuex from 'vuex' | |
| Vue.use(Vuex) | |
| export default new Vuex.Store({ | |
| state: { | |
| 'title': '技术博客', | |
| 'count': 1 | |
| } | |
| }) |
3.我们在入口文件中main.js进行挂在
| import store from './store' | |
| new Vue({ | |
| el: '#app', | |
| router, | |
| store, | |
| components: { App }, | |
| template: '<App/>' | |
| }) |
state的用法
4.我们已经在state中定义了一个变量,官方里state中定义的就是我们公用的变量,但他们都调用count这个变量,我们可以这么写
| <template> | |
| <div> | |
| <button class="btn" @click="handleClick">{{this.$store.state.count}}</button> | |
| </div> | |
| </template> |
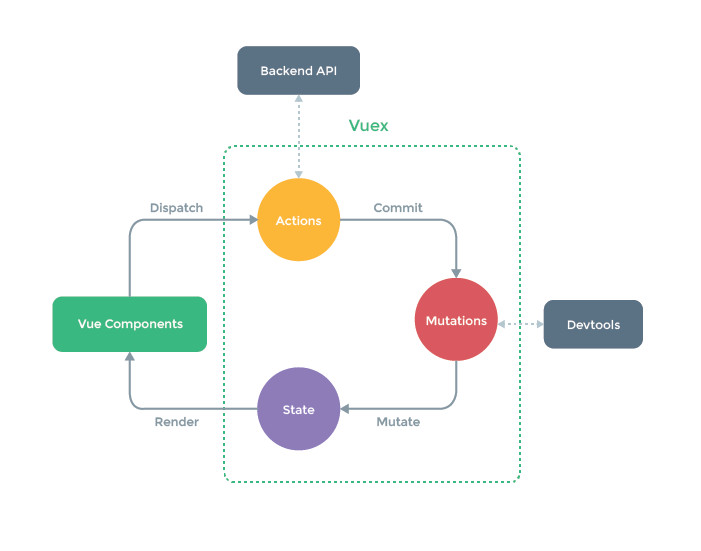
5.这里我们需要点击btn的时候修改count变量,在我们第一张图中介绍,当我们需要修改变量的时候需要需要dispatch派发到Actions中进行,在有Actions出发commit方法将数据提交到Mutations中进行处理,vuex遵循单一原则直接上代码
| <template> | |
| <div> | |
| <button class="btn" @click="handleClick">{{this.$store.state.count}}</button> | |
| </div> | |
| </template> | |
| <script> | |
| export default { | |
| name: 'Testvuex', | |
| methods: { | |
| handleClick () { | |
| this.$store.dispatch('changeCount') | |
| } | |
| } | |
| } | |
| </script> | |
| <style scoped lang="stylus"> | |
| .btn | |
| width :100% | |
| height :3rem | |
| </style> |
我们需要在store/index.js来定义actions
| actions: { | |
| // ctx上下文 | |
| changeCity (ctx, city) { | |
| // actions如果调用mutations使用commit方法 | |
| ctx.commit('changeCity', city) | |
| }, | |
| changeCount (ctx) { | |
| ctx.commit('countIncrease') | |
| } | |
| }, |
通过actions来接受commit传过来的值,在有commit传递给mutations进行数据的处理
| mutations: { | |
| countIncrease (state) { | |
| state.count++ | |
| } | |
| } |
我们点击按钮count变量++完成,基本的vuex流程就完成了