目录
- 问题提出
- 搭建过程
- 1、初始化项目
- 1.1 创建项目
- 1.2 安装vite对vue2支持的插件
- 1.3 安装vue依赖
- 1.4 修改项目文件结构
- 1.5 运行一下项目
- 2、vue-router
- 2.1 安装
- 2.2 新建router目录
- 2.3 全局注册
- 3、vuex
- 3.1 安装
- 3.2 新建vuex目录
- 3.3 全局注册
- 4、组件库
- 4.1 安装
- 4.2 按需引入
- 4.3 在main.js全局注册
- 4.4 在页面中使用
- 5、axios
- 5.1 安装
- 5.2 封装axios
- 5.3 在页面中使用
- 总结
问题提出
最近在做一个练习的小项目,由于要配合组成员的其它成员来搭建项目,大多掌握的技术栈都在vue2,用惯了vite来搭建(vite真香~),就想着来搭建一个vue2的项目。原本以为查下百度很快可以搭好,没想到折腾了一早上。。。。
⭐️文章结尾会给出我的package.json文件
搭建过程
1、初始化项目
vite提供了对应的npm命令可以创建各种框架的项目,但是vite在创建vue项目时,默认直接创建vue3,因此这里我们使用原生项目进行创建
1.1 创建项目
注意:这里vite的版本采用2.8.0的,最新的版本创建后续会出现问题
npm init vite@.8.0
后续,安装如图
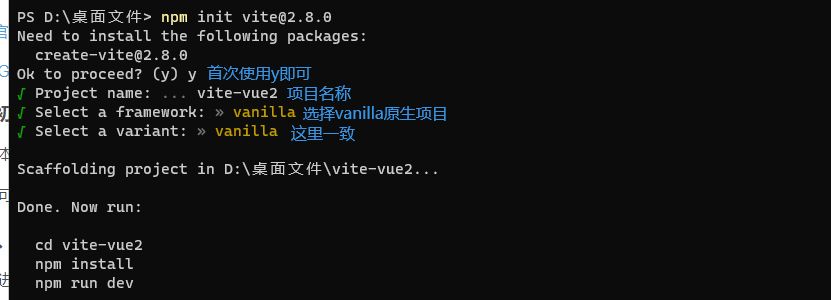
创建好项目后
| //.进入项目 | |
| cd vite-vue | |
| //.安装依赖 | |
| npm install | |
| //.启动项目 | |
| npm run dev |
效果图如下:
1.2 安装vite对vue2支持的插件
在vite-vue2安装:vite-plugin-vue2
| // 注意:vite-plugin-vue的版本为1.9.3 | |
| npm install vite-plugin-vue@1.9.3 -D |
在根目录创建vite.config.js文件,来注册插件
| import { defineConfig } from 'vite' // 动态配置函数 | |
| import { createVuePlugin } from 'vite-plugin-vue' | |
| import { resolve } from 'path' | |
| export default () => | |
| defineConfig({ | |
| plugins: [createVuePlugin()], | |
| server: { | |
| open: true, //自动打开浏览器 | |
| port: //端口号 | |
| }, | |
| resolve: { | |
| // 别名 | |
| alias: [ | |
| { | |
| find: '@', | |
| replacement: '/src' | |
| } | |
| ] | |
| } | |
| }) | |
1.3 安装vue依赖
npm命令安装
写本文时,通过npm install vue安装会直接安装3.0版本的因此要指定好vue版本
npm install vue@.x vue-template-compiler@2.x -S
1.4 修改项目文件结构
1.4.1 创建src目录
在项目根目录下创建src目录,然后把main.js移到src目录里
| import Vue from 'vue' | |
| import App from './App.vue' | |
| new Vue({ | |
| render: h => h(App) | |
| }).$mount('#app') |
1.4.2 修改index.html
修改项目启动的入口文件
| // index.html | |
| <script type="module" src="/src/main.js"></script> |
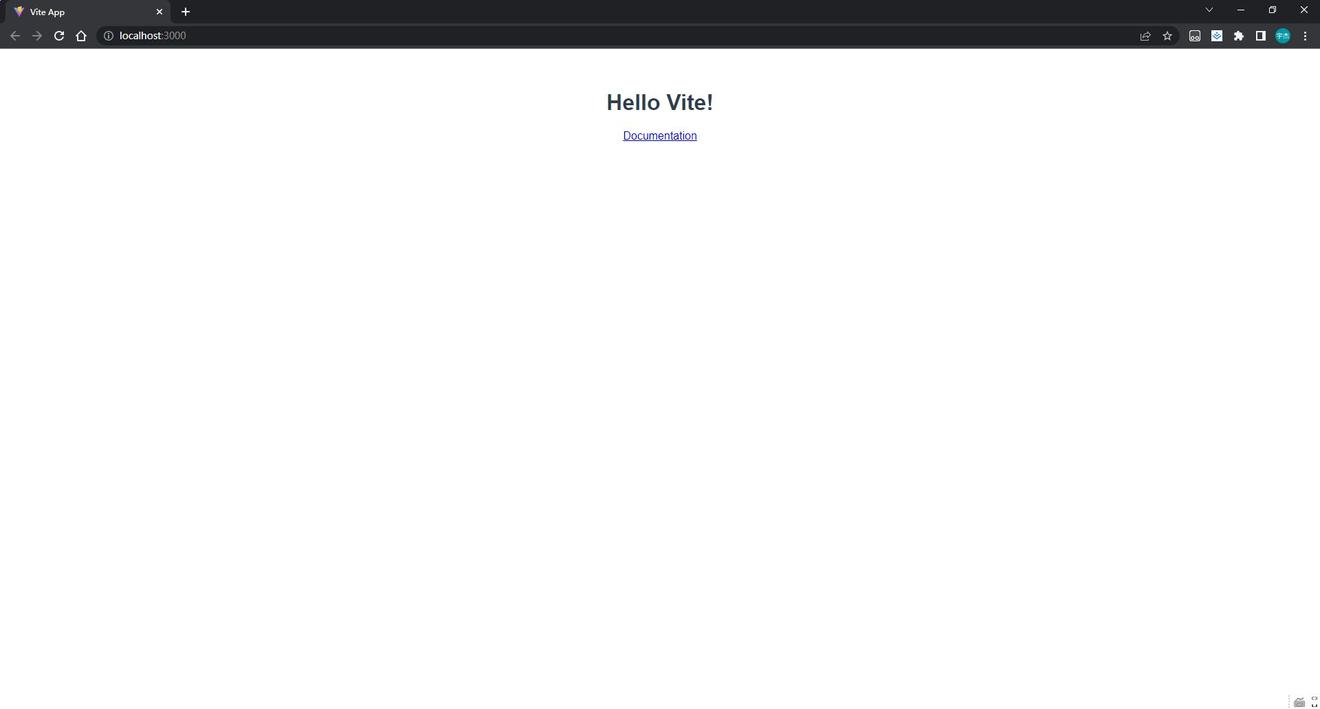
1.4.3 创建App.vue文件
代码如下:
| <template> | |
| <div>Hello Vite Vue</div> | |
| </template> |
1.5 运行一下项目
再次运行下项目检验一下之前配置有无问题
npm run dev
2、vue-router
2.1 安装
npm install vue-router@.5.2 -S
2.2 新建router目录
2.2.1 创建路由表
在src目录下创建router目录,并在router目录下创建index.js文件和module目录,在module目录下创建home.js和index.js。这里采用分模块来存放路由表
| // /src/router/module/home.js | |
| export const home = [ | |
| { | |
| path: '/home', | |
| meta: { title: '首页' }, | |
| component: () => import('@/views/home/Index.vue') | |
| } | |
| ] | |
| // /src/router/module/index.js | |
| import { home } from './home' | |
| export const module = [...home] | |
| // /src/router下index.js | |
| import { module } from './module/index' | |
| import VueRouter from 'vue-router' | |
| import Vue from 'vue' | |
| // 使用VueRouter | |
| Vue.use(VueRouter) | |
| const routes = [ | |
| ...module | |
| ] | |
| const router = new VueRouter({ | |
| mode: 'history', | |
| base: '/', | |
| routes | |
| }) | |
| export default router |
2.2.2 创建路由指向的页面组件
在 src 目录下创建 views 目录,用来存放页面组件。
在 src/views/home 目录下创建1个页面:Index.vue
| <template> | |
| <div> | |
| Home | |
| </div> | |
| </template> |
2.3 全局注册
2.3.1 在main.js里注册
| import Vue from 'vue' | |
| import App from './App.vue' | |
| import router from './router/index.js' | |
| new Vue({ | |
| router, | |
| render: h => h(App) | |
| }).$mount('#app') |
2.3.2 创建路由跳转标签
修改App.vue文件
| <template> | |
| <div id="app" class="app"> | |
| <router-view></router-view> | |
| </div> | |
| </template> |
3、vuex
vuex作为大型单页面的状态管理器,使用起来十分方便,在有mapState、mapMutation等语法糖的引入变得更加的简单,但当项目比较小的时候可以不引入,可能会变得臃肿起来,这里为了学习就引入进来了~
3.1 安装
npm install vuex@.6.2 -S
3.2 新建vuex目录
在src目录下创建store目录,并在store目录下创建index.js
| // index.js | |
| import Vue from 'vue' | |
| import Vuex from 'vuex' | |
| Vue.use(Vuex) // 使用Vuex | |
| export default new Vuex.Store({ | |
| state: { | |
| count: | |
| }, | |
| mutations: { | |
| increment(state) { | |
| state.count++ | |
| } | |
| }, | |
| actions: {}, | |
| modules: {} | |
| }) |
3.3 全局注册
| import Vue from 'vue' | |
| import App from './App.vue' | |
| import router from './router/index.js' | |
| import store from './store' | |
| new Vue({ | |
| router, | |
| store, | |
| render: h => h(App) | |
| }).$mount('#app') |
4、组件库
这里组件库我采用了阿里推荐的ant-design-vue,版本采用1.x才兼容vue2
4.1 安装
npm install ant-design-vue@.7.8 -S
4.2 按需引入
ps:在官网看半天还以为要引入babel-plugin-import 来按需引入,搞半天最后发现可以直接引入。。。。
在src建立目录plugin/antd目录,在下面创建index.js文件,代码如下:
| import Vue from 'vue' | |
| import { Button, message } from 'ant-design-vue' // 按需引入 | |
| import 'ant-design-vue/dist/antd.css' // or 'ant-design-vue/dist/antd.less' | |
| // 挂载全局Message | |
| Vue.prototype.$message = message | |
| Vue.use(Button) |
4.3 在main.js全局注册
| // main.js | |
| // 引入antd | |
| import './plugin/antd' | |
| new Vue({ | |
| router, | |
| store, | |
| render: h => h(App) | |
| }).$mount('#app') |
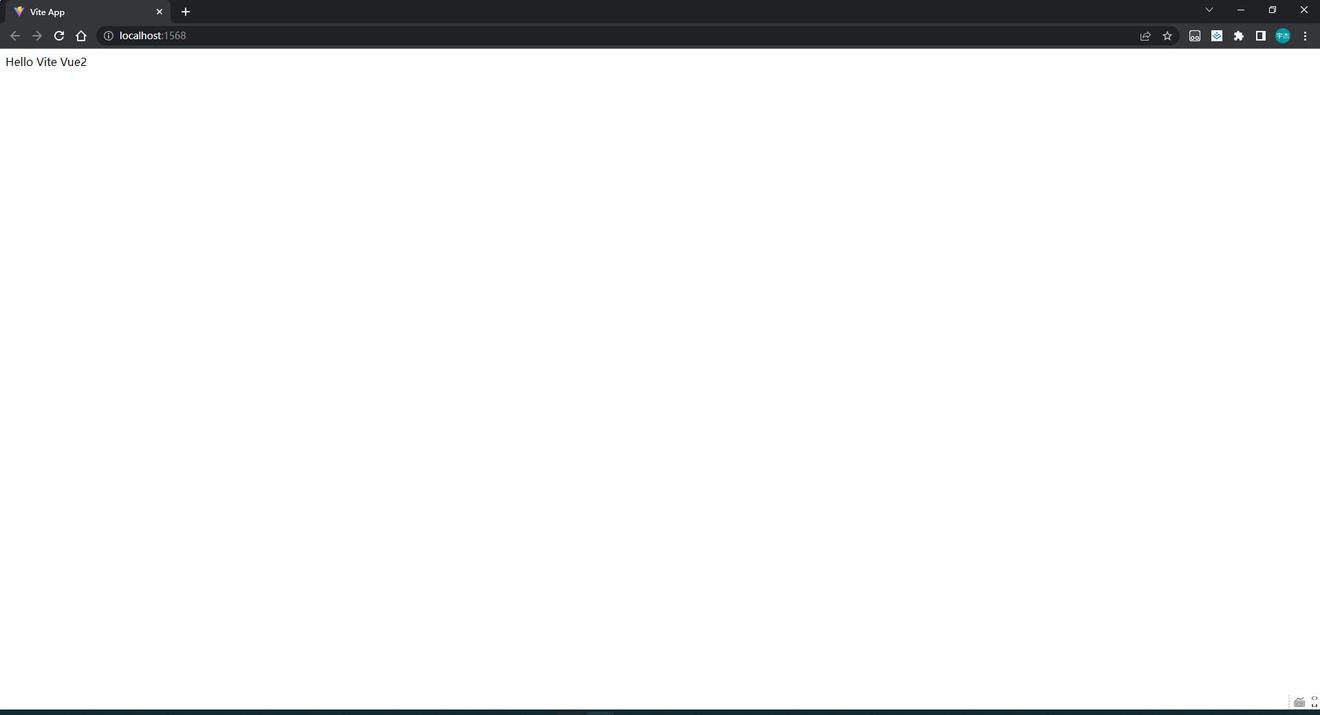
4.4 在页面中使用
| <template> | |
| <div> | |
| <a-button type="dashed" @click="onClick"> | |
| Dashed | |
| </a-button> | |
| </div> | |
| </template> | |
| <script> | |
| export default { | |
| mounted() { | |
| }, | |
| methods: { | |
| onClick() { | |
| this.$message.info('This is a normal message'); | |
| } | |
| } | |
| } | |
| </script> |
5、axios
本文会对axios做一个简单的封装。
5.1 安装
npm install axios -S
5.2 封装axios
在src创建http目录,在其下面创建request.js和home.js
| // request.js | |
| import axios from 'axios' | |
| import { message } from 'ant-design-vue' | |
| // 创建axios实例 | |
| // 创建请求时可以用的配置选项 | |
| // 配后端数据的接收方式application/json;charset=UTF-或者application/x-www-form-urlencoded;charset=UTF-8 | |
| const contentType = 'application/json;charset=UTF-' | |
| const instance = axios.create({ | |
| /** | |
| * 是否携带cookie,注意若携带cookie后端必须配置 | |
| *.Access-Control-Allow-Origin为单一域名(具体到IP + port,用localhost貌似不行) | |
| *.需要带上响应头Access-Control-Allow-Credentials | |
| */ | |
| // withCredentials: true, | |
| timeout:, | |
| baseURL: 'http://localhost:/api/v1', | |
| headers: { | |
| 'Content-Type': contentType | |
| } | |
| }) | |
| // axios的全局配置 | |
| instance.defaults.headers.post = { | |
| 'Content-Type': 'application/x-www-form-urlencoded' | |
| } | |
| instance.defaults.headers.common = { | |
| 'Auth-Type': 'company-web', | |
| 'X-Requested-With': 'XMLHttpRequest', | |
| token: 'sdfjlsdfjlsdjflsjflsfjlskd' | |
| } | |
| // 添加请求拦截器(post只能接受字符串类型数据) | |
| instance.interceptors.request.use( | |
| config => { | |
| const token = window.sessionStorage.getItem('token') | |
| if (token) { | |
| config.headers.Authorization = token | |
| } | |
| return config | |
| }, | |
| error => { | |
| return Promise.reject(error) | |
| } | |
| ) | |
| const errorHandle = (status, other) => { | |
| switch (status) { | |
| case: | |
| message.error('信息校验失败') | |
| break | |
| case: | |
| // @ts-nocheck | |
| message.error('认证失败') | |
| break | |
| case: | |
| message.error('token校验失败') | |
| break | |
| case: | |
| message.error('请求的资源不存在') | |
| break | |
| default: | |
| message.error(other) | |
| break | |
| } | |
| } | |
| // 添加响应拦截器 | |
| instance.interceptors.response.use( | |
| // 响应包含以下信息data,status,statusText,headers,config | |
| res => { | |
| if (res.data && res.data.code !== && !(res.data instanceof Blob)) { | |
| message.error(res.data.msg || '服务器出错!') | |
| } | |
| // 请求通用处理 | |
| return res.data | |
| }, | |
| err => { | |
| // message.error(err) | |
| const { response } = err | |
| if (response) { | |
| errorHandle(response.status, response.data) | |
| return Promise.reject(response) | |
| } | |
| message.error('请求失败') | |
| return true | |
| } | |
| ) | |
| export default instance | |
| import request from './request' | |
| export default { | |
| getList(model) { | |
| return request({ | |
| url: '/theme/list', | |
| method: 'post', | |
| data: model | |
| }) | |
| }, | |
| } |
5.3 在页面中使用
| <script> | |
| import $http from '@/http/home.js' | |
| export default { | |
| mounted() { | |
| }, | |
| methods: { | |
| async onSubmit(){ | |
| const res = await $http.getList({}); | |
| console.log(res) | |
| } | |
| } | |
| } | |
| </script> |