记录学习中遇到的各种奇奇怪怪的问题
下载jwt和配置jwt我就不写了
1.后台登录方法
| public function login(Request $request){ | |
| $arr = $request->only(['email','password']); | |
| if(empty($arr)){ | |
| return $this->response->array([ | |
| 'msg'=>'is null', | |
| 'code'=>403, | |
| 'data' => [], | |
| ]); | |
| } | |
| $token = Auth::guard('api')->attempt($arr); //获取token | |
| //未获得token时返回错误 | |
| if(!$token){ | |
| return $this->responseinfo('error',403,[]); | |
| } | |
| //返回当前用户 | |
| $userAuth =Auth::guard('api')->user(); | |
| //查找用户信息 | |
| $user = Login::find($userAuth->id); | |
| $user->update([$user->updated_at = time()]); | |
| return $this->response->array([ | |
| 'msg'=>'success', | |
| 'token' => 'Bearer '.$token, | |
| 'code' => 200 | |
| ]); | |
| } |
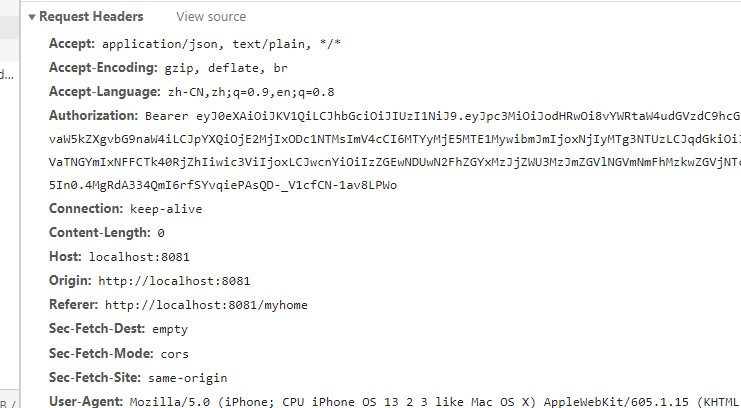
这里有一个值得注意的地方,也是我踩过的一个坑:返回的token必须在前面加入“Bearer +Token” ,这里Bearer和Token之间有一个空格
2.前端VUE接收
| axios.post('/api/index/login', { | |
| email: this.email, | |
| password: this.password | |
| }) | |
| .then((response) =>{ | |
| if(response.data.code === 200 ){ | |
| let token = response.data.token | |
| Toast.success('登录成功') | |
| window.localStorage.setItem('token',token) | |
| this.$store.commit('setToken',token) | |
| return this.$router.push('/myhome') | |
| }else{ | |
| Toast.fail('账户密码错误') | |
| } | |
| }) |
这里是我的前端请求登录方法,在这里需要在后端成功返回之后,将token值保存在本地(localStorage.setItem),因为我这里用的vantui框架,所以要加上windows. 另外将token保存至vuex中。
3.vuex的配置
| import Vue from 'vue' | |
| import Vuex from 'vuex' | |
| Vue.use(Vuex) | |
| export default new Vuex.Store({ | |
| state: { | |
| // 保存公共数据 在设置vuex中的初值时,先从本地存储中取,如果取不到,则初始为空 | |
| tokenInfo: window.localStorage.getItem('token') || {} | |
| }, | |
| mutations: { | |
| setToken(state, tokenObj) { | |
| state.tokenInfo = tokenObj | |
| // 因为刷新会丢失所以进行持久化 调用storage文件里方法 | |
| window.localStorage.setItem('tokenInfo', tokenObj) | |
| } | |
| }, | |
| actions: {}, | |
| modules: {} | |
| }) |
4 axios的配置
| //请求头添加token | |
| _axios.interceptors.request.use( | |
| function(config) { | |
| let token = store.state.tokenInfo //获取token | |
| if (token) { | |
| config.headers.Authorization = token //在请求头中加入token | |
| } | |
| return config; | |
| }, | |
| function(error) { | |
| // Do something with request error | |
| return Promise.reject(error); | |
| } | |
| ); |
这样你的登录方法就做完了,在登录后跳转至首页时,首页发送请求来获取用户信息,就会在header中携带token了。

下面来看一下token令牌的验证
1.首页发送请求获取用户信息,在hearder中携带Token令牌
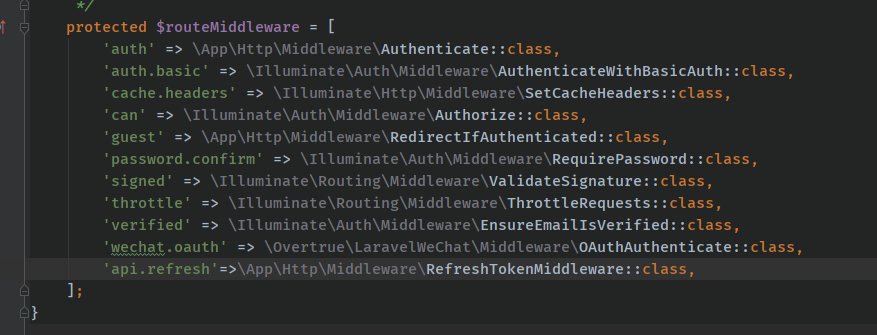
新建路由中间件中间件:RefreshTokenMiddleware , 并完成配置

| namespace App\Http\Middleware; | |
| use Closure; | |
| use Illuminate\Http\Request; | |
| use Illuminate\Support\Facades\Auth; | |
| use Tymon\JWTAuth\Exceptions\JWTException; | |
| use Tymon\JWTAuth\Facades\JWTAuth; | |
| use Tymon\JWTAuth\Http\Middleware\BaseMiddleware; | |
| use Tymon\JWTAuth\Exceptions\TokenExpiredException; | |
| use Symfony\Component\HttpKernel\Exception\UnauthorizedHttpException; | |
| class RefreshTokenMiddleware extends BaseMiddleware | |
| { | |
| /** | |
| * Handle an incoming request. | |
| * | |
| * @param \Illuminate\Http\Request $request | |
| * @param \Closure $next | |
| * @return mixed | |
| */ | |
| public function handle(Request $request, Closure $next) | |
| { | |
| // 检查此次请求中是否带有 token,如果没有则抛出异常。在这里如果你的Token没有添加Bearer ,将会抛出异常检测不到token令牌 | |
| $this->checkForToken($request); | |
| // 使用 try 包裹,以捕捉 token 过期所抛出的 TokenExpiredException 异常 | |
| try { | |
| // 检测用户的登录状态,如果正常则通过 | |
| if ($this->auth->parseToken()->authenticate()) { | |
| return $next($request); | |
| } | |
| throw new UnauthorizedHttpException('jwt-auth', '未登录'); | |
| } catch (TokenExpiredException $exception) { | |
| // 此处捕获到了 token 过期所抛出的 TokenExpiredException 异常,我们在这里需要做的是刷新该用户的 token 并将它添加到响应头中 | |
| try { | |
| // 刷新用户的 token | |
| $token = $this->auth->refresh(); | |
| // 使用一次性登录以保证此次请求的成功 | |
| Auth::guard('api')->onceUsingId($this->auth->manager()->getPayloadFactory()->buildClaimsCollection()->toPlainArray()['sub']); | |
| } catch (JWTException $exception) { | |
| // 如果捕获到此异常,即代表 refresh 也过期了,用户无法刷新令牌,需要重新登录。 | |
| throw new UnauthorizedHttpException('jwt-auth', $exception->getMessage()); | |
| } | |
| } | |
| // 在响应头中返回新的 token | |
| return $this->setAuthenticationHeader($next($request), $token); | |
| } | |
| } |
使用中间件,并配置路由:

写上你控制器方法,你就可以正常访问了,并且你的每次请求都是携带token令牌的,不过这里有一个我还在做的事情,当token过期浏览器返回401时,vue的axios要接收后端返回的请求头里的新token,并对旧的token进行替换,然后再次请求刚刚请求失败的api,我也还在学习,当功能完成时我会再将我的代码贴出来
结语
记录自己学习的过程。