
大家好,在前面的几篇文章里我们一起学习了Vue相关的基础知识,想复习基础的同学可以点击文末链接进行回顾。今天我们将学习 Vue 的 State Management(状态管理):Vuex,我们在构建大型应用时 ,State Management 的处理至关重要。
一、Vuex 简介
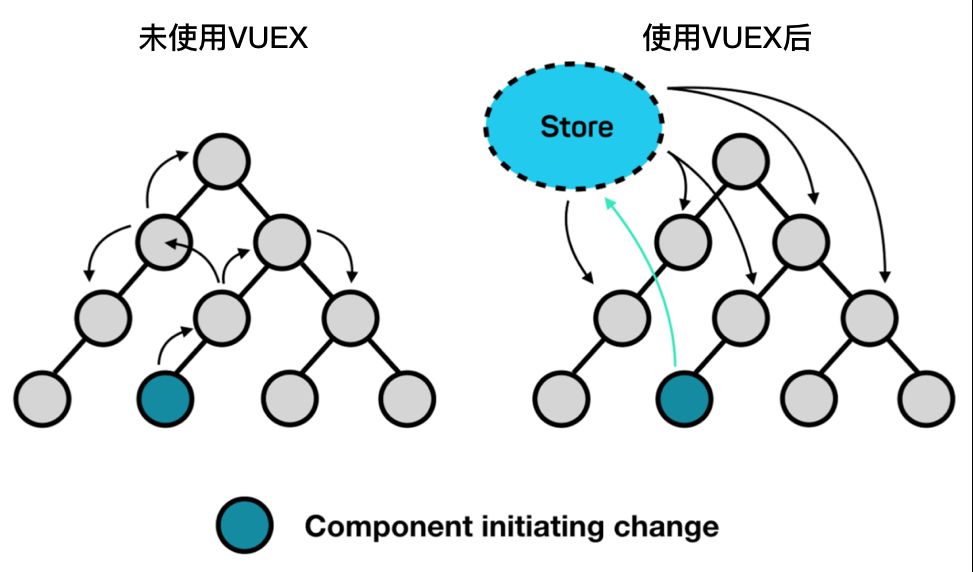
随着业务的增加,我们的应用程序也变得越来越复杂,每个组件都有自己的数据状态,再加上组件之间的数据传递问题,一个数据的变化会影响好几个组件的连锁反应,这就增加了我们定位问题的难度。
因此要解决上述问题,我们就要集中管理数据,在多个组件中共享数据状态时——比如用户的登录信息或者UI组件的呈现状态(按钮禁用或加载数据)。
幸运的是,我们不需要手工去完成 State Management 的工作,许多流行的框架都能帮助我们管理数据状态,你可能听说过Redux——React生态中比较流行的状态管理解决方案。Vue当然也有自己的官方解决方案,称作Vuex。他们共同的特点就是帮助我们集中管理数据状态以及任何组件无需要父子关系,也能很容易进行数据之间的交互。
二、Vuex 相关的几个概念术语
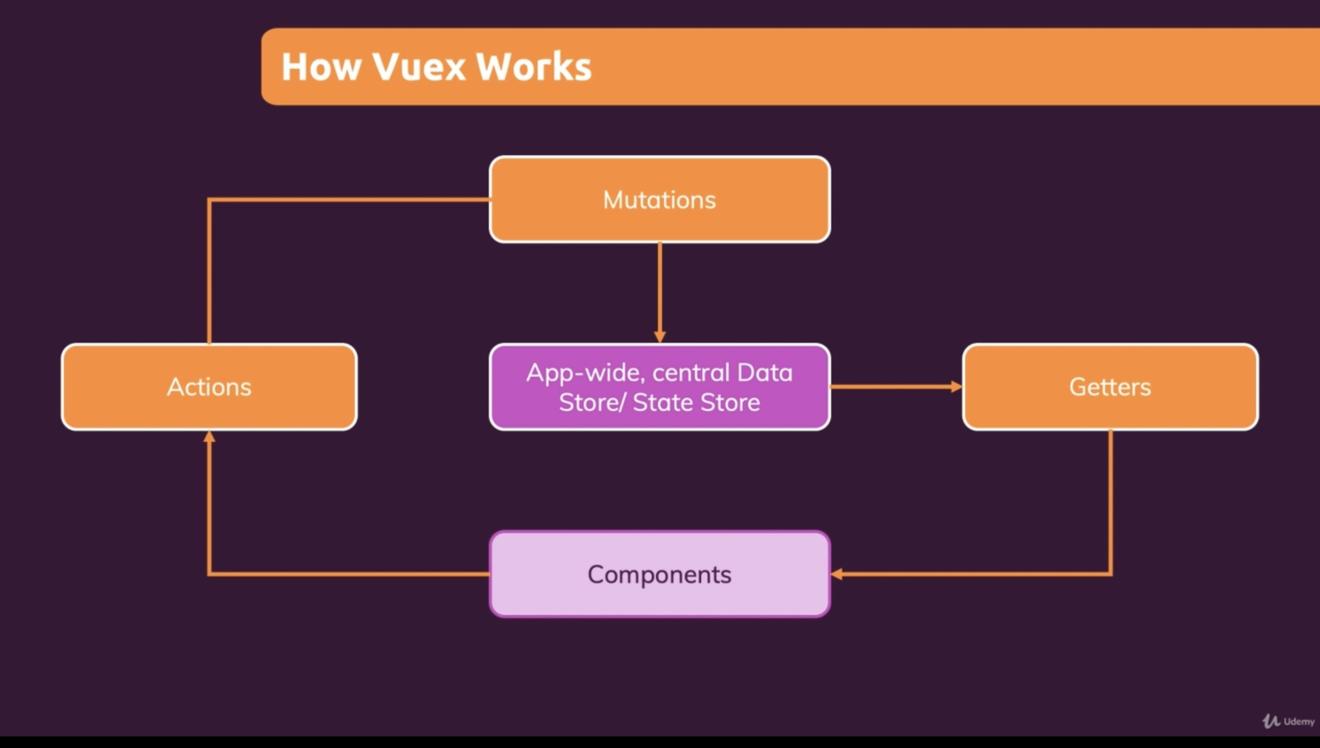
那我们如何使用Vuex呢?在使用之前,我们先看下下张图,这张图很好的诠释了 Vuex 的运行机制,理解了这张图,你就可以很快的上手Vuex的使用了。
要掌握Vuex理解以下几个概念很重要:
State
整个应用的数据中心,应用的相关组件在这里获取数据或更新数据,是整个应用唯一的数据中心。
Store
数据中心的管家,只能在数据中心的内部进行更改,外部组件无法进行直接更改State,只能依赖dispatch action(行为调度) 或 commit a mutation(提交mutation)间接操作。
Getters
Getters 的本质就是 Vuex store 的 computed 属性,读取 store/state 的内容,Getters中的数据将会被缓存,数据更新时其依赖的相关组件状态也随之及时更新。
Mutations
在应用中共享全局数据状态时,也会导致一些问题,因为数据的改变可以来自任何组件,因此很难定位和跟踪数据的状态。
因此 Vuex 提出了使用 Mutations 这种方式进行更改数据的状态,并不是直接进行更改,其 Vue devtools 工具能很好很准确帮我定位哪些更改以及何时进行的更改。
如果你使用过 Redux ,Mutations 的概念很类似 reducer,其作用也是对数据状态进行更改。
Actions
如果要执行异步任务或多个相关的Mutations去更新数据状态时,我们需要 Actions 去定义函数进行操作,其函数第一个参数 context 可以获 state , commit 和 getters 的相关属性,方便我们组织定义更复杂的逻辑。比如我们常用的接口数据请求获取数据,就会经常用到Actions。
最后做下总结,我们使用 Store/State 定义和管理应用的核心数据,在组件中通过compute属性调用Getters 中的数据,如果我们要操作数据,我们可以通过使用 dispatch 方法调用已注册的 Actions 方法,Actions 再去调用相关的 mutations 进行数据的操作。
三、动手做一个简单例子
接下来我们亲自动手做一个简单的练习,通过代码进一步的了解Vuex,废话不多说,我们开始吧!
1、安装 Vuex
假设我们通过 CLI 工具创建了一个Vue 项目(使用默认预设),如果我们要使用 Vuex 就要安装相关依赖,安装命令如下:
npm install vuex
依赖安装完成后,我们需要将Vuex实例进行注册,接下来我们在src目录里新建个 store.js ,示例代码如下:
src/store.js
| import Vue from "vue"; | |
| import Vuex from "vuex"; | |
| Vue.use(Vuex); | |
| export default new Vuex.Store({ | |
| state: {}, | |
| mutations: {}, | |
| actions: {} | |
| }); |
我们在 Vuex.store 构造函数里传入一个对象,含有 state , mutations 及actions 这几个核心属性,不用担心,我们来一步步逐一实现,接下来我们打开 main.js 文件,在Vue实例里进行注册,示例代码如下:
src/main.js
| import Vue from "vue"; | |
| import App from "./App.vue"; | |
| import store from "./store"; | |
| Vue.config.productionTip = false; | |
| new Vue({ | |
| store, | |
| render: h => h(App) | |
| }).$mount("#app"); |
完成上述操作后,我们就能很方便的通过 this.$store 访问 store 实例的内容。
2、在 State 里初始化数据
State 本身就是一个 JS 对象,创建的数据可以在不同的组件中进行共享,比如初始化一个购物车的数据,示例代码如下:
| export default new Vuex.Store({ | |
| state: { | |
| customerName: 'John Smith', | |
| shoppingCart: [ | |
| { | |
| name: 'Jumbo Box of Teabags', | |
| quantity: 1, | |
| price: 350 | |
| }, | |
| { | |
| name: 'Packet of Fancy Biscuits', | |
| quantity: 1, | |
| price: 199 | |
| }, | |
| ] | |
| }, | |
| }); |
状态属性的值可以包含任何有效的数据类型,接下来我们可以在组件中使用 computed 进行数据的获取,比如我们要获取顾客的名字,示例代码如下:
| <template><div><span>{{ customerName }}</span></div> | |
| </template> | |
| <script> | |
| export default { | |
| computed: { | |
| customerName() { | |
| return this.$store.state.customerName; | |
| } | |
| } | |
| } | |
| </script> |
上述代码我们通过 store 实例进行数据获,也许你会觉得这样获取很啰嗦,Vuex 提供了一个工具函数能很方便的获取 store 实例的数据。
使用 mapState 方法,示例代码如下:
| <template><div><span>{{ customerName }}</span></div> | |
| </template> | |
| <script> | |
| import { mapState } from "vuex"; | |
| export default { | |
| computed: { | |
| ...mapState(['customerName']) | |
| } | |
| } | |
| </script> |
mapState() 方法使用 ES6 的新语法 ... 帮助我们获取 State 中的数据,只需要在函数里传递State对应的属性值即可,这样是不是很简单呢。
3、在 Getters 里获取数据
Getters 的本质就是 Vuex store 的 computed 属性,它允许你可以在不同组件之间共享数据状态,就和组件的 computed 属性是一样的,其中的数据将会被缓存,数据发生变化时,进行动态计算,实时反馈。
比如我们要获取购物车商品的商品种类,示例代码如下:
| export default new Vuex.Store({ | |
| state: { | |
| shoppingCart: [ | |
| // ... | |
| ] | |
| }, | |
| getters: { | |
| cartItemCount: state => state.shoppingCart.length | |
| } | |
| }); |
在组件中使用 getter 方法来获取 store/state ,我们需要创建一个 computed 属性进行调用,示例代码如下:
| <template><div><span>Shopping Cart ({{ cartItemCount }} items)</span></div> | |
| </template> | |
| <script> | |
| export default { | |
| computed: { | |
| cartItemCount() { | |
| return this.$store.getters.cartItemCount; | |
| } | |
| } | |
| } | |
| </script> |
同样 Vuex 提供了一个更便捷的方法 mapGetters() 快速调用 getter,我们传递getters 对象的属性值即可,示例代码如下:
| <template><div><span>Shopping Cart ({{ cartItemCount }} items)</span></div> | |
| </template> | |
| <script> | |
| import { mapGetters } from "vuex"; | |
| export default { | |
| computed: { | |
| ...mapGetters(['cartItemCount']) | |
| } | |
| } | |
| </script> |
4、通过 Mutations 操作数据
如果我们要进行数据状态的更新,我们可以使用 Mutations 进行方法的定义,比如我们要更新购物车顾客的姓名,示例代码如下:
| export default new Vuex.Store({ | |
| state: { | |
| customerName: 'Fred' | |
| }, | |
| mutations: { | |
| setCustomerName(state, name) { | |
| state.customerName = name; | |
| } | |
| } | |
| }); |
接下来我们在调用的组件里定义方法,通过调用 mutations 的 setCustomerName 的方法进行数据操作,这里我们使用 commit() 方法进行调用,示例代码如下:
| <template><div><p>{{ customerName }}</p><input type="text" @input="updateName" :value="customerName" /></div> | |
| </template> | |
| <script> | |
| import { mapState } from "vuex"; | |
| export default { | |
| name: "Example", | |
| computed: { | |
| ...mapState(['customerName']) | |
| }, | |
| methods: { | |
| updateName(event) { | |
| this.$store.commit('setCustomerName', event.target.value); | |
| } | |
| } | |
| } | |
| </script> |
上述代码,我们通过一个文本输入框组件,进行顾客姓名信息的更改,同样,你也猜到了,Vuex也提供了 mapMutations 方法,快速获取对应的属性方法,简化后的调用方法,示例代码如下:
| import { mapState, mapMutations } from 'vuex'; | |
| export default { | |
| name: "Example", | |
| computed: { | |
| ...mapState(['customerName']) | |
| }, | |
| methods: { | |
| ...mapMutations(['setCustomerName']), | |
| updateName(event) { | |
| this.setCustomerName(event.target.value); | |
| } | |
| } | |
| } |
你可能注意到,我们这里的操作是同步的,如果操作的数据需要等待,或者比较费时间,比如我们需要异步请求(AJAX)后端的数据,我们就需要使用 actions ,这就是其存在的理由。
5、使用 Actions 获取接口数据
讲到这里,你也许会这样理解,state 就好比 store/ state 的状态树,我们通过 commit 方法去调用mutations 定义的方法属性去更新数据状态,使用 getters 属性定义获取状态树的数据集合。
Actions 则为我们提供了异步获取后端数据API接口的规则,比如我们要获取一组用户列表信息,示例代码如下:
| import Vue from "vue"; | |
| import Vuex from "vuex"; | |
| import axios from "axios"; | |
| Vue.use(Vuex); | |
| export default new Vuex.Store({ | |
| state: { | |
| users: [], | |
| isLoading: false, | |
| }, | |
| mutations: { | |
| setLoadingTrue(state) { | |
| state.isLoading = true; | |
| }, | |
| setLoadingFalse(state) { | |
| state.isLoading = false; | |
| }, | |
| setUsers(state, users) { | |
| state.users = users; | |
| }, | |
| setCustomerName(state, name) { | |
| state.customerName = name; | |
| } | |
| }, | |
| actions: { | |
| getUsers(context) { | |
| context.commit('setLoadingTrue'); | |
| axios.get('/api/users') | |
| .then(response => { | |
| context.commit('setUsers', response.data); | |
| context.commit('setLoadingFalse'); | |
| }) | |
| .catch(error => { | |
| context.commit('setLoadingFalse'); | |
| // handle error | |
| }); | |
| } | |
| } | |
| }); |
在上述例子里,我们定义了数据请求中的状态,默认为false,请求数据时将其定义为true,请求完毕或接口异常时,将其重置为初始值。之所以定义这个状态值,方便前端组件进行UI的展示,提示用户数据正在加载中。
接下来我们可以通过 Vuex Store 提供的 this.$store.dispatch() 方法调用actions 定义的方法,但是也可以通过 mapActions() 来简化代码的调用,示例代码如下:
| <template><div><div id="spinner" v-if="isLoading"><img src="spinner.gif" /></div><ul v-else><li v-for="(user, index) in users" :key="index" >{{ user }}</li></ul></div> | |
| </template> | |
| <script> | |
| import { mapActions, mapState } from "vuex"; | |
| export default { | |
| computed: { | |
| ...mapState([ | |
| 'isLoading', | |
| 'users' | |
| ]) | |
| }, | |
| methods: { | |
| ...mapActions(['getUsers']) | |
| }, | |
| created() { | |
| this.getUsers(); | |
| } | |
| } | |
| </script> |
通过以上代码示例,想必大家对 state,store,getters, mutations,actions 有了更深刻的认识吧。
四、一个完整的项目示例
最后我们做一个完整的例子,对上述的学习进行一个巩固,我们来做一个用户信息列表和一个用户信息详细页,通过后端接口的形式进行获取。
我们先通过 CLI 脚手架使用 manually 创建项目,确保我们选择了 Vue Router 和 Vuex 选项,创建完成后,我们修改下项目的 index.html 页面,添加一些基础的CSS样式信息。示例代码如下:
public/index.html
| <html><head><meta charset="utf-8" /><meta http-equiv="X-UA-Compatible" content="IE=edge,chrome=1" /><meta name="viewport"content="width=device-width, initial-scale=1.0, maximum-scale=1.0"><title>Vuex Example - Jump Start Vue.js</title><link rel="stylesheet" type="text/css"href="<https://cdnjs.cloudflare.com/ajax/libs/semantic-ui/2.3.1/semantic.min.css>"><style type="text/css">body { | |
| background-color: #FFFFFF; | |
| } | |
| .ui.menu .item img.logo { | |
| margin-right: 1.5em; | |
| } | |
| .main.container { | |
| margin-top: 7em; | |
| } | |
| </style></head><body><div id="app"></div></body> | |
| </html> |
接着我们继续修改下 <App> 组件的内容,代码如下:
src/App.vue
| <template><div><div class="ui fixed inverted menu"><div class="ui container"><div class="header item"><img class="logo" src="./assets/logo.png"> | |
| Jump Start Vue.js | |
| </div><router-link class="item" to="/" exact>Home</router-link><router-link class="item" to="/users">Users</router-link></div></div><router-view></router-view></div> | |
| </template> | |
| <script> | |
| import { mapActions } from "vuex"; | |
| export default { | |
| name: "App", | |
| methods: { | |
| ...mapActions(["fetchUsers"]) | |
| }, | |
| created() { | |
| this.fetchUsers(); | |
| } | |
| }; | |
| </script> |
你可能注意到,上述代码我们创建了 <router-link> 组件,方便我们进行页面之间的切换,同时我们调用了mapActions 中的 fetchUsers 方法,用于应用一加载,我们就去请求后端数据,获取用户信息。
接下来,我们来编写Vuex的核心文件,store.js 文件,示例代码如下:
src/store.js
| import Vue from "vue"; | |
| import Vuex from "vuex"; | |
| import axios from "axios"; | |
| Vue.use(Vuex); | |
| export default new Vuex.Store({ | |
| state: { | |
| users: [], | |
| selectedUserId: null, | |
| isFetching: false | |
| }, | |
| mutations: { | |
| setUsers(state, { users }) { | |
| state.users = users; | |
| }, | |
| setSelectedUser(state, id) { | |
| state.selectedUserId = id; | |
| }, | |
| setIsFetching(state, bool) { | |
| state.isFetching = bool; | |
| } | |
| }, | |
| getters: { | |
| selectedUser: state => | |
| state.users.find(user => user.login.uuid === state.selectedUserId) | |
| }, | |
| actions: { | |
| fetchUsers({ commit }) { | |
| commit("setIsFetching", true); | |
| return axios | |
| .get("<https://randomuser.me/api/?nat=gb,us,au&results=5&seed=abc>") | |
| .then(res => { | |
| setTimeout(() => { | |
| commit("setIsFetching", false); | |
| commit("setUsers", { users: res.data.results }); | |
| }, 2500); | |
| }) | |
| .catch(error => { | |
| commit("setIsFetching", false); | |
| console.error(error); | |
| }); | |
| } | |
| } | |
| }); |
上述代码,这里不再过多解释,因为和我们开头的例子很类似,这里需要提一下,我们需要通过以下命令安装 axios 依赖:
npm install axios
接下来,我们继续编写三个页面组件:Home(首页)、Users(用户列表)、User(用户信息页)
src/views/Home.vue
| <template><div class="ui main text container"><h1 class="ui header">Vuex 数据管理</h1><p>This is a basic Vuex example app, to demo the concepts learned in the | |
| ➥accompanying chapter.</p><p>Go to <router-link to="/users">Users</router-link></p></div> | |
| </template> | |
| <script> | |
| export default { | |
| name: "Home" | |
| } | |
| </script> |
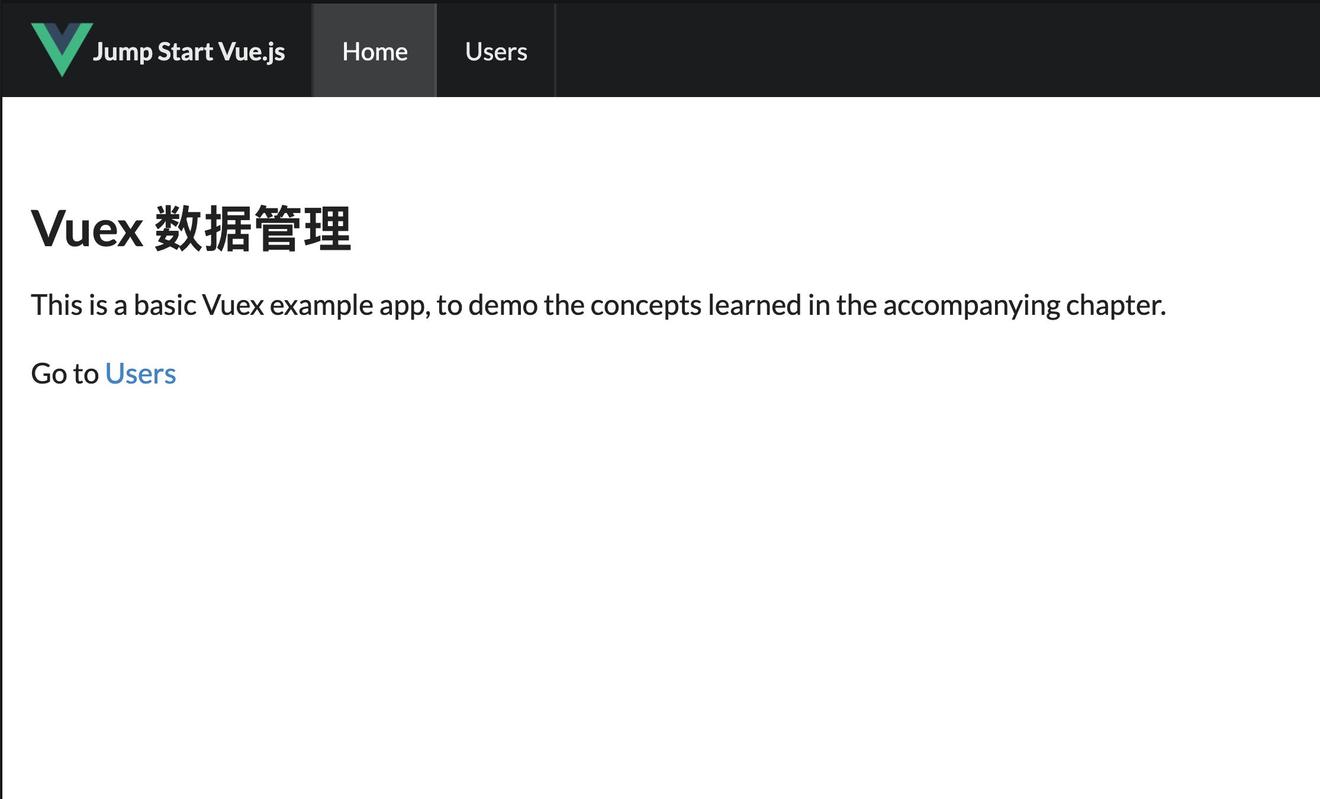
上面的代码也不需要太多的解释,首页包含了一个链接,导向用户信息列表页。
src/views/Users.vue
| <template><div class="ui main text container"><h1 class="ui header">Users</h1><div class="ui active inverted dimmer" v-if="isFetching"><div class="ui text loader">Loading</div></div><ul v-else><li v-for="(user, index) in users" :key="index"><router-link :to="{ name: 'user', params: { id: user.login.uuid }}"> | |
| {{ user.name.title }} {{ user.name.first }} {{ user.name.last }} | |
| </router-link></li></ul></div> | |
| </template> | |
| <script> | |
| import { mapState } from "vuex"; | |
| export default { | |
| name: "Users", | |
| computed: { | |
| ...mapState([ | |
| 'isFetching', | |
| 'users' | |
| ]) | |
| } | |
| } | |
| </script> | |
| <style>li { | |
| text-transform: capitalize; | |
| } | |
| </style> |
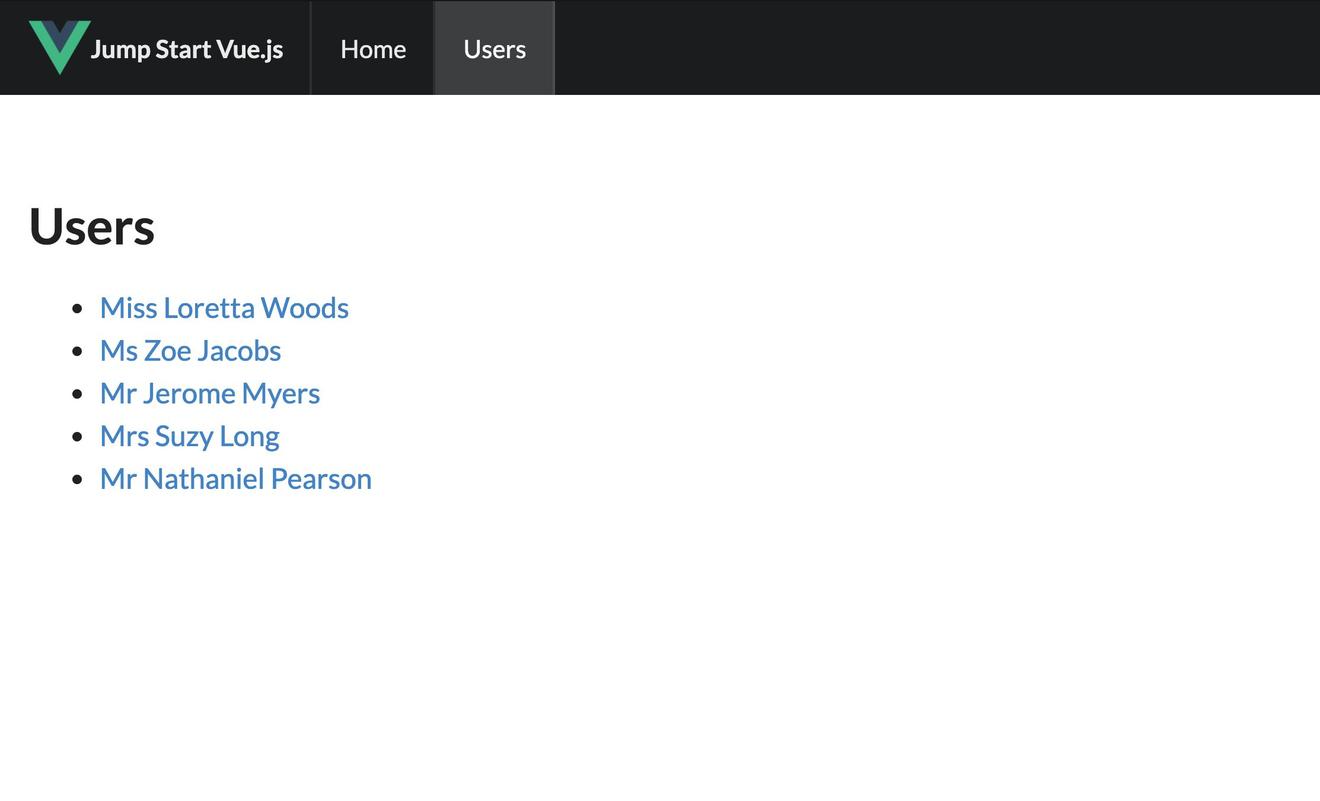
上述代码,我们通过 mapState 获取了 isFetching,users 数据状态,第一个用于显示数据是否正在加载中,第二个则是用户的数据集合信息,并有专门的链接指向用户信息详情页。
src/views/User.vue
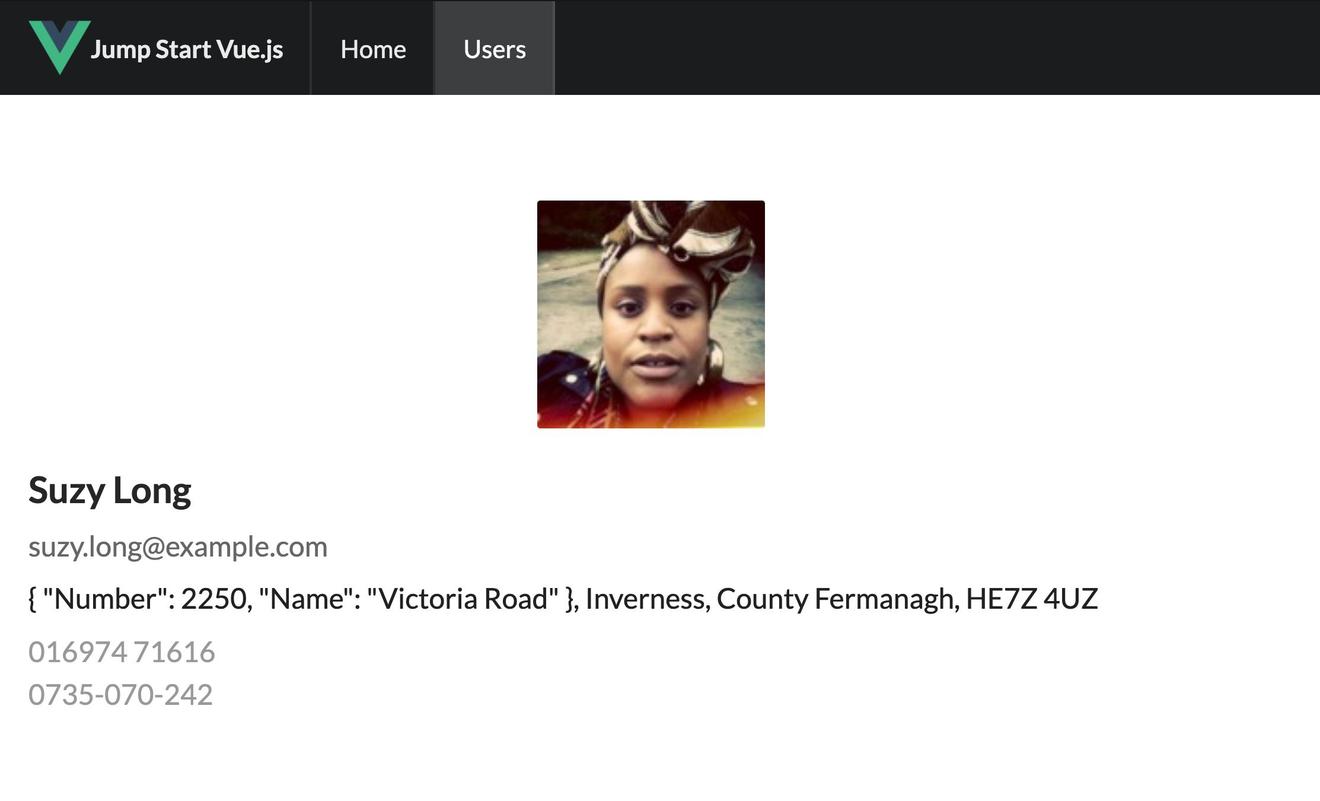
| <template><div class="ui main text container" v-if="selectedUser"><div class="ui items"><div class="item"><div class="image"><img :src="selectedUser.picture.large"></div><div class="content"><a class="header">{{ fullName }}</a><div class="meta"><span>{{ selectedUser.email }}</span></div><div class="description"><p>{{ selectedUser.location.street }}, {{ selectedUser.location.city }}, | |
| {{ selectedUser.location.state }}, {{ selectedUser.location.postcode }} | |
| </p></div><div class="extra"> | |
| {{ selectedUser.phone }}<br /> | |
| {{ selectedUser.cell }} | |
| </div></div></div></div></div> | |
| </template> | |
| <script> | |
| import { mapGetters, mapMutations } from "vuex"; | |
| export default { | |
| name: "Users", | |
| computed: { | |
| ...mapGetters(["selectedUser"]), | |
| fullName() { | |
| return `${this.selectedUser.name.first} ${this.selectedUser.name.last}`; | |
| } | |
| }, | |
| methods: { | |
| ...mapMutations(["setSelectedUser"]) | |
| }, | |
| created() { | |
| const userId = this.$route.params.id; | |
| this.setSelectedUser(userId); | |
| } | |
| }; | |
| </script> | |
| <style scoped>a.header, p { | |
| text-transform: capitalize; | |
| } | |
| </style> |
这个组件通过路由传参,调用 Mutations 的方法,更新当前的用户的数据状态信息,并通过mapGetters 方法获取 selectedUser 定义的属性方法,读取用户的信息。
最后我们来看下路由组件的定义,示例代码如下:
| import Vue from "vue"; | |
| import Router from "vue-router"; | |
| import Home from "./views/Home.vue"; | |
| import Users from "./views/Users.vue"; | |
| import User from "./views/User.vue"; | |
| Vue.use(Router); | |
| export default new Router({ | |
| mode: "history", | |
| linkActiveClass: "active", | |
| routes: [ | |
| { | |
| path: "/", | |
| name: "home", | |
| component: Home | |
| }, | |
| { | |
| name: "users", | |
| path: "/users", | |
| component: Users | |
| }, | |
| { | |
| name: "user", | |
| path: "/users/:id", | |
| component: User | |
| } | |
| ] | |
| }); |
最后完成的项目效果如下图所示:
五、小节
今天的分享就到这里,最后我们在做下小节:
- state 是一个JS对象,包含了整个应用程序中需要共享的数据,在组件中,我们可以通过computed 属性使用 Vuex 提供的 mapState 函数获取数据
- Getters 本质是 Vuex Store 内部的 computed 计算属性,它允许你在不同的组件之间共享状态,在需要调用的组件里,我们创建 computed 属性,调用 mapGetters() 获取对应的属性方法即可。
- 组件不会直接去更改数据中心的内容,当我们需要更新数据状态时,需要使用 Store 提供的commit() 进行操作,调用Mutations定义的属性方法即可。你也可以使用 mapMutations 的方法进行调用。有点需要注意的是,这里的数据操作是同步的。
- Actions 永远不会直接去操作 state 中的数据,而是执行一些组合逻辑,通常是异步的操作逻辑,将数据的操作委托给 mutations 中定义的方法 。Actions 内部的方法,其中第一个参数是context,此参数对象包含了当前的 state , commit , 和 getter,你能很方便的组织复杂的逻辑。和 Mutations 一样我们不能直接调用 Actions 里定义的方法,而是需要借助 this.$store.dispatch() 这个调度方法,除了这个方法,你还可以使用 mapActions() 进行更便捷的调用。
本文大部分内容翻译来源:《Jump Start Vue.js》作者:Nilson Jacques
链接: https://www.sitepoint.com/premium/books/jump-start-vue-js/read/5