这篇文章来实现一下js中的放大镜效果,以及如何实现模态框拖动效果 先来了解一下offset,client和scroll系列属性
1.offset系列属性
使用offset系列相关属性可以动态的得到该元素的位置(偏移)、大小等。
下面在代码中实现一下更为直观
| <html lang="en"> | |
| <head> | |
| <meta charset="UTF-8"> | |
| <meta name="viewport" content="width=device-width, initial-scale=1.0"> | |
| <meta http-equiv="X-UA-Compatible" content="ie=edge"> | |
| <title>Document</title> | |
| <style> | |
| * { | |
| margin: 0; | |
| padding: 0; | |
| } | |
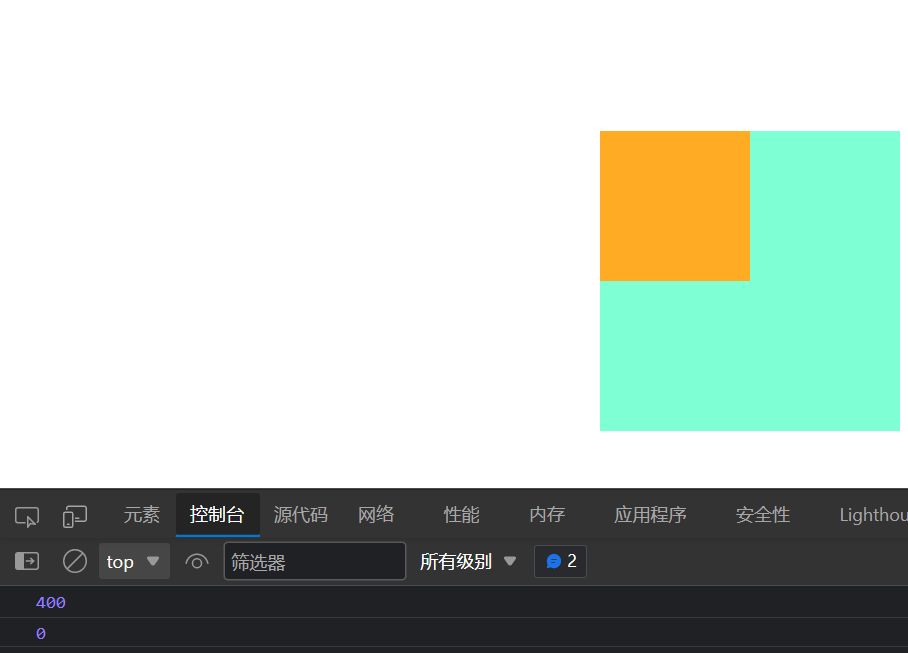
| .father { | |
| position: relative; | |
| margin: 400px; | |
| width: 200px; | |
| height: 200px; | |
| background-color: aquamarine; | |
| } | |
| .son { | |
| position: absolute; | |
| margin: 0 auto; | |
| width: 100px; | |
| height: 100px; | |
| background-color: rgb(255, 171, 36); | |
| } | |
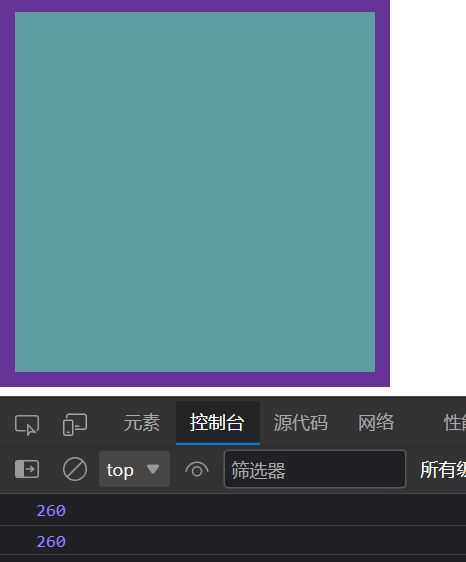
| .wh { | |
| width: 200px; | |
| height: 200px; | |
| border: 10px solid rebeccapurple; | |
| background-color: cadetblue; | |
| padding: 20px; | |
| } | |
| </style> | |
| </head> | |
| <body> | |
| <div class="father"> | |
| <div class="son"></div> | |
| </div> | |
| <script> | |
| var box = document.querySelector('.father'); | |
| var boxs = document.querySelector('.son'); | |
| var boxs1 = document.querySelector('.wh'); | |
| // 可以得到元素的偏移位置返回的不带单位的数值 | |
| console.log(box.offsetTop); | |
| // 它以带有定位的父亲为准如果没有父亲或者父亲没有定位 则以body为准 | |
| console.log(boxs.offsetTop); | |
| // 可以得到元素的大小宽度和高度是包含padding+border+width | |
| console.log(boxs1.offsetWidth); | |
| console.log(boxs1.offsetHeight); | |
| </script> | |
| </body> | |
| </html> |
1.1offset 与style的区别
1.offset
●offset 可以得到任意样式表中的样式值
●offset 系列获得的数值是没有单位的
●offsetWidth 包含padding+ border + width
●offsetWidth 等属性是只读属性,只能获取不能赋值所以,我们想要获取元素大小位置,用offset更合适
2.style
●style 只能得到行内样式表中的样式值
●style.width 获得的是带有单位的字符串
●style.width 获得不包含padding和border的值
●style.width 是可读写属性,可以获取也可以赋值所以,我们想要给元素更改值,则需要用style改变
1.2如何获取鼠标在盒子内的坐标?
| <html lang="en"> | |
| <head> | |
| <meta charset="UTF-8"> | |
| <meta name="viewport" content="width=device-width, initial-scale=1.0"> | |
| <meta http-equiv="X-UA-Compatible" content="ie=edge"> | |
| <title>Document</title> | |
| <style> | |
| .box { | |
| width: 200px; | |
| height: 200px; | |
| margin-left: 30px; | |
| background-color: blueviolet; | |
| } | |
| </style> | |
| </head> | |
| <body> | |
| <div class="box"></div> | |
| <script> | |
| var box = document.querySelector('.box'); | |
| box.addEventListener('mousemove', function (e) { | |
| // 获取鼠标在盒子内的位置 | |
| // console.log(e.pageX); | |
| // console.log(e.pageY); | |
| // 获取盒子外面的位置 | |
| // console.log(box.offsetLeft); | |
| // console.log(box.offsetTop); | |
| // 相减得到鼠标在盒子内的位置 | |
| var x = e.pageX - this.offsetLeft; | |
| var y = e.pageY - this.offsetTop; | |
| box.innerHTML = 'x坐标为' + x + 'y坐标为' + y; | |
| }) | |
| </script> | |
| </body> | |
| </html> |
当鼠标在盒子内移动时,通过JavaScript代码获取鼠标在盒子内的坐标,并将其显示在盒子内部。通过这种方式,可以实现一个简单的鼠标跟随效果。
2.如何实现js模态框
思维整理:
1.点击弹出层,模态框和遮挡层就会显示出来display:block; 2.点击关闭按钮,模态框和遮挡层就会隐藏起来display:none; 3.在页面中拖拽的原理:鼠标按下并且移动,之后松开鼠标 4.触发事件是鼠标按下mousedown, 鼠标移动mousemove鼠标松开mouseup 5.拖拽过程:鼠标移动过程中,获得最新的值赋值给模态框的left和top值, 这样模态框可以跟着鼠标走了 6.鼠标按下触发的事件源是最上面一行,就是id为title . 7.鼠标的坐标减去鼠标在盒子内的坐标,才是模态框真正的位置。 8.鼠标按下,我们要得到鼠标在盒子的坐标,鼠标移动,就让模态框的坐标设置为:鼠标坐标减去盒子坐标即可,注意移动事件写到按下事件里面。
| <html> | |
| <head lang="en"> | |
| <meta charset="UTF-8"> | |
| <title></title> | |
| <style> | |
| * { | |
| padding: 0px; | |
| margin: 0px; | |
| } | |
| .login-header { | |
| width: 100%; | |
| text-align: center; | |
| height: 30px; | |
| font-size: 24px; | |
| line-height: 30px; | |
| } | |
| .login { | |
| display: none; | |
| width: 512px; | |
| height: 280px; | |
| position: fixed; | |
| border: #ebebeb solid 1px; | |
| left: 50%; | |
| top: 50%; | |
| background: #ffffff; | |
| box-shadow: 0px 0px 20px #ddd; | |
| z-index: 9999; | |
| transform: translate(-50%, -50%); | |
| } | |
| .login-title { | |
| width: 100%; | |
| margin: 10px 0px 0px 0px; | |
| text-align: center; | |
| line-height: 40px; | |
| height: 40px; | |
| font-size: 18px; | |
| position: relative; | |
| cursor: move; | |
| } | |
| .login-input-content { | |
| margin-top: 20px; | |
| } | |
| .login-button { | |
| width: 50%; | |
| margin: 30px auto 0px auto; | |
| line-height: 40px; | |
| font-size: 14px; | |
| border: #ebebeb 1px solid; | |
| text-align: center; | |
| } | |
| .login-bg { | |
| display: none; | |
| width: 100%; | |
| height: 100%; | |
| position: fixed; | |
| top: 0px; | |
| left: 0px; | |
| background: rgba(0, 0, 0, .3); | |
| } | |
| a { | |
| text-decoration: none; | |
| color: #000000; | |
| } | |
| .login-button a { | |
| display: block; | |
| } | |
| .login-input input.list-input { | |
| float: left; | |
| line-height: 35px; | |
| height: 35px; | |
| width: 350px; | |
| border: #ebebeb 1px solid; | |
| text-indent: 5px; | |
| } | |
| .login-input { | |
| overflow: hidden; | |
| margin: 0px 0px 20px 0px; | |
| } | |
| .login-input label { | |
| float: left; | |
| width: 90px; | |
| padding-right: 10px; | |
| text-align: right; | |
| line-height: 35px; | |
| height: 35px; | |
| font-size: 14px; | |
| } | |
| .login-title span { | |
| position: absolute; | |
| font-size: 12px; | |
| right: -20px; | |
| top: -30px; | |
| background: #ffffff; | |
| border: #ebebeb solid 1px; | |
| width: 40px; | |
| height: 40px; | |
| border-radius: 20px; | |
| } | |
| </style> | |
| </head> | |
| <body> | |
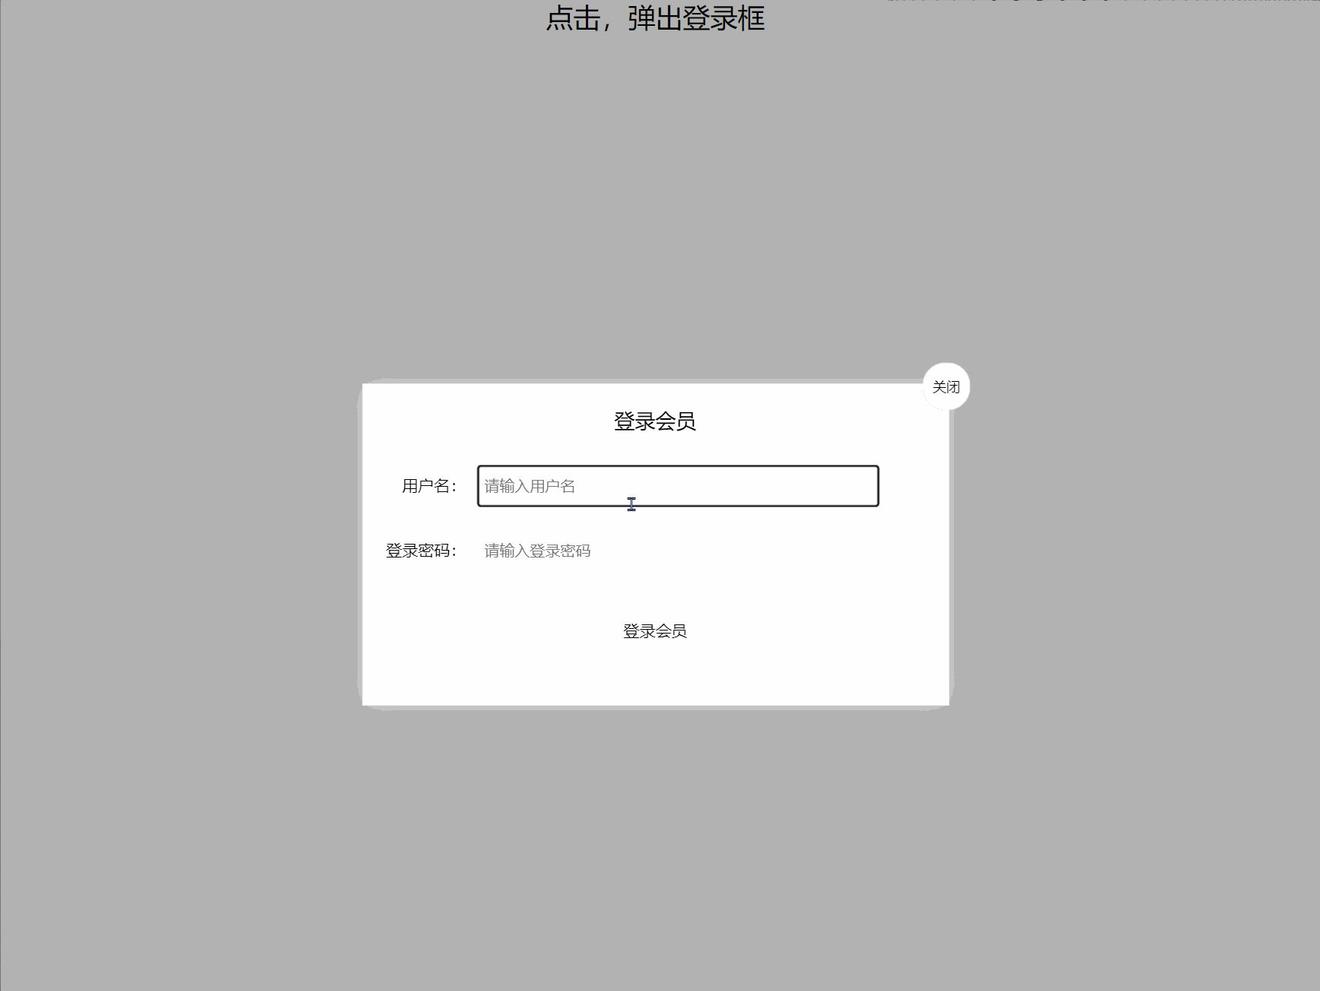
| <div class="login-header"><a id="link" href="javascript:;">点击,弹出登录框</a></div> | |
| <div id="login" class="login"> | |
| <div id="title" class="login-title">登录会员 | |
| <span><a id="closeBtn" href="javascript:void(0);" class="close-login">关闭</a></span> | |
| </div> | |
| <div class="login-input-content"> | |
| <div class="login-input"> | |
| <label>用户名:</label> | |
| <input type="text" placeholder="请输入用户名" name="info[username]" id="username" class="list-input"> | |
| </div> | |
| <div class="login-input"> | |
| <label>登录密码:</label> | |
| <input type="password" placeholder="请输入登录密码" name="info[password]" id="password" class="list-input"> | |
| </div> | |
| </div> | |
| <div id="loginBtn" class="login-button"><a href="javascript:void(0);" id="login-button-submit">登录会员</a></div> | |
| </div> | |
| <!-- 遮盖层 --> | |
| <div id="bg" class="login-bg"></div> | |
| <script> | |
| // 1. 获取元素 | |
| var login = document.querySelector('.login'); | |
| var mask = document.querySelector('.login-bg'); | |
| var link = document.querySelector('#link'); | |
| var closeBtn = document.querySelector('#closeBtn'); | |
| var title = document.querySelector('#title'); | |
| // 2. 点击弹出层这个链接 link 让mask 和login 显示出来 | |
| link.addEventListener('click', function () { | |
| mask.style.display = 'block'; | |
| login.style.display = 'block'; | |
| }) | |
| // 3. 点击 closeBtn 就隐藏 mask 和 login | |
| closeBtn.addEventListener('click', function () { | |
| mask.style.display = 'none'; | |
| login.style.display = 'none'; | |
| }) | |
| // 4. 开始拖拽 | |
| // (1) 当我们鼠标按下, 就获得鼠标在盒子内的坐标 | |
| title.addEventListener('mousedown', function (e) { | |
| var x = e.pageX - login.offsetLeft; | |
| var y = e.pageY - login.offsetTop; | |
| // (2) 鼠标移动的时候,把鼠标在页面中的坐标,减去 鼠标在盒子内的坐标就是模态框的left和top值 | |
| document.addEventListener('mousemove', move) | |
| function move(e) { | |
| login.style.left = e.pageX - x + 'px'; | |
| login.style.top = e.pageY - y + 'px'; | |
| } | |
| // (3) 鼠标弹起,就让鼠标移动事件移除 | |
| document.addEventListener('mouseup', function () { | |
| document.removeEventListener('mousemove', move); | |
| }) | |
| }) | |
| </script> | |
| </body> | |
| </html> |
效果展示
点赞👍:您的赞赏是我前进的动力!
收藏⭐:您的支持我是创作的源泉!
评论✍:您的建议是我改进的良药!