而 Spring cache 正好可以帮我们减轻开发负担,一个注解就搞定,不用自己去编程式操作。
Spring Cache 介绍
看到 Spring 就知道这是Spring生态中的东西,其实缓存数据的技术并不少,Spring 官方此举是引入 Spring Cache 来帮我们管理缓存,使用注解,简化很多操作。
当然使用 Spring Cache 也有优缺点的.
优点
- 使用注解,简化操作
- 缓存管理器,方便多种实现切换缓存源,如 Redis ,Guava Cache等
- 支持事务, 即事物回滚时,缓存同时自动回滚
缺点
- 不支持TTL,不能为每个 key 设置单独过期时间 expires time,
- 针对 多线程 没有专门的处理,所以当多线程时,是会产生数据不一致性的。(同样,一般有高并发操作的缓存数据,都会特殊处理,而不太使用这种方式)
Spring Cache 快速上手
不想那么多,先快速上个手,再接着详细说一说。
SpringBoot 常规步骤:
- 导入依赖
- 修改配置文件(这一步也可以直接写在第三步)
- 编写xxxxConfig 或者是Enablexxxx
前期准备
这也一样的,另外我这里使用的是 Spring Cache 整合 redis 做缓存。
| <dependency> | |
| <groupId>org.springframework.boot</groupId> | |
| <artifactId>spring-boot-starter-cache</artifactId> | |
| </dependency> | |
| <dependency> | |
| <groupId>org.springframework.boot</groupId> | |
| <artifactId>spring-boot-starter-data-redis</artifactId> | |
| </dependency> |
一般看到是spring-boot-starter开头的依赖,都可以大胆猜测他们是有一个xxxProperties配置类与之对应的。
修改配置文件:
| spring: | |
| redis: | |
| host: xxxxx | |
| password: xxxx | |
| #指定缓存类型 | |
| cache: | |
| type: redis | |
| #指定存活时间(ms) | |
| redis.time-to-live: | |
| #是否缓存空值,可以防止缓存穿透 | |
| redis.cache- Null -values: true |
与之对应的配置类,大伙可以自己去看看,能配置些啥

另外,在这里进行配置的,在我们的编写xxxConfig类的时候,也同样可以在那里配置。
因为也要配置Redis的配置,就把之前文章里面的东西都粘贴过来了~
| /** | |
| * @description: | |
| * @author: Ning Zaichun | |
| * @date:年10月22日 23:21 | |
| */ | |
| (CacheProperties.class) | |
| public class MyRedisConfig { | |
| private final Jackson2JsonRedisSerializer<Object> serializer = new Jackson2JsonRedisSerializer(Object.class); | |
| { | |
| ObjectMapper objectMapper = new ObjectMapper(); | |
| objectMapper.setVisibility(PropertyAccessor.ALL, Json AutoDetect.Visibility.ANY); | |
| objectMapper.activateDefaultTyping(LaissezFaireSubTypeValidator.instance, ObjectMapper.DefaultTyping.NON_FINAL); | |
| serializer.setObjectMapper(objectMapper); | |
| } | |
| /** | |
| *.原来的配置类形式 | |
| * @ConfigurationProperties(prefix = "spring.cache") | |
| * public class CacheProperties { | |
| * 因为这个并没有放到容器中,所以要让他生效 @EnableConfigurationProperties(CacheProperties.class) | |
| * 因为这个和配置文件已经绑定生效了 | |
| * @return | |
| */ | |
| RedisCacheConfiguration redisCacheConfiguration(CacheProperties CacheProperties) { | |
| RedisCacheConfiguration config = RedisCacheConfiguration.default Cache Config(); | |
| //因为key的序列化默认就是 StringRedisSerializer | |
| // config = config.serializeKeysWith(RedisSerializationContext | |
| // . Serialization Pair | |
| // .fromSerializer(new StringRedisSerializer())); | |
| | |
| config = config.serializeValuesWith(RedisSerializationContext | |
| .SerializationPair | |
| .fromSerializer(serializer)); | |
| | |
| CacheProperties.Redis redisProperties = CacheProperties.getRedis(); | |
| if (redisProperties.getTimeToLive() != null) { | |
| config = config.entryTtl(redisProperties.getTimeToLive()); | |
| } | |
| if (!redisProperties.isCacheNullValues()) { | |
| config = config.disableCachingNullValues(); | |
| } | |
| if (!redisProperties.isUseKeyPrefix()) { | |
| config = config.disableKeyPrefix(); | |
| } | |
| return config; | |
| } | |
| | |
| public RedisTemplate<Object, Object> redisTemplate(RedisConnectionFactory redisConnectionFactory) { | |
| RedisTemplate<Object, Object> redisTemplate = new RedisTemplate<>(); | |
| | |
| //设置value 值的序列化 | |
| redisTemplate.setValueSerializer(serializer); | |
| //key的序列化 | |
| redisTemplate.setKeySerializer(new StringRedisSerializer()); | |
| | |
| // set Hash hashkey 值的序列化 | |
| redisTemplate.setHashKeySerializer(new StringRedisSerializer()); | |
| // set hash value 值的序列化 | |
| redisTemplate.setHashValueSerializer(serializer); | |
| | |
| redisTemplate.setConnectionFactory(redisConnectionFactory); | |
| redisTemplate.afterPropertiesSet(); | |
| return redisTemplate; | |
| } | |
| | |
| public StringRedisTemplate stringRedisTemplate(RedisConnectionFactory redisConnectionFactory) { | |
| return new String RedisTemplate(redisConnectionFactory); | |
| } | |
| } |
前期准备结束,直接上手使用~
开始使用
controller– service–mapper 一路到底,我这里是连接了数据库,只是测试的话,直接在service 的返回结果中存一串 字符串 即可。
| /** | |
| * @description: | |
| * @author: Ning Zaichun | |
| * @date:年09月06日 22:16 | |
| */ | |
| @ Request Mapping("/cache") | |
| Constructor | |
| public class CacheController { | |
| | |
| private final IUseSpringCache useSpringCache; | |
| | |
| ("/test") | |
| public String getTest() { | |
| return useSpringCache.getTest(); | |
| } | |
| | |
| | |
| ("/test") | |
| public String getTest() { | |
| return useSpringCache.getTest(); | |
| } | |
| | |
| | |
| ("/test/clear") | |
| public String clearTest() { | |
| useSpringCache.clearTest(); | |
| return "clearTest"; | |
| } | |
| | |
| public List<MenuEntity> getMenuList() { | |
| return useSpringCache.getMenuList(); | |
| } | |
| | |
| ("/clear") | |
| public String updateMenu() { | |
| MenuEntity menuEntity = new MenuEntity(); | |
| menuEntity.setCatId(L); | |
| menuEntity.setName("其他测试数据"); | |
| useSpringCache.updateMenuById(menuEntity); | |
| return "成功清空缓存"; | |
| } | |
| } | |
| /** | |
| * @description: | |
| * @author: Ning Zaichun | |
| * @date:年09月21日 20:30 | |
| */ | |
| public interface IUseSpringCache { | |
| | |
| String getTest(); | |
| | |
| String getTest(); | |
| | |
| void clearTest(); | |
| | |
| List<MenuEntity> getMenuList(); | |
| | |
| void updateMenuById(MenuEntity menuEntity); | |
| } | |
| /** | |
| * @description: | |
| * @author: Ning Zaichun | |
| * @date:年09月21日 20:30 | |
| */ | |
| public class UseSpringCacheImpl implements IUseSpringCache { | |
| | |
| private final MenuMapper menuMapper; | |
| | |
| (value = {"menu"}, key = "'getMenuList'") | |
| public List<MenuEntity> getMenuList() { | |
| System.out.println("查询数据库======"); | |
| List<MenuEntity> menuEntityList = menuMapper.selectList(new QueryWrapper<>()); | |
| return menuEntityList; | |
| } | |
| | |
| /** | |
| * 级联更新所有关联的数据 | |
| * | |
| * @param menuEntity | |
| * @CacheEvict:失效模式 | |
| * @CachePut:双写模式,需要有返回值、同时进行多种缓存操作:@Caching | |
| *、指定删除某个分区下的所有数据 @CacheEvict(value = "menu",allEntries = true) | |
| *、存储同一类型的数据,都可以指定为同一分区 | |
| */ | |
| // @Caching(evict = { | |
| // @CacheEvict(value = "category",key = "'getLevelCategorys'"), | |
| // @CacheEvict(value = "category",key = "'getCatalogJson'") | |
| // }) | |
| (value = "menu", allEntries = true) //删除某个分区下的所有数据 | |
| (rollbackFor = Exception .class) | |
| public void updateMenuById(MenuEntity menuEntity) { | |
| System.out.println("清空缓存======"); | |
| menuMapper.updateById(menuEntity); | |
| } | |
| | |
| (value = {"test"}, key = "# root .methodName") | |
| public String getTest() { | |
| System.out.println("测试查询了数据库"); | |
| return "我是测试缓存数据"; | |
| } | |
| | |
| (value = {"test"}, key = "'getTest'") | |
| public String getTest() { | |
| System.out.println("测试查询了数据库"); | |
| return "我是测试缓存数据"; | |
| } | |
| | |
| (evict = { | |
| (value = "test",key = "'getTest'") | |
| }) | |
| public void clearTest() { | |
| System.out.println("清空了test缓存"); | |
| } | |
| } |
测试
上面就是简单的使用,上面的注解啥的,马上就开说哈
先讲讲案例中的两个删除缓存的注解
| @CacheEvict(value = "menu", allEntries = true) | |
| @Caching(evict = { | |
| @CacheEvict(value = "test",key = "'getTest'") | |
| }) |
两种方式,allEntries = true表示直接清空掉整个分区,
而第二种方式,只会清掉getTest的分区。
在Redis的缓存,它的格式是这样的。

采用第二种方式时,只会清理掉getTest的分区。
变成下面这样:

上面的案例,我只是使用最简单的方式使用了一下 Spring Cache
但其实 注解 上远不止这么一点东西,接下来慢慢说一说
大家也不用刻意记,就大致知道Spring cache可以解决什么问题即可。
Spring Cache 注解
只有使用public定义的方法才可以被缓存 ,而private方法、protected 方法或者使用default 修饰符的方法都不能被缓存。 当在一个类上使用注解时,该类中 每个公共方法的返回值 都将被缓存到指定的缓存项中或者从中移除。
- @Cacheable
- @CachePut
- @CacheEvict
- @Caching
- @CacheConfig
@Cacheable
属性名 |
作用与描述 |
cacheNames/value |
指定缓存的名字,缓存使用CacheManager管理多个缓存Cache,这些Cache就是根据该属性进行区分。对缓存的真正增删改查操作在Cache中定义,每个缓存Cache都有自己唯一的名字。 |
key |
缓存数据时的key的值,默认是使用方法所有入参的值。1、可以使用SpEL表达式表示key的值。2、可以使用字符串,3、可以使用方法名 |
keyGenerator |
缓存的生成策略(键生成器),和key二选一,作用是生成键值key,keyGenerator可自定义。 |
cacheManager |
指定缓存管理器(例如 ConcurrentHashMap 、Redis等)。 |
cacheResolver |
和cacheManager作用一样,使用时二选一。 |
condition |
指定缓存的条件(对参数判断,满足什么条件时才缓存),可用SpEL表达式,例如:方法入参为对象user则表达式可以写为condition = “#user.age>18″,表示当入参对象user的属性age大于18才进行缓存。 |
unless |
否定缓存的条件(对结果判断,满足什么条件时不缓存),即满足unless指定的条件时,对调用方法获取的结果不进行缓存,例如:unless = “result==null”,表示如果结果为null时不缓存。 |
sync |
是否使用异步模式进行缓存,默认false。 |
@Cacheable指定了被注解方法的返回值是可被缓存的。其工作原理是就是AOP机制,实际上,Spring 首先查找的是缓存,缓存中没有再查询的数据库。
接下来就说说几种用法:
| @Cacheable(value = "users") | |
| //Spring 从.0开始新增了value别名cacheNames比value更达意,推荐使用 | |
| @Cacheable(cacheNames = "users") | |
| | |
| //综合使用 | |
| @Cacheable(cacheNames = {"test"}, key = "'getTest'",condition = "# number >12",unless = "#number<12") |
测试~

当我不传值,因为不满足条件,Redis 中是不会缓存的

只有满足number>12 时才会进行缓存

下面的注解中含有的condition和unless属性的都是同样的用法。
@CachePut
@CachePut的注解属性就比@Cacheable 少了一个sync,其余都一样。
@CachePut注解你就直接理解为执行后更新缓存就好。
就比如我一个方法是缓存某个学生或者是某个用户信息。
然后我修改了我的个人信息什么之类的,这个时候就可以直接用上@CachePut注解了。
比如:
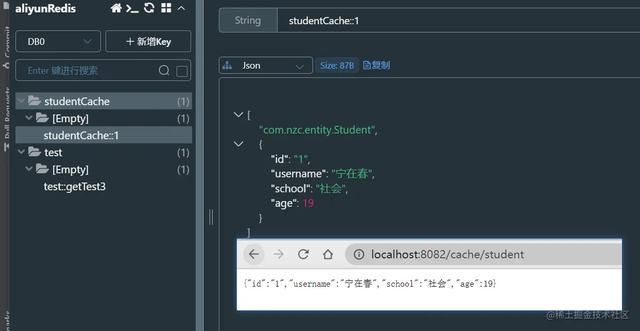
| /** | |
| * studentCache | |
| * 缓存键值key未指定默认为userNumber+userName组合字符串 | |
| */ | |
| (cacheNames = "studentCache") | |
| public Student getStudentById(String id) { | |
| // 方法内部实现不考虑缓存逻辑,直接实现业务 | |
| return getFromDB(id); | |
| } | |
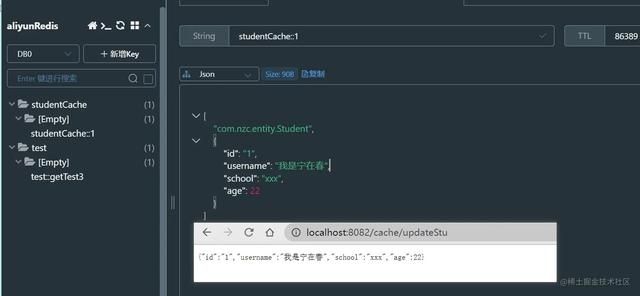
| | |
| /** | |
| * 注解@CachePut:确保方法体内方法一定执行,执行完之后更新缓存; | |
| * 相同的缓存userCache和key(缓存键值使用spEl表达式指定为userId字符串)以实现对该缓存更新; | |
| * @param student | |
| * @return 返回 | |
| */ | |
| (cacheNames = "studentCache", key = "(#student.id)") | |
| public Student updateStudent(Student student) { | |
| return updateData(student); | |
| } | |
| | |
| private Student updateData(Student student) { | |
| System.out.println("real updating db..." + student.getId()); | |
| return student; | |
| } | |
| | |
| private Student getFromDB(String id) { | |
| System.out.println("querying id from db..." + id); | |
| return new Student(id,"宁在春","社会",); | |
| } |
结果:
更新之后
@CacheEvict
@CacheEvict注解是@Cachable注解的反向操作,它负责从给定的缓存中移除一个值。大多数缓存框架都提供了缓存数据的有效期,使用该注解可以显式地从缓存中删除失效的缓存数据。
cacheNames/value、key、keyGenerator、cacheManager、cacheResolver、condition这些和上面一样的属性就不说了
它还有两个其他的属性:
allEntries:allEntries是布尔类型的,用来表示是否需要清除这个缓存分区中的的所有元素。默认值为false,表示不需要。
beforeInvocation: 清除操作默认是在对应方法执行成功后触发的(beforeInvocation = false),即方法如果因为抛出异常而未能成功返回时则不会触发清除操作。使用beforeInvocation属性可以改变触发清除操作的时间。当指定该属性值为true时,Spring会在调用该方法之前清除缓存中的指定元素。
之前也简单的使用过了,就不多测试啦,让我偷个懒~
大伙想要啥骚操作的话,就得多去尝试~
@Caching
@Caching注解属性一览:
属性名 |
作用与描述 |
cacheable |
取值为基于@Cacheable注解的数组,定义对方法返回结果进行缓存的多个缓存。 |
put |
取值为基于@CachePut注解的数组,定义执行方法后,对返回方的方法结果进行更新的多个缓存。 |
evict |
取值为基于@CacheEvict注解的数组。定义多个移除缓存。 |
总结来说,@Caching是一个组注解,可以为一个方法定义提供基于@Cacheable、@CacheEvict或者@CachePut注解的数组。
就比如:
你如果使用@CacheEvict(value = “test”,key = “‘getTest'”)这条注解,只能清理某一个分区的缓存,test下的getTest所缓存的数据,你没办法再清理其他分区的缓存。
使用了@Caching就可以一次清理多个。
| @Caching(evict = { | |
| @CacheEvict(value = "test",key = "'getTest'"), | |
| @CacheEvict(value = "test",key = "'getTest'"), | |
| @CacheEvict(value = "test",key = "'getTest'"), | |
| }) |
其他的也类似。
@CacheConfig
@CacheConfig注解属性一览:cacheNames/value、keyGenerator、cacheManager、cacheResolver.
一个类中可能会有多个缓存操作,而这些缓存操作可能是重复的。这个时候可以使用 @CacheConfig是一个类级别的注解.
简单举个例子吧:

我们发现在同个service类下,对不同方法添加的注解都要指定同一个缓存组件我们可以在类头上统一抽取缓存组件,或者是缓存名称之类的~
大伙私下多试一试,就可以啦,很简单的~
其实还有一些知识的,但是说难也不难,就没有再说啦,大伙慢慢发掘吧~
注意事项
1)不建议缓存分页查询的结果。
2)基于 proxy 的 spring aop 带来的内部调用问题
这个问题不仅仅是出现在这里,其实只要牵扯到Spring AOP 切面的问题,都有这个问题,就像@Transactional(rollbackFor = Exception.class)注解一样。
假设对象的方法是内部调用(即 this 引用)而不是外部引用,则会导致 proxy 失效,那么切面就失效,也就是说 @Cacheable、@CachePut 和 @CacheEvict 都会失效。
解决方法:
- 启动类添加@EnableAspectJAutoProxy(exposeProxy = true),方法内使用AopContext.currentProxy()获得代理类,使用事务。
- @Autowired private ApplicationContext applicationContext; // 在方法中手动获取bean,再调用 applicationContext.getBean(xxxxServiceImpl.class); 复制代码
3)@Cache注解的方法必须为 public
4)默认情况下,@CacheEvict标注的方法执行期间抛出异常,则不会清空缓存。
后记
不知道这篇文章有没有帮助到你,希望看完的你,对于分布式锁已经有所了解。